The Arbalist Guild

Would you like to react to this message? Create an account in a few clicks or log in to continue.

Crossbows - Everything about Building, Modding, and Using your Crossbow Gear

Latest topics

» 12th Century Chinese Crossbow Chronographed
by stuckinthemud1 Fri Nov 24, 2023 3:50 pm

» Crossbow Stock
by kenh Tue Oct 31, 2023 6:19 am

» Colletiere a Charavines continuing experiment
by stuckinthemud1 Sat Oct 07, 2023 5:36 am

» Cocking - how
by stuckinthemud1 Thu Aug 03, 2023 4:24 am

» Questions around heavy crossbow lath buildin
by stuckinthemud1 Wed Apr 26, 2023 1:10 am

» Arab Crossbow
by stuckinthemud1 Tue Apr 25, 2023 7:57 am

» prod angle, and lever trigger for sale anyone?
by stuckinthemud1 Mon Mar 20, 2023 5:54 am

» flexible string
by jasper1978 Mon Mar 20, 2023 1:25 am

» [solved]Skane/Lillohus crossbow thread
by stuckinthemud1 Sun Mar 19, 2023 7:44 am

» jens sensfelder
by jasper1978 Wed Mar 08, 2023 11:58 pm

» 400lb Windlass crossbow bolts weight and accuracy shooting high.
by stuckinthemud1 Sun Mar 05, 2023 2:53 pm

» Codex Löffelholz crossbow
by stuckinthemud1 Tue Jan 24, 2023 4:14 pm

» Digitar prodsc
by stuckinthemud1 Sun Jan 15, 2023 2:42 pm

» Troubleshooting
by Andy. Fri Jan 06, 2023 12:29 pm

» Wood Prods
by stuckinthemud1 Fri Dec 30, 2022 12:47 pm

» Colletiere a Charavines crossbow
by stuckinthemud1 Fri Dec 30, 2022 8:54 am

» Simplified Löffelhotz speedloader
by stuckinthemud1 Fri Dec 09, 2022 4:05 pm

» Fiberglass H-bows
by c sitas Sat Nov 12, 2022 8:44 am

» Bad Antler
by drawknife Sat Nov 12, 2022 3:48 am

» Anyone make their own bolts?
by Juniper Mon Oct 17, 2022 8:20 am

» Josef alm in English
by Juniper Sat Oct 15, 2022 4:22 am

» Qin/Han lock drawings
by kenh Fri Sep 23, 2022 8:16 pm

» stirrup dimensions?
by stuckinthemud1 Thu Sep 01, 2022 1:49 pm

» Skane/Lillohus lockbow information needed
by stuckinthemud1 Sun Aug 14, 2022 6:23 am

» need help contacting le musee Dauphinois Grenoble
by stuckinthemud1 Sat Aug 13, 2022 3:22 pm


+2
Basilisk120
Tinker
6 posters

    My Medieval Arbalist project

    Tinker
    Tinker
    Techno Weeny Supreme
    Techno Weeny Supreme


    Posts : 75
    Join date : 2010-07-19
    Location : Idaho, USA

    My Medieval Arbalist project Empty My Medieval Arbalist project

    Post by Tinker Sat Aug 21, 2010 4:41 pm

    It's pretty quiet around here. Time to throw some fat in the fire. Some of these are basic but it would have been helpful to have seen some like this when I first started 'lurking'...

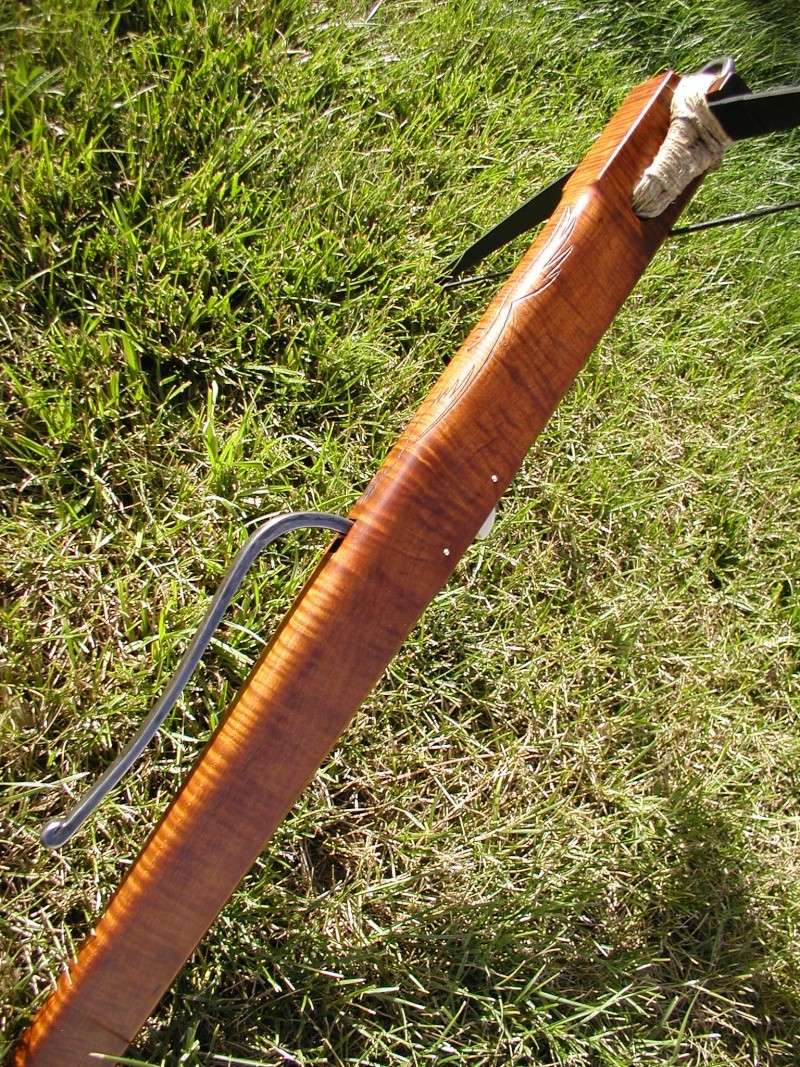
    With all of the junk and tools I have I do not own a propane torch, so I made this little 'quickie' mini-forge that utilizes charcoal briquets and injected air from my compressor... worked fine to form the tickler!

    My Medieval Arbalist project P1010038-Copy

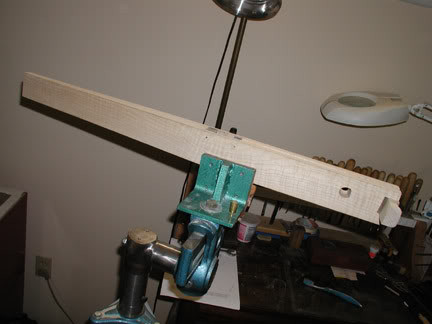
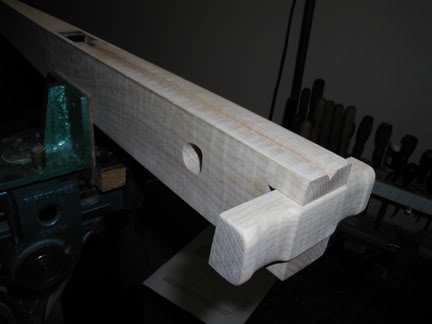
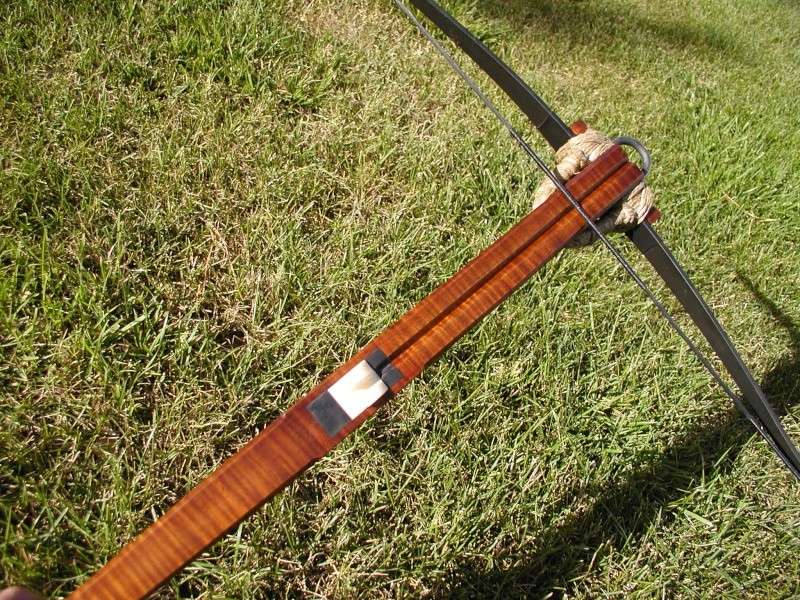
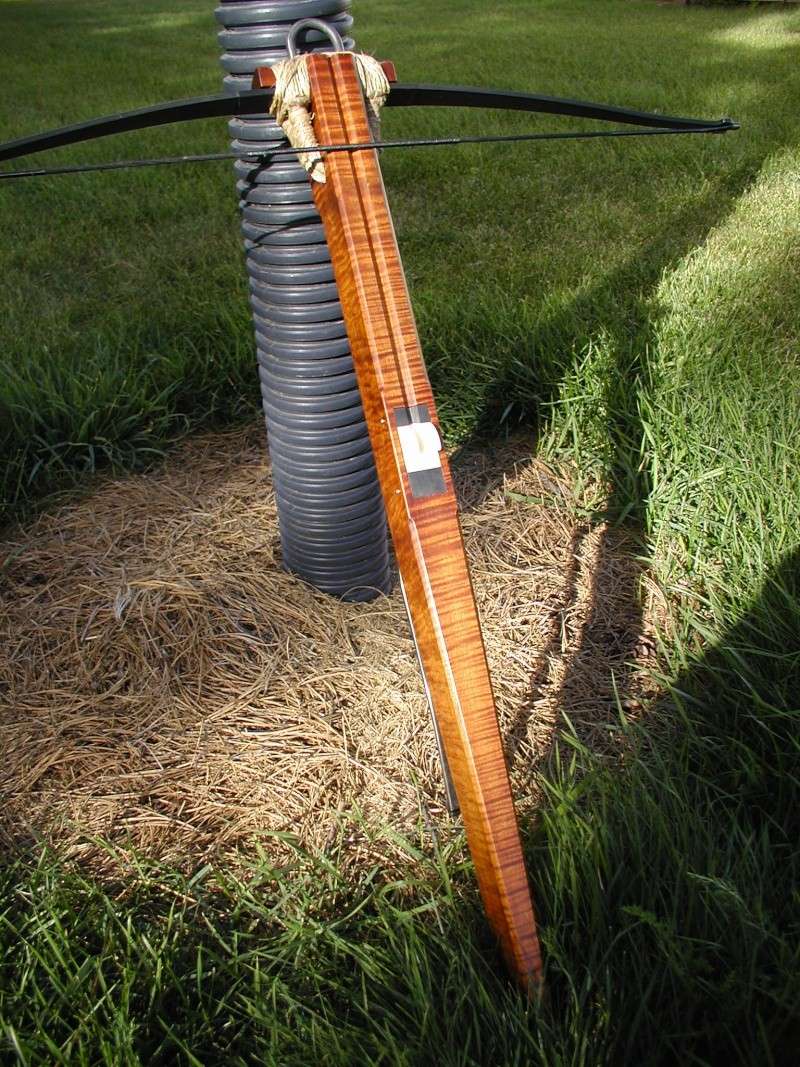
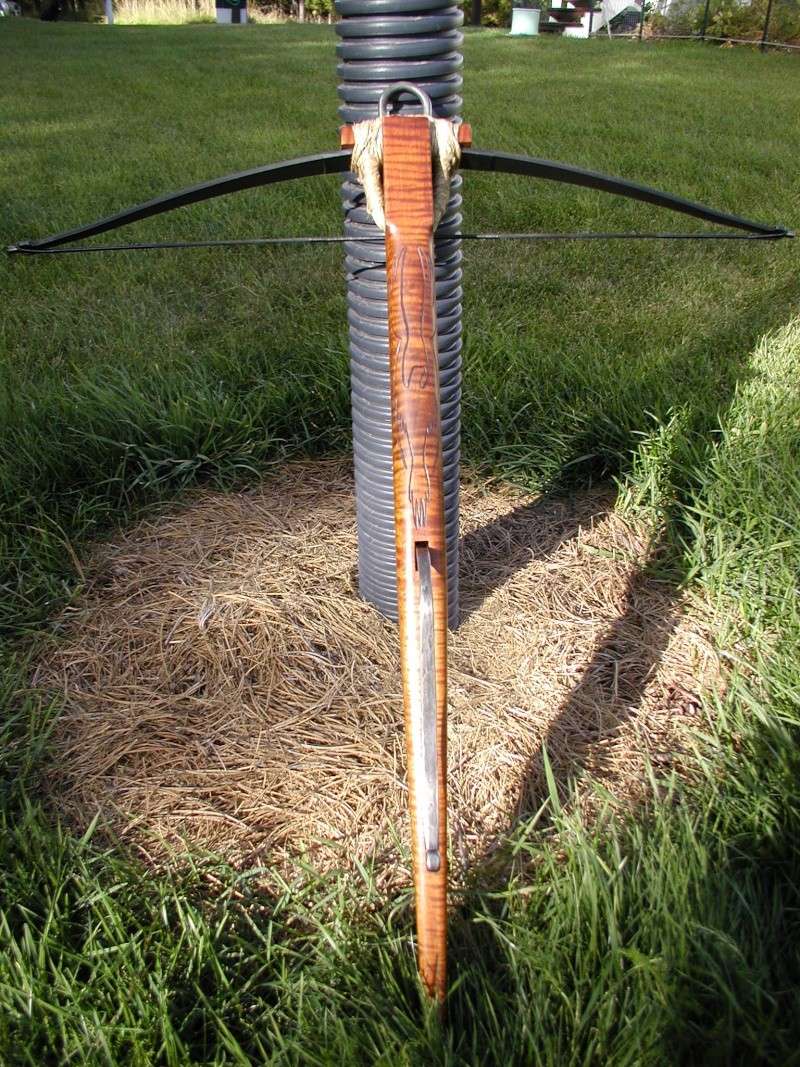
    Here is where I am with it as of now. The string groove is not going to be made in the nut until I receive the string to see what the diameter is first. Going to have to do the carving on the tiller before binding the prod to it. ...Thinking now on maybe carving a dragon.

    My Medieval Arbalist project P1010048-Copy

    My Medieval Arbalist project P1010051-Copy

    My Medieval Arbalist project P1010052-Copy

    [EDIT] Discussion on fabricating a roll-nut block assembly >>> Link

    My Medieval Arbalist project P1010053

    My Medieval Arbalist project P1010054

    My Medieval Arbalist project P1010050-Copy

    My Medieval Arbalist project P1010049-Copy

    My Medieval Arbalist project P1010055

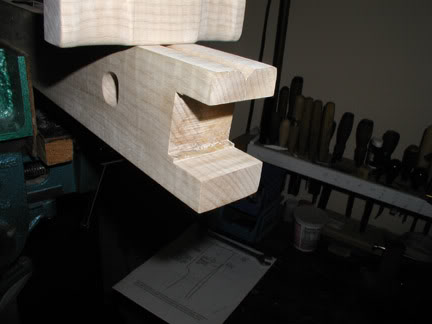
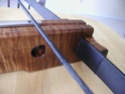
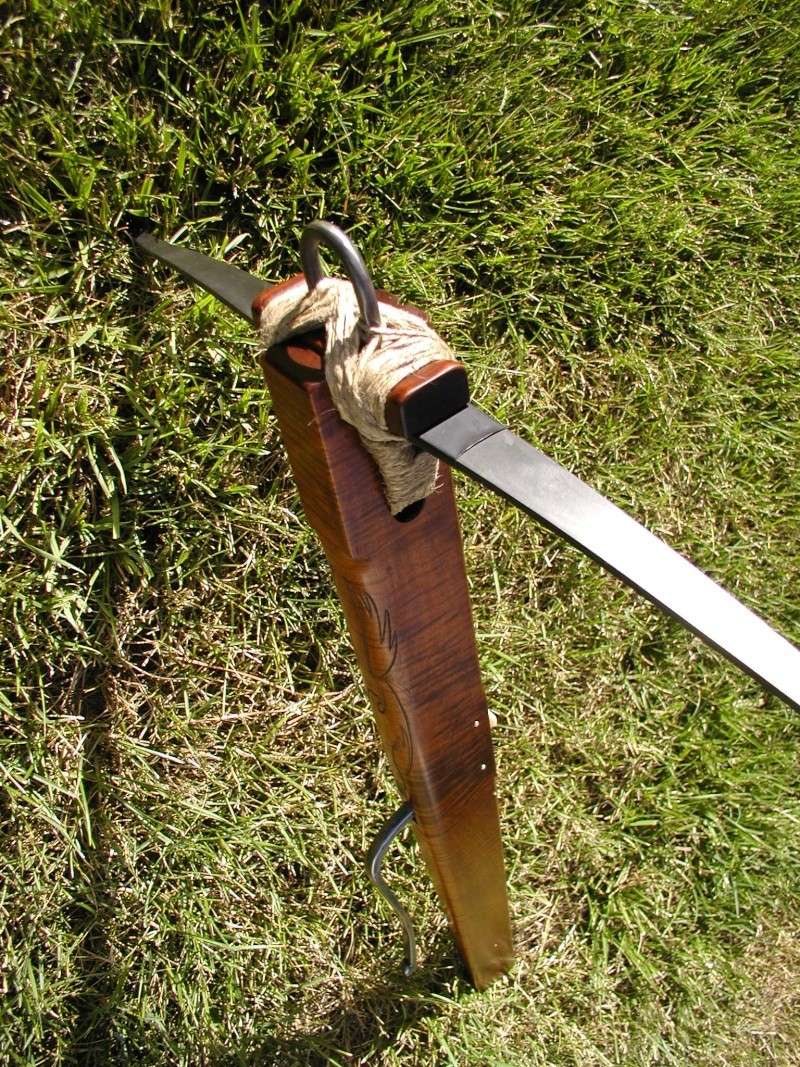
    Noticed the photo of the nut block sitting on the tiller is "bas-ackwards"

    cheers Tinker


    Last edited by Ivo on Sun Sep 05, 2010 1:12 am; edited 1 time in total (Reason for editing : Adding a link to roll-nut block assembly discussion topic.)
    Basilisk120
    Basilisk120
    Moderator
    Moderator


    Posts : 548
    Join date : 2010-03-01
    Age : 45
    Location : Arizona

    My Medieval Arbalist project Empty Re: My Medieval Arbalist project

    Post by Basilisk120 Sat Aug 21, 2010 4:45 pm

    Wow that is looking spiffy. I do like the trick to make an improvised forge. Have to remeber that.

    Ivo
    Ivo
    Admin
    Admin


    Posts : 1041
    Join date : 2009-11-25
    Age : 36
    Location : NJ, USA

    My Medieval Arbalist project Empty Re: My Medieval Arbalist project

    Post by Ivo Sun Aug 22, 2010 4:06 am

    Time to throw some fat in the fire. Some of these are basic but it
    would have been helpful to have seen some like this when I first started
    'lurking'...

    Welcome to the world of "buildalongs" Tinker...sometimes you wish someone showed you something only to end up being the one who does the show, but that is also the cool part...did you see my mess in the "Little Rabbit Hunter"?, yeh well I have propane and need an acetalyne one instead...bummer...wish someone told me - "Ivan, you can't weld with propane!" My Medieval Arbalist project 576186

    Here is a topic that one wonderful lady from the New Wold Arbalest did.(Geezer's crossbow shop My Medieval Arbalist project Icon_wink )
    Photo essay of one of my first crossbows >>>Link

    PS: ...you also have a suggestions/corrections topic, would you like me to merge that topic with this one to keep everything together?
    Tinker
    Tinker
    Techno Weeny Supreme
    Techno Weeny Supreme


    Posts : 75
    Join date : 2010-07-19
    Location : Idaho, USA

    My Medieval Arbalist project Empty Re: My Medieval Arbalist project

    Post by Tinker Sun Aug 22, 2010 10:09 am

    Ivo wrote:

    Welcome to the world of "buildalongs" Tinker...sometimes you wish someone showed you something only to end up being the one who does the show, but that is also the cool part...did you see my mess in the "Little Rabbit Hunter"?, yeh well I have propane and need an acetalyne one instead...bummer...wish someone told me - "Ivan, you can't weld with propane!" My Medieval Arbalist project 576186

    Here is a topic that one wonderful lady from the New Wold Arbalest did.(Geezer's crossbow shop My Medieval Arbalist project Icon_wink )
    Photo essay of one of my first crossbows >>>Link

    PS: ...you also have a suggestions/corrections topic, would you like me to merge that topic with this one to keep everything together?

    DAMN! Wish I would have seen that photo show before I started tinkering... (No pun intended). ALWAYS LEARNING and 'Lightly' is a lady cheers All right!!

    I like all of the work you did on the lock mechanism of your "Little Rabbit Hunter"; looks great!

    Once upon a time I was a moderator on a political forum. From experience, I tried to avoid lengthly threads. That is why I broke it off, but if'n you want to combine them feel free.

    Thanks, Tinker
    Moon
    Moon
    Techno Weeny

    Lets put a laser on it!!!


    Techno WeenyLets put a laser on it!!!


    Posts : 55
    Join date : 2010-02-25

    My Medieval Arbalist project Empty Watching your project with great interest

    Post by Moon Thu Aug 26, 2010 6:51 am

    I'm considering buiding one or farming out the parts fabrication but not until I get a better handle on what I actually need for a hunting crossbow. I'm currently going into my first bowhunting season with a David Watson built Miximilian. Lots to learn :-)
    Tinker
    Tinker
    Techno Weeny Supreme
    Techno Weeny Supreme


    Posts : 75
    Join date : 2010-07-19
    Location : Idaho, USA

    My Medieval Arbalist project Empty Re: My Medieval Arbalist project

    Post by Tinker Thu Aug 26, 2010 9:31 am

    Moon wrote:I'm considering buiding one or farming out the parts fabrication but not until I get a better handle on what I actually need for a hunting crossbow. I'm currently going into my first bowhunting season with a David Watson built Miximilian. Lots to learn :-)

    Moon; Crossbows are new to me. I am more familiar with Kentucky rifle building My Medieval Arbalist project P3290210 
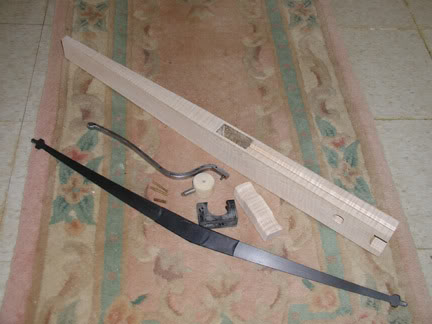
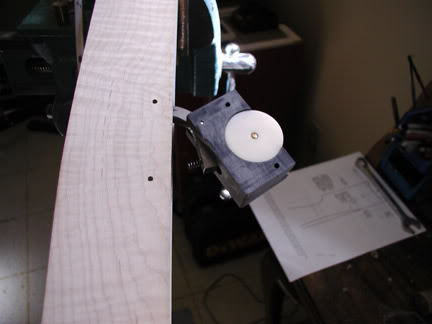
and I like to fabricate things. I wanted a tiller without a bore-hole in its side and sideplate inlets for this hard maple block I had left over. I had on hand some 1 inch delrin, so I conjured-up an assembly that would insert from the top as a clean installation. This made for a close-fitting block/nut unit. The (almost) impossibility of locating a blind dead-on-center axle for the nut to prevent any binding led me to the idea of building the 'stop' which would also prevent the nut from remaining captive when it rotated to the string cut-out without it. After I made it, GEEZER advised that he had unsuccessfully experimented with a stop in the past. I believe that the nylon block may allow for some cushion for the rotational inertia and not destroy itself (?) Also, this is a 100# prod and the longivity of this type of mechanism would obviously be shortened by heavier prods. What I am going on about here is explaining that this is EXPERIMENTAL... it may work and it may not! scratch
    I do have some alternative "fixes" in mind should they be necessary.

    Just noticed that the 3/8" sear screw in the photos appears to be L-O-N-G... It is'nt. The screw is barely started in the nut. When properly installed, it only protrudes 3/16-1/4" and the back of the sear face on the screw contacts the 'stop' at the end of the cut in the delrin. (Weight of the nut and sear is kept toward the center, minimizing inertia).


    Last edited by Tinker on Thu Aug 26, 2010 9:45 am; edited 1 time in total (Reason for editing : Forgot to add..)
    Moon
    Moon
    Techno Weeny

    Lets put a laser on it!!!


    Techno WeenyLets put a laser on it!!!


    Posts : 55
    Join date : 2010-02-25

    My Medieval Arbalist project Empty Have you decided

    Post by Moon Thu Aug 26, 2010 12:55 pm

    Is it too early to ask what style the stock will be? Please bear with me because I still use modern archery/crossbow terminology.
    Tinker
    Tinker
    Techno Weeny Supreme
    Techno Weeny Supreme


    Posts : 75
    Join date : 2010-07-19
    Location : Idaho, USA

    My Medieval Arbalist project Empty MOON; I'll get a photo in a couple days

    Post by Tinker Fri Aug 27, 2010 9:02 am

    Moon wrote:Is it too early to ask what style the stock will be? Please bear with me because I still use modern archery/crossbow terminology.

    Profile is the same as in the above pix. Top is 45-degree edged and bottom is rounded. Incised carving of the 'Bird of Prey' on underbelly is finished.
    Don't know what 'style' it would be labeled scratch.

    Tinker
    Tinker
    Tinker
    Techno Weeny Supreme
    Techno Weeny Supreme


    Posts : 75
    Join date : 2010-07-19
    Location : Idaho, USA

    My Medieval Arbalist project Empty Looks Like I Need Some Advice...

    Post by Tinker Sun Aug 29, 2010 10:37 am

    I just got my string from Alchem yesterday, strung the prod and placed it in the tiller socket. Having NO hands-on knowledge with crossbows when building the tiller I carefully followed the instructions for fitting Alchems #2316 (100#) prod to the tiller. ref: http://alcheminc.com/plan1.jpg

    When the prod is strung at 3" the bottom of the string is 5/16 over the flat top of the tiller. With a 11/32" gage in the groove the string is about 1/16" over the gage with the prod in the 3" rest position. I found that with the prod sitting at 90 degrees instead of the 6 degrees called for the bottom of the string was about 1/32" over the tiller bed at the same rest point. Testing to see what happened when the string was pulled toward the nut I found the prod adjusted itself to the 90 degree position in its socket. I have not yet ordered the hemp cord to bind the prod into place so don't know what will happen if it is bound before drawing it to the cock position.

    The 'fix' appears to be to change the angle of the socket to 90 degrees, but I can't help thinking Alchem has proofed their template and even though their prod sweeps up at the tips I would guess their plan layout should be correct. Input much appreciated; Here are some pix:

    My Medieval Arbalist project P1010016 My Medieval Arbalist project P1010017 My Medieval Arbalist project P1010018 My Medieval Arbalist project P1010019


    Does the angle need to be changed or is it correct and should be bound where it is ??

    Thanks, Tinker
    Pavise
    Pavise
    Dear Friend, You will be Greatly Missed.
    Dear Friend, You will be Greatly Missed.


    Posts : 128
    Join date : 2010-02-07

    My Medieval Arbalist project Empty Re: My Medieval Arbalist project

    Post by Pavise Sun Aug 29, 2010 11:07 am

    Hi Tinker,

    I always mock-up a design in cheap wood before cutting the real stuff. My prod mounting angle is usually 10 - 12 degrees but in your case this would only make it worse. The old guideline of 5 - 6 degrees works, but with more unwanted string pressure onto the deck. The distance from my deck to the top corner prod gap is 5/8" and if I were you I would experiment with some different wedges behind your prod to see if indeed this primary mounting angle is the problem. Is the heat-shrink plastic safety sleeve a bit too thick on the upper part of your prod? And have you tried shortening your string a tad by twisting it a couple of turns to bring it to a 3 1/2" braced height?

    Hope this helps, but I'm sure that Geezer and Lightly will get back to you on this as well.

    Pavise
    Tinker
    Tinker
    Techno Weeny Supreme
    Techno Weeny Supreme


    Posts : 75
    Join date : 2010-07-19
    Location : Idaho, USA

    My Medieval Arbalist project Empty Re: My Medieval Arbalist project

    Post by Tinker Sun Aug 29, 2010 12:45 pm

    Pavise wrote:Hi Tinker,

    I always mock-up a design in cheap wood before cutting the real stuff. My prod mounting angle is usually 10 - 12 degrees but in your case this would only make it worse. The old guideline of 5 - 6 degrees works, but with more unwanted string pressure onto the deck. The distance from my deck to the top corner prod gap is 5/8" and if I were you I would experiment with some different wedges behind your prod to see if indeed this primary mounting angle is the problem. Is the heat-shrink plastic safety sleeve a bit too thick on the upper part of your prod? And have you tried shortening your string a tad by twisting it a couple of turns to bring it to a 3 1/2" braced height?

    Hope this helps, but I'm sure that Geezer and Lightly will get back to you on this as well.

    Pavise

    Howdy! If I had 10-12 degrees on this I would be able to launch my shoe Laughing
    I don't have a bastard string so was not able to get it braced to full 3 1/2 inches. Correct me if I am wrong please. Because of the prod tips 'up sweep' the string should follow the same path from release to stop along the top of the table? In other words, If the string cleared the top of the table 1/16" at rest, it should be the same distance from the table from release to stop/rest.

    I would have jumped in and recut the prod socket in the tiller, but realized maybe I did not understand something, Like upon release the string imparts its total thrust to the bolt and then rises as it travels forward and does not overtake the bolt... I don't think that is correct, but just wanted to be sure before I started whittling on something that was basically finished.

    The shrink tube seems to be uniform thickness. I started to remove it but figured some cushion would be beneficial. Would the extra 1/2" of braced height change the string relation to the top of the table? I do not understand, "The distance from my deck to the top corner prod gap is 5/8"... Does this mean, The string is 5/8" above the table when the strung prod is at rest?

    Appreciate your patience study , Tinker
    Regerald
    Regerald
    Master Crossbowyer
    Master Crossbowyer


    Posts : 67
    Join date : 2009-11-30
    Age : 38
    Location : Finland

    My Medieval Arbalist project Empty Re: My Medieval Arbalist project

    Post by Regerald Sun Aug 29, 2010 1:23 pm

    As I remember, a line drawn from a nut to the center of a prod mount, should be perpendicular to prod mount itself..
    Tinker
    Tinker
    Techno Weeny Supreme
    Techno Weeny Supreme


    Posts : 75
    Join date : 2010-07-19
    Location : Idaho, USA

    My Medieval Arbalist project Empty Re: My Medieval Arbalist project

    Post by Tinker Sun Aug 29, 2010 2:13 pm

    Regerald; Would that only apply to a prod that was straight across tip to tip? Alchems prods have a 1/2" tip-rise. Would that make a difference to the angle you speak of?

    My Medieval Arbalist project Alchem10

    Tinker
    Pavise
    Pavise
    Dear Friend, You will be Greatly Missed.
    Dear Friend, You will be Greatly Missed.


    Posts : 128
    Join date : 2010-02-07

    My Medieval Arbalist project Empty Re: My Medieval Arbalist project

    Post by Pavise Sun Aug 29, 2010 2:17 pm

    Tinker,

    With the utmost respect sir I think you are reading far too much into what is being discussed here. Slow down, adjust your trim a bit, and try not to be such a techno-weeny by fighting with the joystick.

    Despite the bold type suggestion that you might not be wrong, the fact of the matter is that you are sir.

    If you will take the time to plot the side elevation (perspective) of your crossbow, on a piece of graph paper, or better yet, as I do with my computer drawing aids, your prod and total string movement will become clear and you will discover that the resulting V point in the middle of the string always follows the line of load and thus remains straight in line with the prod tips throughout the full range of travel. In fact Alchem's drawing is already laid out in this fashion and is thus most convenient for demonstrating this.

    Unless the center of the prod tips, and thus the string loops. are exactly in line with the deck at rest and at full draw, there will be some change of alignment as the string moves in line with the force. Alchem has designed their prod to have these tips as high as can be achieved from the stock material they cut their prods from. This is done to minimize the frictional losses that result from too much deviation from center. I have already told you that the string should only require the pinky finger to lift it barely from the deck. Any more than this is giving away energy!

    My deck to gap distance is five eights of an inch to give this area more strength and no more. And no, this doesn't mean that the string will remain at five eights from the deck at all points.

    Now take some strong non-stretch thread, wire, fishing line, etc., etc., and make yourself a bastard string. This does not have to be as thick and as strong as the shooting string because you will (must) not be pulling back so far as to load it with too much weight. This bastard string should have generous (long) loops on either end and be just long enough to go over the prod ends (pins) with little effort. Put this on the strung prod and then with your foot holding it down firmly on to a wooden or carpeted floor, pull up enough that you, or better yet an assistant. can remove one loop of the real string off its pin. To re-string the prod, place one loop of the real string on one end and and then one loop of the bastard string on top of this one. Twist the real string a couple of turns to shorten it a bit and then with the other loop of the bastard string on the remaining pin, pull up enough so that the real string loop can be passed through this longer loop and onto this pin. Relax the pull carefully and you will find that pressure will force real string loops into place and that a tug on the bastard string will set it free, and you're ready to go. IF YOU DO USE AN ASSISTANT TO HELP YOU, MAKE SURE THAT THEY KEEP THEIR FINGERS AND FACE OUT OF HARMS WAY. YOU HAVE BEEN WARNED! And with three and one half inches of brace height you will find that yes, this will slightly change the point where the string, hopefully, touches the deck.

    Ground control out and now over to ATC.

    Pavise


    Last edited by Pavise on Sun Aug 29, 2010 3:55 pm; edited 1 time in total (Reason for editing : Typo)
    Tinker
    Tinker
    Techno Weeny Supreme
    Techno Weeny Supreme


    Posts : 75
    Join date : 2010-07-19
    Location : Idaho, USA

    My Medieval Arbalist project Empty Apology for my over-enthusiasm

    Post by Tinker Sun Aug 29, 2010 3:17 pm

    Pavise wrote:Tinker,

    With the utmost respect sir I think you are reading for too much into what is being discussed here. Slow down, adjust your trim a bit, and try not to be such a techno-weeny by fighting with the joystick.

    Despite the bold type suggestion that you might not be wrong, the fact of the matter is that you are sir.

    Ground control out and now over to ATC.

    Pavise

    OK, Pavise; I sincerely thank you for the detailed information you have provided. I shall throttle-back and adjust my trim tabs (I too have soloed and saavy the jargon). If being over-enthusiastic makes me a techno-weenie, then I was behaving like a techno-weenie. Fighting with the joy stick, however, is not my area of expertise.

    Your interpretation of, "the bold type suggestion that you might not be wrong, the fact of the matter is that you are sir" WAS diametrically-opposed to its intent. I WAS emphatically inviting any corrections to my reasoning if it was flawed. You pointed out that "I WAS WRONG", and I thank you for doing that, I don't mind being wrong as long as I learn something.

    I am going to print out your reply Pavise and study it carefully to better understand it.

    I shall keep my enthusiasm to myself in the future. If I have overstepped my welcome or offended anyone else here I DO apologize.
    ...Back to you ATC, Over and Out... Tinker Sad


    Pavise
    Pavise
    Dear Friend, You will be Greatly Missed.
    Dear Friend, You will be Greatly Missed.


    Posts : 128
    Join date : 2010-02-07

    My Medieval Arbalist project Empty Re: My Medieval Arbalist project

    Post by Pavise Sun Aug 29, 2010 3:51 pm

    Okay Tinker, let's relax and not take ourselves so seriously. A good friend of mine once said that it is impossible to see the other writer's eyes. And that is what is fundamentally wrong with the 'net.

    Please be assured that you have not offended me and if I have somehow offended you, then I am sorry. But it is you who is asking the questions and I'm only trying to help you out.

    If I were you I would simply take a piece of 2" x 4" and cut a fore-end exactly as shown on Alchem's 'site, or trace around the one you have already made from that beautiful piece of wood and then lash the prod to it as prescribed and see what it looks like. To tell you the truth I have never heard of anyone having the problem you describe and illustrate, but I cannot quite put my finger on what the solution might be from here.

    Keep smiling,

    Pavise

    Moon
    Moon
    Techno Weeny

    Lets put a laser on it!!!


    Techno WeenyLets put a laser on it!!!


    Posts : 55
    Join date : 2010-02-25

    My Medieval Arbalist project Empty Tinker

    Post by Moon Sun Aug 29, 2010 5:29 pm

    Keep the enthusiasm and keep the good stuff coming. Believe it or not I'm at such an early stage with medieval crossbow designs, I'm learning from a learner. I can talk modern crossbows all day long but I'm in kindergarten here.
    Regerald
    Regerald
    Master Crossbowyer
    Master Crossbowyer


    Posts : 67
    Join date : 2009-11-30
    Age : 38
    Location : Finland

    My Medieval Arbalist project Empty Re: My Medieval Arbalist project

    Post by Regerald Wed Sep 01, 2010 2:05 pm

    Tinker wrote:Regerald; Would that only apply to a prod that was straight across tip to tip? Alchems prods have a 1/2" tip-rise. Would that make a difference to the angle you speak of?
    This rule apply for prods with a tip-rise as well.. But as a "center" you have to mark a level of a string perpendicular to a prod surface. At list I understand it in this way.. Here one picture from a book:
    My Medieval Arbalist project Pict10
    In ideal case, string is slightly touching a track at any point of a draw length.
    Tinker
    Tinker
    Techno Weeny Supreme
    Techno Weeny Supreme


    Posts : 75
    Join date : 2010-07-19
    Location : Idaho, USA

    My Medieval Arbalist project Empty IT WORKS!

    Post by Tinker Sun Sep 05, 2010 9:28 am

    cheers The nylon block release assembly appears to have no damage from the stop. Smooth as silk. This is a 100# prod.

    My Medieval Arbalist project P1010011

    My Medieval Arbalist project P1010012

    My Medieval Arbalist project P1010013

    My Medieval Arbalist project P1010014

    My Medieval Arbalist project P1010015

    My Medieval Arbalist project P1010016

    Thanks again to everyone who helped... Tinker My Medieval Arbalist project Anim_b10
    Basilisk120
    Basilisk120
    Moderator
    Moderator


    Posts : 548
    Join date : 2010-03-01
    Age : 45
    Location : Arizona

    My Medieval Arbalist project Empty Re: My Medieval Arbalist project

    Post by Basilisk120 Sun Sep 05, 2010 10:16 am

    OOOH Shiny yeeeeaahhhh 
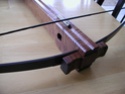
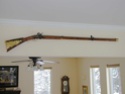
That is one spectacular looking crossbow. Hopefully it shoots as well as it looks.

    You may have answered this earlier but are you using a wippe to Cock the bow?
    Pavise
    Pavise
    Dear Friend, You will be Greatly Missed.
    Dear Friend, You will be Greatly Missed.


    Posts : 128
    Join date : 2010-02-07

    My Medieval Arbalist project Empty Re: My Medieval Arbalist project

    Post by Pavise Sun Sep 05, 2010 10:35 am

    Well now Tinker, that is one fine piece of workmanship and a lovely crossbow you have made. I decided to back off for a few days and see whether you would resolve the issue you had with the prod angle and it appears as though it all worked out okay.

    I am also a master firearms instructor and examiner and every so often I get a student or two who will read far too much into what is being taught. I have even had police officers, soldiers and other "experienced" participants disagree with the teaching manuals and who rewrite the text and or the questions, only to then get the answer wrong during their test. These are what we instructors call "Techno-weenys" and if they would only pull their necks in a bit they would find that things can be easier all round.

    Pavise

    "The reward in having anything comes best when shared with others." Smile
    Ivo
    Ivo
    Admin
    Admin


    Posts : 1041
    Join date : 2009-11-25
    Age : 36
    Location : NJ, USA

    My Medieval Arbalist project Empty Re: My Medieval Arbalist project

    Post by Ivo Sun Sep 05, 2010 11:00 am

    Haha!

    "Hit-you-in-the-face" stands up to it's name and looks fantastic while at it! My Medieval Arbalist project 602584

    Great time...beautiful crossbow...but what about the prod? did you fix it? I assume you did, since it's all tied down neatly, so just checking. My Medieval Arbalist project Icon_smile

    Great build, now all you need is some bolts for it. My Medieval Arbalist project 932938

    PS: I'm a "techno-weeny" at times, but turning the tables is easy....In my case it was the "Principals of eccentric cam operation"... very difficult to put into words, yet sooooo much easier to build a few props and observe what
    happens.
    Tinker
    Tinker
    Techno Weeny Supreme
    Techno Weeny Supreme


    Posts : 75
    Join date : 2010-07-19
    Location : Idaho, USA

    My Medieval Arbalist project Empty Responses

    Post by Tinker Sun Sep 05, 2010 12:02 pm

    You may have answered this earlier but are you using a wippe to Cock the bow?
    Actually, when I shot it yesterday I found myself using the old, "Two thumb grunt and push system"! I read somewhere that a man could hand cock up to about 140#
    ... 100# is plenty for me Baby Shocked

    I decided to back off for a few days and see whether you would resolve the issue you had with the prod angle and it appears as though it all worked out okay.
    On Monday I spoke with Jim Koch at ALCHEM. He explained that the prods sometimes warp slightly when heat-treating, therefore they may vary in the mounting angle. (A VERY helpful and pleasant gentleman I might add) Therefore, the suggestion to make a 2x4 mock-up prior to starting on the actual stock would be a wise decision. As it worked out here a 90 degree mounting puts the slightest string pressure on the table.
    By the way; The more you disclose of yourself, the more we have in common ('been there-done that') ....Except I am probably old enough to be your Grandfather! Want your Gorilla hug now or later?

    ... now all you need is some bolts for it.

    I was going to shoot that thing come hell or high water. It was gnawing on me to see if the release was going to survive or self-destruct so I was not going to let the lack of a bolt hold me up. I dug up a 3/8" hickory ramrod from the muzzle loader junk-pile and proceeded to construct a 342 grain projectile with a maple fin and a .38 caliber casing for a blunt tip. (We used to use them on arrows when I was kid) The fourth shot at my pistol range back stop at about 20 yards went clear through the 1/2" chipboard. When the bolt was retrieved I figured the fins would be gone, but they were not even dinged. The bolt found an area that had been shot up with .38 wad-cutters and bored its way through.... Going out today and build a wicked medieval harpoon for the shaft as a display.
    On the 'to do' list is to get a fletching tool ordered. Thinking Grayling with the bolt adapter; but not certain if it should be ordered with straight, right or left fletch. Sure like to find some 3/8" shafting but don't see any. Ideas?
    BTW, LOVE the new Icons smack Laughing

    Tinker
    Pavise
    Pavise
    Dear Friend, You will be Greatly Missed.
    Dear Friend, You will be Greatly Missed.


    Posts : 128
    Join date : 2010-02-07

    My Medieval Arbalist project Empty Re: My Medieval Arbalist project

    Post by Pavise Sun Sep 05, 2010 2:08 pm

    'Except I am probably old enough to be your Grandfather!'

    And that would make you about 140 years old and you would also know twice as much as me. Razz

    Pavise

    "Better to be a has-been than a never-was."

    Basilisk120
    Basilisk120
    Moderator
    Moderator


    Posts : 548
    Join date : 2010-03-01
    Age : 45
    Location : Arizona

    My Medieval Arbalist project Empty Re: My Medieval Arbalist project

    Post by Basilisk120 Sun Sep 05, 2010 9:05 pm

    Tinker wrote:
    I was going to shoot that thing come hell or high water. It was gnawing on me to see if the release was going to survive or self-destruct so I was not going to let the lack of a bolt hold me up. I dug up a 3/8" hickory ramrod from the muzzle loader junk-pile and proceeded to construct a 342 grain projectile with a maple fin and a .38 caliber casing for a blunt tip. (We used to use them on arrows when I was kid) The fourth shot at my pistol range back stop at about 20 yards went clear through the 1/2" chipboard. When the bolt was retrieved I figured the fins would be gone, but they were not even dinged. The bolt found an area that had been shot up with .38 wad-cutters and bored its way through.... Going out today and build a wicked medieval harpoon for the shaft as a display.
    On the 'to do' list is to get a fletching tool ordered. Thinking Grayling with the bolt adapter; but not certain if it should be ordered with straight, right or left fletch. Sure like to find some 3/8" shafting but don't see any. Ideas?
    BTW, LOVE the new Icons smack Laughing

    Clever idea with the .38 brass for blunts. I was thinking of trying something similiar for a particular project. I was just going to use 11/32" shaft for that. There isn't that much difference a little glue on the outside edge to make a smooth transition. But you could always get some 3/8 dowels. I was thinking of getting some nice hard would dowels to make some bolts out of, some thing that would match the new crossbow.

    As for the fletching jig, I think that a straight clamp would be the most adaptable. You can always put a slight angled offset to the fletching with it if you need to.

    Sponsored content


    My Medieval Arbalist project Empty Re: My Medieval Arbalist project

    Post by Sponsored content


      Current date/time is Fri Apr 19, 2024 7:34 am