The Arbalist Guild

Would you like to react to this message? Create an account in a few clicks or log in to continue.

Crossbows - Everything about Building, Modding, and Using your Crossbow Gear

Latest topics

» 12th Century Chinese Crossbow Chronographed
by stuckinthemud1 Fri Nov 24, 2023 3:50 pm

» Crossbow Stock
by kenh Tue Oct 31, 2023 6:19 am

» Colletiere a Charavines continuing experiment
by stuckinthemud1 Sat Oct 07, 2023 5:36 am

» Cocking - how
by stuckinthemud1 Thu Aug 03, 2023 4:24 am

» Questions around heavy crossbow lath buildin
by stuckinthemud1 Wed Apr 26, 2023 1:10 am

» Arab Crossbow
by stuckinthemud1 Tue Apr 25, 2023 7:57 am

» prod angle, and lever trigger for sale anyone?
by stuckinthemud1 Mon Mar 20, 2023 5:54 am

» flexible string
by jasper1978 Mon Mar 20, 2023 1:25 am

» [solved]Skane/Lillohus crossbow thread
by stuckinthemud1 Sun Mar 19, 2023 7:44 am

» jens sensfelder
by jasper1978 Wed Mar 08, 2023 11:58 pm

» 400lb Windlass crossbow bolts weight and accuracy shooting high.
by stuckinthemud1 Sun Mar 05, 2023 2:53 pm

» Codex Löffelholz crossbow
by stuckinthemud1 Tue Jan 24, 2023 4:14 pm

» Digitar prodsc
by stuckinthemud1 Sun Jan 15, 2023 2:42 pm

» Troubleshooting
by Andy. Fri Jan 06, 2023 12:29 pm

» Wood Prods
by stuckinthemud1 Fri Dec 30, 2022 12:47 pm

» Colletiere a Charavines crossbow
by stuckinthemud1 Fri Dec 30, 2022 8:54 am

» Simplified Löffelhotz speedloader
by stuckinthemud1 Fri Dec 09, 2022 4:05 pm

» Fiberglass H-bows
by c sitas Sat Nov 12, 2022 8:44 am

» Bad Antler
by drawknife Sat Nov 12, 2022 3:48 am

» Anyone make their own bolts?
by Juniper Mon Oct 17, 2022 8:20 am

» Josef alm in English
by Juniper Sat Oct 15, 2022 4:22 am

» Qin/Han lock drawings
by kenh Fri Sep 23, 2022 8:16 pm

» stirrup dimensions?
by stuckinthemud1 Thu Sep 01, 2022 1:49 pm

» Skane/Lillohus lockbow information needed
by stuckinthemud1 Sun Aug 14, 2022 6:23 am

» need help contacting le musee Dauphinois Grenoble
by stuckinthemud1 Sat Aug 13, 2022 3:22 pm


+3
Ivo
Geezer
Pavise
7 posters

    Nuts and sear plugs

    Pavise
    Pavise
    Dear Friend, You will be Greatly Missed.
    Dear Friend, You will be Greatly Missed.


    Posts : 128
    Join date : 2010-02-07

    Nuts and sear plugs Empty Nuts and sear plugs

    Post by Pavise Tue Feb 09, 2010 12:43 pm

    Geezer recently wrote these following good points under Books:

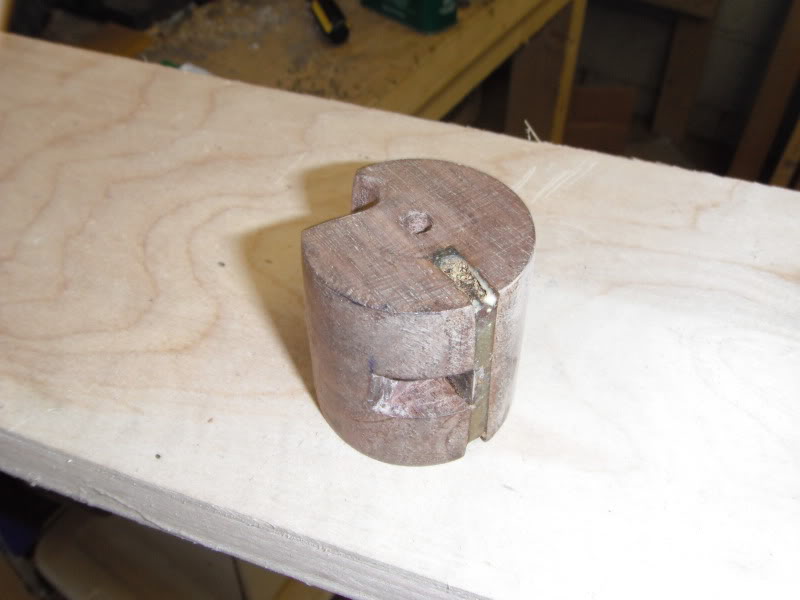
    "P-G makes his roller a bit shallow, at 3/5 below the top edge of the socket and 2/5 above. I recommend you bury the roller 2/3, with 1/3 protruding. That will give you a much stronger socket. If you bury it as much as 3/4 of it's diameter, you won't be able to take the roller out of the top of the socket.
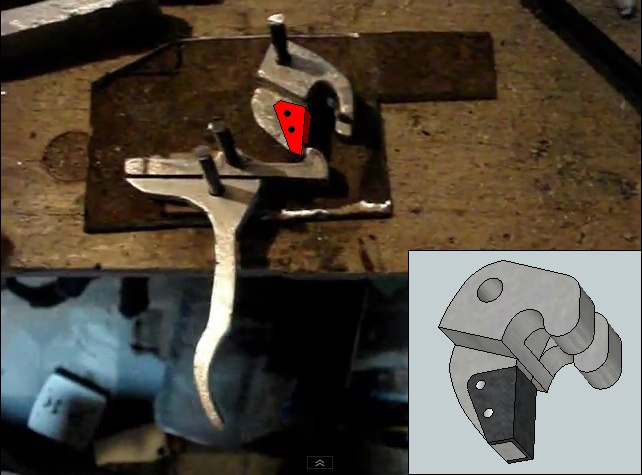
    P-G places the sear-plug, where the trigger/tickler bears against the nut, almost precisely at the bottom of the nut. If you move the sear around toward the rear of the nut by, say 5 mm. You will get a stronger lock, since the trigger takes more load and the upper edges of the socket are stressed much less."

    Robin Allen made the elkhorn nut and a steel socket for my med, and it is impossible to pull the nut out from above because the recess is purposely made deep enough to prevent the nut from being pulled up and out by the string load before release. This undoubtedly is an important safety feature where draw weight can easily excede the strength of the axle pin or lashing.

    And how did Sir Ralph Payne-Gallwey securely fasten the metal sear-plug into the horn nut? There is a lot of friction applied at this point when the tickler is pressed and the engagement points begin to slide apart. As for his depicted trigger mortise I have to wonder: Did he ever make one like that? If he did he must have used special trained woodworms Very Happy

    Pavise
    Geezer
    Geezer
    Master Crossbowyer
    Master Crossbowyer


    Posts : 1194
    Join date : 2010-01-12
    Age : 76
    Location : Austin, Texas, USA

    Nuts and sear plugs Empty nuts and sear plugs

    Post by Geezer Fri Feb 12, 2010 10:52 am

    Payne-Gallwey' trigger mortise has all those weird angles, but the medieval bows I have examined just cut a straight slot-moritse. I'm not sure PG's trigger could actually be put into that mortise without going in sideways.
    I suspect medieval sear-plugs were secured with a pin going in from the side. I simply drill a hole between the lugs, from top to bottom, then thread the hole and make the sear out of 5/26 or 3/8 inch allthread (threaded rod) that's been notched and slotted at the bottom so I can screw it into place. That works very well up to @ 200 lb. but for stronger bows, one might want to do something more substantial.
    ps. I just took a number of detailed photos of a German sporting bow, dated 1596. If I can get the owner's permission, I'll post some samples here.
    Geezer
    Geezer
    Geezer
    Master Crossbowyer
    Master Crossbowyer


    Posts : 1194
    Join date : 2010-01-12
    Age : 76
    Location : Austin, Texas, USA

    Nuts and sear plugs Empty sear plugs

    Post by Geezer Fri Feb 12, 2010 11:17 am

    Correction: make that 5/16 or 3/8 inch allthread, not 5/26. My typing error.
    Geezer
    Pavise
    Pavise
    Dear Friend, You will be Greatly Missed.
    Dear Friend, You will be Greatly Missed.


    Posts : 128
    Join date : 2010-02-07

    Nuts and sear plugs Empty Re: Nuts and sear plugs

    Post by Pavise Fri Feb 12, 2010 12:39 pm

    Robin Allan and I have discussed this problem at some length and have yet to come to any final solution. Ideally the sear engagement parts should be made of metal that can be hardened enough to resist wear, be polished too, and thus provide a consistant feel each time the crossbow is shot. This metal can be mild steel which has been case-hardened or of tool steel that has been tempered or merely chilled when red-hot. Drill-rod is ideal for the latter process and can most often be easily found at metal supply outlets. Drill-rod can be machined and threaded and then screwed and fixed in place as Geezer has described, after hardening. However if the sear engagement point is to be flat then one ought to carefully grind this small profile after the piece is in place. A Dremel tool or such is ideal for doing this but there is a chance of locally overheating a horn or Delrin nut when doing so!

    Oh how I wish that Sir Ralph had explained this part better. And surely there must be more evidence of how this was done in the old days? I milled a narrow mortise in my elk-horn nut and then made a tool-steel "wedge" that I hardened before afixing it with epoxy cement. Hopefully it will stand up to the forces involved and not work loose.

    Pavise
    Geezer
    Geezer
    Master Crossbowyer
    Master Crossbowyer


    Posts : 1194
    Join date : 2010-01-12
    Age : 76
    Location : Austin, Texas, USA

    Nuts and sear plugs Empty sear plugs

    Post by Geezer Fri Feb 12, 2010 9:57 pm

    I have experimented with making the sear-plugs in my medieval reproductions out of stainless-steel allthread, rather than the ordinary mild-steel stuff I get at the hardware store. In fact, stainless sears are substantially more wear-resistant, but there's a catch...yes, always a catch. I make the sear out of stainless, the distal-end of the tickler/trigger, the part that engages the sear, gets all the wear. Eventually, the end of the trigger rounds off enough that it becomes necessary to re-form the end in the forge. In fact, it's much easier from a maintenance standpoint to replace a threaded-in sear than it is to rework the end of the trigger. So nowadays, I don't put a really hard sear into any crossbow that isn't near my maximum power (@ 180 lb) Geezer.
    Ivo
    Ivo
    Admin
    Admin


    Posts : 1041
    Join date : 2009-11-25
    Age : 35
    Location : NJ, USA

    Nuts and sear plugs Empty Re: Nuts and sear plugs

    Post by Ivo Thu Feb 25, 2010 4:41 am

    Hi guys,

    I've been thinking about this one thing lately.

    A thought of fabricating an aluminum nut by casting...the model is cut out out of styrofoam using a hot wire, then all the sear pins/plugs are slightly heated and inserted/screwed into the styrofoam. Sprues are added and the model is dipped in investment and submerged in sand once dry just as it is done in the Lost Foam Casting Method. Fianlly the part is cast in aluminum.

    Primary concern of course arises when it comes thoughts of hardening the sear...I assume that by insulating the metal around the sear(practically the whole nut) with a mixture of clay we should be able to harden this area with out much trouble. All theory, so I'll be glad to hear your thoughts guys.
    crimbizzle
    crimbizzle
    Fresh Blood

    Doesn't mean
    I'm new to crossbows


    Fresh Blood Doesn't meanI'm new to crossbows


    Posts : 14
    Join date : 2009-12-13

    Nuts and sear plugs Empty Re: Nuts and sear plugs

    Post by crimbizzle Thu Feb 25, 2010 11:12 pm

    Ivo, so you want a to utilize the lightweight strength of aluminum and put a harder steel wear piece onto it? The memory surfaces that Ferrari used to use brass pins or something to attach steel wear plates to aluminum brake rotors. Not anymore of course, but I think it was one of the evolutionary steps of what has led to the modern vented disk brake system.

    I'm having trouble visualizing this though, so if you have some bar napkins laying around scan them and post.
    Ivo
    Ivo
    Admin
    Admin


    Posts : 1041
    Join date : 2009-11-25
    Age : 35
    Location : NJ, USA

    Nuts and sear plugs Empty Re: Nuts and sear plugs

    Post by Ivo Fri Feb 26, 2010 12:16 am

    Not sleeping either...huh? Shocked ... Smile

    The method I'm describing is very well documented in one of the resource links in the metalworking section of Technology forum. It's called Lost Foam Metal Casting, but it doesn't necessarily have to be LFMC and could be a Lost Wax Method...what really concerns me here(and that I see not as a necessity, but as a challenge) is if it is going to be possible to harden a sear pin once aluminum has been cast around it, given aluminum has a melting point very close to some steels hardening temperatures. Another thing that concerns me is the pin chilling and solidifying the metal before the mold could be fully filled.

    I don't have any bar napkins, but instead I actually intend to attempt this and post the results in the metalworking section of Technology forum. Very Happy

    What I meant by saying that this isn't a necessity, but simply a challenge is that the nut can be cast(with all the marking holes in right places) and the sear pin prepared and properly hardened separately. Then the guide holes are followed, bored to a right diameter, and tapped to receive the threaded sear pin(to avoid hardening...this pin can be made by modifying/grinding an already hardened bolt of the right size) pirat

    The casting is only another way of doing it...just my way of having fun is trying something stupid like that...who knows it might just survive the process....in addition to this some people I know even suggested casting in in bronze to gain an authentic period look drunken

    As for demonstration of these reinforcement/sear pins...In one of Lightly's buildalongs there are photos of the the horn nut with a threaded rod down the center of the nut a little bit behind the teeth...good thing she was so happy and took a few more pictures.drunken ...by the way did you notice that under every next photo on Flikr she commented on the work being done.
    Nuts and sear plugs 3164944066_c5066cd217Nuts and sear plugs 3164941856_c0914fac55
    Geezer
    Geezer
    Master Crossbowyer
    Master Crossbowyer


    Posts : 1194
    Join date : 2010-01-12
    Age : 76
    Location : Austin, Texas, USA

    Nuts and sear plugs Empty aluminum nut?

    Post by Geezer Fri Feb 26, 2010 7:03 am

    Geezer here: I made some aluminum nuts from round bar-stock years ago. For a sear, I cut a keyway, slotted it, then dropped in a thin piece of hard steel and peened it in place. The nut looked great and spun very fast WHEN NEW. Unfortunately, when an aluminum nut is placed in a close-fitting round socket, Medieval style, the surfaces will oxidize, and the oxide will inevitably transfer to the inside of the socket. If you leave your bow hanging for a few weeks and then take it out to shoot again, the oxide on the nut will stick to the oxide in the socket, making the lock slow and sticky for the first few shots... then things smooth out and work normally... but wait, there's more. All that nasty grey aluminum oxide will eventually transfer to the serving on your bowstring and thence to the top of your stock. After a few months, the entire bolt-track will develop a nasty grey coating that wasn't in your plans at the beginning.
    So what can you do? Well, hanging the aluminum roller on an axle, rather than having it run in a close socket will probably reduce the sticking problems, but the business of spreading aluminum oxide all over the top... I dunno. That's why I gave up on aluminum for a roller. I tried brass too... it's beautiful but Very Heavy, giving the bow a slow release.
    Just my two-bits. Geezer
    crimbizzle
    crimbizzle
    Fresh Blood

    Doesn't mean
    I'm new to crossbows


    Fresh Blood Doesn't meanI'm new to crossbows


    Posts : 14
    Join date : 2009-12-13

    Nuts and sear plugs Empty Re: Nuts and sear plugs

    Post by crimbizzle Fri Feb 26, 2010 8:36 am

    AH ok ok ok. I C I C.

    All these terms like sear pins and nuts aren't totally cemented in my mind yet. My mental schema links them to new york strip steak and cashews, makes it difficult to focus.

    Geezer! you're missing a HUGE marketing opportunity! Aluminum oxide is what sapphires are made out of. A whole new line of Sapphire Crossbows with ultra light weight nuts! I'm not serious of course. It sounds like the marginal benefits would be far outweighed by having to extensively clean your weapon every time you fired it.

    Is it possible to anodize aluminum with under the sink chemicals? Are there alloys of it which resist corroding? Could you seal it in another manner like oil or poly?
    Geezer
    Geezer
    Master Crossbowyer
    Master Crossbowyer


    Posts : 1194
    Join date : 2010-01-12
    Age : 76
    Location : Austin, Texas, USA

    Nuts and sear plugs Empty aluminum nuts?

    Post by Geezer Fri Feb 26, 2010 8:54 am

    Sapphire! Well durn, why didn't I think of that? No doubt lots of people would like sapphire a sapphire prod... and why stop with the prod anyhow... maybe the lockplates, tickler, etc. etc. as well
    One of the problems with aluminum is its position on the periodic table of elements... down at the really active end of things. As for anodized aluminum nuts... I fancy the black, would look very nice. I have considered trying to get anodized Dural for my lightweight aluminum prods, but I don't know what effect the anodizing would have on the reliability/durability of the prod. Unfortunately I know squat about anodizing and all the other stuff I have to deal with seems to get in the way of further research. I'm open to suggestions, though. Geezer.
    Pavise
    Pavise
    Dear Friend, You will be Greatly Missed.
    Dear Friend, You will be Greatly Missed.


    Posts : 128
    Join date : 2010-02-07

    Nuts and sear plugs Empty Anodising

    Post by Pavise Fri Feb 26, 2010 11:13 am

    One of the problems of using aluminum alloys is the one of coatings to improve or disguise the metalic look of the part.
    Typically we will be using structural alloys 6061 or 7075 both of which were developed for the aircraft industry. These alloys require some sophisticated treatment in order to coat them with any durable kind of a suface, and hard anodising is most often the chosen route. The metal is chemically cleaned and acid etched and then through a process of electrical oxidization a permanent dye is fixed to the surface pores of the metal. The ways of doing this are available from books or the 'net and a suitable set-up can be built by the hobbyist. See "Electroplating" by J. Poyner ISBN 0085242-862-6
    But it would be nice to know of other ways to permanently coat our various aluminum crossbow parts that are perhaps much simpler. Birchwood Casey advertises a product to make aluminum black and there are formulas for blacking aluminum by the use of lye (castic soda). Powder coating is another industrial process that is used a lot but again this method is usually beyond the realm of the average do-it-yourself crossbow maker.

    Pavise
    Ivo
    Ivo
    Admin
    Admin


    Posts : 1041
    Join date : 2009-11-25
    Age : 35
    Location : NJ, USA

    Nuts and sear plugs Empty Re: Nuts and sear plugs

    Post by Ivo Mon Mar 01, 2010 1:36 pm

    structural alloys(6061 or 7075)

    Those alloys are definitely something else, and I agree that hardening/hard coating them is a real pain in the but. From what I know the process of hardening aluminum alloys is actually called "aging" and can be done naturally or artificially(under high temperature). Have you and Robin made any alloy based triggers, if yes, then what draw weight can a sear based trigger withstand(without looking like an engine block Nuts and sear plugs Icon_smile)? or will it really need a sear plug to function reliably under stress?

    I should be able to cast a test piece today...hopefully the pin won't freeze the metal prematurely, perhaps i'll do one with a pin and one without(with guide holes only)...wish me luck. Nuts and sear plugs Icon_biggrin

    Coatings

    Anodizing Nuts and sear plugs Icon_biggrin ...I hear it creates a sort of rigid honeycomb structure on the surface that acts almost like a ceramic coating when done. Interesting, how much stress can such coating endure while the part is flexed and to what degree...I know it's an awesome coating(memories of trying to physically grind it off my paintball barrel...I'm ashamed to mention that I even tried it Nuts and sear plugs Icon_mad Nuts and sear plugs Icon_lol )

    As for other coatings...I see gunsmithing shops selling some phosphate based bake on cotings and I hear only good stuff about gun coatings.
    Homedepo is also offering a powder coating kit, not sure if the quality is going to be what we would normaly expect from factory powder coatings, but I've seen some computer cases done with it and they looked and felt very nice. I didn't dare try to test the coating quality on a just finished custom computer case. Nuts and sear plugs Icon_lol
    Pavise
    Pavise
    Dear Friend, You will be Greatly Missed.
    Dear Friend, You will be Greatly Missed.


    Posts : 128
    Join date : 2010-02-07

    Nuts and sear plugs Empty Re: Nuts and sear plugs

    Post by Pavise Mon Mar 01, 2010 4:00 pm

    Hi Ivo,

    Neither 6061 nor 7075 alloys are suitable for the actual sear engagement; they are simply not hard enough, nor can they be made hard enough to resist galling at this highly loaded and friction prone critical area of our trigger mechanism. Robin made dozens of crossbows back in England that were used at a fairgound shooting stand and these had what he calls a shunt trigger made from Dural, but the sear engagement part was a piece of hardened drill rod that hooked in a notch on the steel trigger lever. Under Robin's Triggers on his website you will find a drawing for one of these types.

    Anodising is commonly done by passing a low DC electrical plating current through the part (the anode, thus anodise) whilst it is suspended in a 10% or 12% sulphuric acid sollution. This leaves the part covered with a very thin, microscopically porous film which is then sealed in hot water and then dyed for appearance sake. It is, as you have discovered, quite a tough finish that it also resistant to the passing of electricity. The way to remove an anodised coating is by reversing the pre-treatment process, which is an alkali wash and then immersion in a nitric acid sollution. I have a friend who builds high performance snowmobile suspensions and track runners from various CNC machined alluminum alloys that he then has anodised for appearance and durability. Robin tried to have a cast aluminum crossbow stock anodised and it didn't turn out right at all. Nuts and sear plugs Icon_cry This was due to the original material coming from melted down automatic transmission cases (contamination) and the fact that castings do not lend themselves to normal anodising. Most of the usual aluminum alloys can be anodised as long as they are "clean" and bright.

    I am no practicing expert and I am continually indebted to my library and now forums like this for such information. The aforementioned book, whilst being a simple DIY paperback copy, is full of such food for the the thirsty mind.

    And as Robin always says, "Try it. That's the way we discover things."

    Pavise
    Ivo
    Ivo
    Admin
    Admin


    Posts : 1041
    Join date : 2009-11-25
    Age : 35
    Location : NJ, USA

    Nuts and sear plugs Empty Re: Nuts and sear plugs

    Post by Ivo Mon Jan 23, 2012 8:29 pm

    Hey guys,

    Bringing up an older topic to help out a friend.

    The guy decided to cast a nut (over the string design) and smoothly progresses with the trigger build...however...the sear is still awaiting some reinforcement and we are wondering about the best way of approaching the task in this particular case.

    Nuts and sear plugs Jwtrig10

    My first idea was to drill through the vertical axis of the nut, insert a steel rod and rivet it in place, but as we can see there isn't much room now that the nut is practically in it's final shape. So...

    My second suggestion would have been to cut a section of a hacksaw blade (or even mild steel in the 18-16ga range) wide enough to wrap around the sear and tall enough to allow it to be riveted in place.

    Nuts and sear plugs Jwtrig13

    What do you guys think?

    Ivo

    PS: I'm also a little worried about how thin the teeth are on that nut,
    but that's another story...welcome to chip in on that part as well
    though.
    avatar
    8fingers
    Workshop Savvy

    Did you see my tool collection?


    Workshop SavvyDid you see my tool collection?


    Posts : 200
    Join date : 2011-04-06
    Location : Chetwynd, BC, Canada

    Nuts and sear plugs Empty Re: Nuts and sear plugs

    Post by 8fingers Tue Jan 24, 2012 1:14 am


    Hack saw blades would be too brittle to bend to cover the sear. My radical fix would be to cut the sear nose off completely and slot or dovetail the remainder. Fit a sear of hardened steel into the slot. Secure with pins, solder or epoxy.
    Ivo
    Ivo
    Admin
    Admin


    Posts : 1041
    Join date : 2009-11-25
    Age : 35
    Location : NJ, USA

    Nuts and sear plugs Empty Re: Nuts and sear plugs

    Post by Ivo Thu Jan 26, 2012 1:27 pm

    True, those blades snap if you bend them straight up in their hardened state, but when annealed the story changes and you can bend them very efficiently.

    Another thing jumped to mind and that's why I corrected/added on material choices being widened to also include mild sheet metal steel...reason:

    Geezer wrote:I have experimented with making the sear-plugs in my
    medieval reproductions out of stainless-steel allthread, rather than the
    ordinary mild-steel stuff I get at the hardware store. In fact,
    stainless sears are substantially more wear-resistant, but there's a
    catch...yes, always a catch. I make the sear out of stainless, the
    distal-end of the tickler/trigger, the part that engages the sear, gets
    all the wear.
    Eventually, the end of the trigger rounds off enough
    that it becomes necessary to re-form the end in the forge. In fact,
    it's much easier from a maintenance standpoint to replace a threaded-in
    sear than it is to rework the end of the trigger. So nowadays, I don't
    put a really hard sear into any crossbow that isn't near my maximum
    power (@ 180 lb) Geezer.

    So to take advantage of the carbon steel casing from those saw blades, the same material would have to be brazed onto the sear catch of the transitional lever. That way the two are of roughly the same hardness (given the brazed on reinforcement and sear casing are re-hardened at/before their installation stages - Casing after the bend, but before riveting...sear lever after the brazing)...that way everything is brought back in balance. In theory everything is legit, did I miss anything?

    Ivo
    ferdinand
    ferdinand
    Crossbow Junkie

    I live here!


    Crossbow JunkieI live here!


    Posts : 301
    Join date : 2012-04-24

    Nuts and sear plugs Empty Re: Nuts and sear plugs

    Post by ferdinand Tue May 01, 2012 6:04 am

    Maybe a little simple but i just cut a groove in the bottom of my hardwood nut and insert a smal piece of sheet-steel and glue it in place.
    Easy done, easy to replace.
    Wear should be on the part wich is easy to replace or the least expencive from a technical point of vieuw.
    U cant prevent things from wearing when they rub together under high stress so create a weak point and periodically inspect/replace it.
    Maintenance is my work and controlling the proces of wear is the key if u dont want to have unexpected brake or fail.
    Hope my thoughts are helpfull...
    Todd the archer
    Todd the archer
    Crossbow Junkie

    I live here!


    Crossbow JunkieI live here!


    Posts : 581
    Join date : 2010-02-25
    Age : 61
    Location : sellersville,pa.

    Nuts and sear plugs Empty Re: Nuts and sear plugs

    Post by Todd the archer Tue May 01, 2012 7:22 am

    Yes, I have done just that. Seems to work so far.

    Nuts and sear plugs DSCF1421


    Todd
    avatar
    8fingers
    Workshop Savvy

    Did you see my tool collection?


    Workshop SavvyDid you see my tool collection?


    Posts : 200
    Join date : 2011-04-06
    Location : Chetwynd, BC, Canada

    Nuts and sear plugs Empty Re: Nuts and sear plugs

    Post by 8fingers Mon Jul 23, 2012 1:00 am

    I was at a knife making forum and one of the guys boiled a piece of antler for about 2 hours until it started to soften then simply pushed the tang of his knife into the antler core then let it cool.Required very firm pressure but it went. I suspect the inserts in RPG's horn nuts could have been installed the same way.
    Would horn, similarly softened, be easier to tap?
    Geezer
    Geezer
    Master Crossbowyer
    Master Crossbowyer


    Posts : 1194
    Join date : 2010-01-12
    Age : 76
    Location : Austin, Texas, USA

    Nuts and sear plugs Empty Re: Nuts and sear plugs

    Post by Geezer Mon Jul 23, 2012 9:01 am

    Softening horn: Remember, there's horn and horn, at least in English. Which is to say, cow-horn which is much like your fingernails, and antler, which is more akin to ivory. Boiling cow-horn, particularly boiling in vinegar is said to permanently soften the horn, by removing some of the constituents. When you let it cool, it gets a little harder, but not as hard and springy as it was before boiling. The same might be true of antler. Still it seems worthwhile running some simple experiments to find out.
    You might find useful info about horn or antler on buckskinning or other 'primitives' sites. Ain't the web great? Geezer

    Sponsored content


    Nuts and sear plugs Empty Re: Nuts and sear plugs

    Post by Sponsored content


      Current date/time is Thu Mar 28, 2024 4:14 am