The Arbalist Guild

Would you like to react to this message? Create an account in a few clicks or log in to continue.

Crossbows - Everything about Building, Modding, and Using your Crossbow Gear

Latest topics

» 12th Century Chinese Crossbow Chronographed
by stuckinthemud1 Fri Nov 24, 2023 3:50 pm

» Crossbow Stock
by kenh Tue Oct 31, 2023 6:19 am

» Colletiere a Charavines continuing experiment
by stuckinthemud1 Sat Oct 07, 2023 5:36 am

» Cocking - how
by stuckinthemud1 Thu Aug 03, 2023 4:24 am

» Questions around heavy crossbow lath buildin
by stuckinthemud1 Wed Apr 26, 2023 1:10 am

» Arab Crossbow
by stuckinthemud1 Tue Apr 25, 2023 7:57 am

» prod angle, and lever trigger for sale anyone?
by stuckinthemud1 Mon Mar 20, 2023 5:54 am

» flexible string
by jasper1978 Mon Mar 20, 2023 1:25 am

» [solved]Skane/Lillohus crossbow thread
by stuckinthemud1 Sun Mar 19, 2023 7:44 am

» jens sensfelder
by jasper1978 Wed Mar 08, 2023 11:58 pm

» 400lb Windlass crossbow bolts weight and accuracy shooting high.
by stuckinthemud1 Sun Mar 05, 2023 2:53 pm

» Codex Löffelholz crossbow
by stuckinthemud1 Tue Jan 24, 2023 4:14 pm

» Digitar prodsc
by stuckinthemud1 Sun Jan 15, 2023 2:42 pm

» Troubleshooting
by Andy. Fri Jan 06, 2023 12:29 pm

» Wood Prods
by stuckinthemud1 Fri Dec 30, 2022 12:47 pm

» Colletiere a Charavines crossbow
by stuckinthemud1 Fri Dec 30, 2022 8:54 am

» Simplified Löffelhotz speedloader
by stuckinthemud1 Fri Dec 09, 2022 4:05 pm

» Fiberglass H-bows
by c sitas Sat Nov 12, 2022 8:44 am

» Bad Antler
by drawknife Sat Nov 12, 2022 3:48 am

» Anyone make their own bolts?
by Juniper Mon Oct 17, 2022 8:20 am

» Josef alm in English
by Juniper Sat Oct 15, 2022 4:22 am

» Qin/Han lock drawings
by kenh Fri Sep 23, 2022 8:16 pm

» stirrup dimensions?
by stuckinthemud1 Thu Sep 01, 2022 1:49 pm

» Skane/Lillohus lockbow information needed
by stuckinthemud1 Sun Aug 14, 2022 6:23 am

» need help contacting le musee Dauphinois Grenoble
by stuckinthemud1 Sat Aug 13, 2022 3:22 pm


+3
Todd the archer
kenh
jaeger22
7 posters

    New Member and new trigger design

    avatar
    jaeger22
    Workshop Savvy

    Did you see my tool collection?


    Workshop SavvyDid you see my tool collection?


    Posts : 153
    Join date : 2013-03-15
    Age : 75
    Location : Orlando, FL

    New Member and new trigger design Empty New Member and new trigger design

    Post by jaeger22 Wed Apr 23, 2014 4:44 pm

    Hi Guys, a newbie here, I have been reading some of the great posts here and I am blown away by some of the beautiful projects you guys have done. I am especially impressed with the RDT that Palandjali built using hand tools. Those cams would make me proud if I had done them with a full machine shop!
    Just as a quick introduction, I have been making my own recurve and long bows for many years and also black power rifles (including making and rifling the barrels). I have also made a few simple crossbows along the way. I recently got the urge to do a serious crossbow build. So glad I found this site! Most of the crossbow building stuff on the net is junk. But there is nice work and interesting ideas going on here.
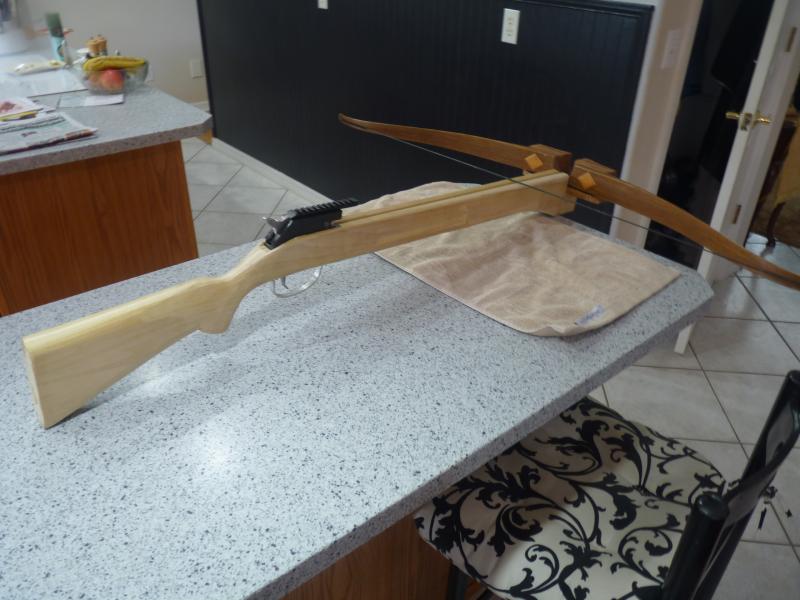
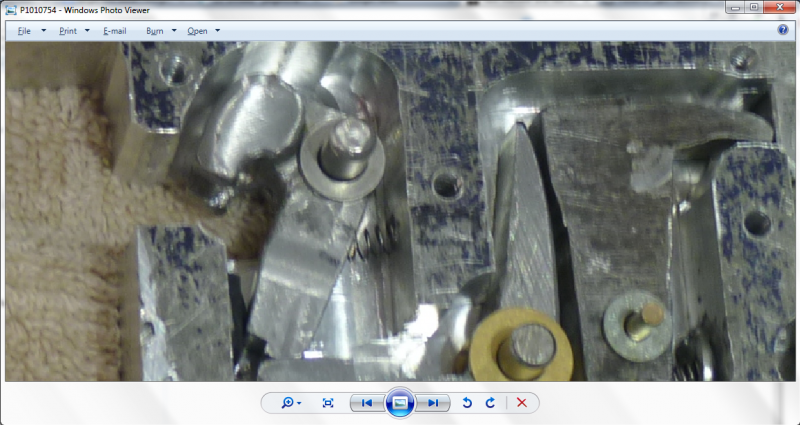
    So I have to say up front I am not normal. I never just build a kit or a copy of an existing design like a rational person. I always have to design my own. In this case I am starting with the trigger assembly. There are a lot of usable designs out there but I have a couple of goals in mind. I want it to have a very light pull and at the same time be ultra-safe. (I know that sounds like a contradiction) Something like a set trigger on a BP rifle but one that is easily put back to safe.  So here is what I have come up with so far. I added a hammer. The overhead claw is the same as a conventional setup and the latch is also similar except that it takes a 90 degree bend up at the pivot pin. If the hammer was allowed to strike the latch directly, it would be unsafe because any inadvertent blow to the back of the hammer would cause it to discharge. So I incorporated an inertia transfer bar. The transfer bar is just a bit too short to make contact with the latch with the hammer down. With the hammer up, a spring pushes the transfer bar out just a bit so that the hammer will strike it when it falls. That will cause the transfer bar to fly forward and inertia will cause it to strike the vertical arm of the latch. The Latch will then rotate and release the nut.
    I built a wood mock up to test the action and work out the 3D fit issues.
    Here is a picture:
     New Member and new trigger design P1010703_zps1f41481d
    And here is a video showing its operation;
     https://www.youtube.com/watch?v=SkQ-zTVrxFU
    I welcome any comments even if they point out flaws. Better to know before I cut metal!  Smile
    kenh
    kenh
    Crossbow Junkie

    I live here!


    Crossbow JunkieI live here!


    Posts : 883
    Join date : 2012-08-03
    Age : 75
    Location : Living Aboard a Sailboat in Fort Myers, FL

    New Member and new trigger design Empty Re: New Member and new trigger design

    Post by kenh Wed Apr 23, 2014 6:25 pm

    Cut two!
    Todd the archer
    Todd the archer
    Crossbow Junkie

    I live here!


    Crossbow JunkieI live here!


    Posts : 581
    Join date : 2010-02-25
    Age : 61
    Location : sellersville,pa.

    New Member and new trigger design Empty Re: New Member and new trigger design

    Post by Todd the archer Wed Apr 23, 2014 7:37 pm

    Looks like a good design, keep us up to date with your progress.

    Todd
    avatar
    jaeger22
    Workshop Savvy

    Did you see my tool collection?


    Workshop SavvyDid you see my tool collection?


    Posts : 153
    Join date : 2013-03-15
    Age : 75
    Location : Orlando, FL

    New Member and new trigger design Empty Claw

    Post by jaeger22 Mon Apr 28, 2014 5:19 am

    Thanks guys, and will do.
    So I thought I would start with the "nut" or in this case overhead claw (Do we still call it the nut?) because it looks to be the hardest part to make and is key to everything else. I cut this out of a block of 4140. It is tough stuff and a bit of a pain to machine. It is still a bit rough and I will smooth all the edges. I am also thinking about drilling lightening holes in the down arm.
    New Member and new trigger design P1010707_zps4fb32bc7
    New Member and new trigger design P1010710_zpsd9367fa6
    New Member and new trigger design P1010711_zps19186a18
    Jack Pine
    Jack Pine
    Fresh Blood

    Doesn't mean
    I'm new to crossbows


    Fresh Blood Doesn't meanI'm new to crossbows


    Posts : 27
    Join date : 2014-02-28
    Location : Sportsman's paradise-Northern MI

    New Member and new trigger design Empty Re: New Member and new trigger design

    Post by Jack Pine Mon Apr 28, 2014 7:16 am

    jaeger22 wrote:Thanks guys, and will do.
    So I thought I would start with the "nut" or in this case overhead claw (Do we still call it the nut?) because it looks to be the hardest part to make and is key to everything else. I cut this out of a block of 4140. It is tough stuff and a bit of a pain to machine. It is still a bit rough and I will smooth all the edges. I am also thinking about drilling lightening holes in the down arm.
    New Member and new trigger design P1010707_zps4fb32bc7
    New Member and new trigger design P1010710_zpsd9367fa6
    New Member and new trigger design P1010711_zps19186a18

    I have those top-releasing claws in my Middleton; they are superb as long as the backside and radius edges are polished.
    Jack ><>
    avatar
    jaeger22
    Workshop Savvy

    Did you see my tool collection?


    Workshop SavvyDid you see my tool collection?


    Posts : 153
    Join date : 2013-03-15
    Age : 75
    Location : Orlando, FL

    New Member and new trigger design Empty Re: New Member and new trigger design

    Post by jaeger22 Wed Apr 30, 2014 8:29 pm

    Thanks Jack, yes I have a lot of polishing to do. I am actually on a business trip at the moment and I packed the claw and some sandpaper so I can polish on it in the hotel room when not working. Smile 
    I realized that the mock up was too big and bulky so I redesigned it to shrink it down about 25%.
    Here is the a picture of the rough main block and side block clamped together in the mill being drilled, counter sunk, and taped for 8/32 screws. There are 6 screws total in it now holding the two parts together, but in this picture only one is installed and one being tapped.
    New Member and new trigger design P1010717_zps60d6fe71
    When I get home, I will drill undersize and then ream the holes to finished size for the pins so that the pins will have a good tight fit. I plan to do the drilling and reaming in the mill through both parts at the same time with all the screws installed  holding the two parts together in their final position. That should insure that all the holes are perfectly aligned. I will drill them all in the mill at the same time without taking them out of the vice so the holes should all be perfectly parallel. At least that is the theory, Rolling Eyes I sure hope it works or I will never be able to get the side plate on and off of the 5 pins. pale
    The main block is 1" thick. The side plate will end up 1/8" thick but is 3/8" at this point to allow for the areas that need to protrude into the inside to support moving parts. The rest will be milled away down to the 1/8". So the finished assembly will be 1 1/8" wide.
    This has been fun so far but there are still plenty of challenges ahead. Rolling Eyes
    avatar
    MRobin
    Tinkerer

    If there is a will, there is a way.


    TinkererIf there is a will, there  is a way.


    Posts : 67
    Join date : 2012-09-01
    Age : 34
    Location : Paris, France

    New Member and new trigger design Empty Re: New Member and new trigger design

    Post by MRobin Thu May 01, 2014 8:20 am

    The inertia mechanism is quite amazing, hope it works with a 2 or 3 hundred pound load on the nut.
    I guess you thought of some kind of screw adjustment to increase or decrease the spring tension.
    avatar
    jaeger22
    Workshop Savvy

    Did you see my tool collection?


    Workshop SavvyDid you see my tool collection?


    Posts : 153
    Join date : 2013-03-15
    Age : 75
    Location : Orlando, FL

    New Member and new trigger design Empty Re: New Member and new trigger design

    Post by jaeger22 Thu May 01, 2014 4:01 pm

    No I wasn't that smart. Sad  But you hit on the BIG question and I think only experimenting will answer that question for sure. The hammer spring I am using is actually  a hammer spring from an AR-15 rifle. It is a coil type something like the spring on a clothespin, but with coils on both sides of the spring. It looks like this:   
    New Member and new trigger design P_969000100_1

    I can adjust it somewhat by the amount of pre-load but but not quick or easy, For sure no screw adjustment. That would be very nice indeed but would add complication and should only be needed for the initial set up if at all. I could also adjust the mass of the inertia transfer bar. I am starting with it made of a single thickness of 3/8" tool steel, the same as the latch and the hammer. If I find I need more mass, I can make another one that is "fat" in the middle up to 7/8" if needed. But honestly, I expect that the hammer will have quite a snap and will transfer more than enough energy to overcome even the large force on the latch. I hope so, but only building it and experimenting will tell for sure.  
    But then again that is the FUN part!!  Very Happy
    Anatine Duo
    Anatine Duo
    Tinkerer

    If there is a will, there is a way.


    TinkererIf there is a will, there  is a way.


    Posts : 65
    Join date : 2013-10-07
    Location : Muskoka, Canada

    New Member and new trigger design Empty Re: New Member and new trigger design

    Post by Anatine Duo Mon May 05, 2014 5:53 pm

    It is an interesting concept, and you sure packed it tight together!

    Looking forward to seeing more
    avatar
    jaeger22
    Workshop Savvy

    Did you see my tool collection?


    Workshop SavvyDid you see my tool collection?


    Posts : 153
    Join date : 2013-03-15
    Age : 75
    Location : Orlando, FL

    New Member and new trigger design Empty Progress!

    Post by jaeger22 Sun May 11, 2014 11:22 am

    Well I got the rough machining mostly done. I still have to cut the scope mount into the top. This is turning out to be more work than I expected, but that is normal. Laughing  I count 22 parts so far. 7 machined parts and 15 purchased like screws, washers, and springs.
    I got all the machined internal parts done and cut the main body out of a 1" thick chunk of aluminum and the cover from a 3/8" slab. The 3/8" cover is cut away to match a mirror image of the main body so that the edges are 1/8" thick. I still have a lot of detail work to do but it is basically working now and I plan to do some testing soon. Just putting pressure on the claw with my hands, it works fine and has a crisp hair trigger. But I want to test it with something pulling at 100 to 200 LB and see if it will still release reliably.
    Here is the latest pictures:
    New Member and new trigger design P1010754_zps84034ba8

    Close up:

    New Member and new trigger design P1010757_zps77b628b0

    Other side and assembled:

    New Member and new trigger design P1010759_zps6d4a739b
    avatar
    chaz
    Crossbow Junkie

    I live here!


    Crossbow JunkieI live here!


    Posts : 313
    Join date : 2012-04-13
    Age : 75
    Location : Texas

    New Member and new trigger design Empty Re: New Member and new trigger design

    Post by chaz Sun May 11, 2014 11:37 pm

    Very nice progress !

    Chaz
    avatar
    jaeger22
    Workshop Savvy

    Did you see my tool collection?


    Workshop SavvyDid you see my tool collection?


    Posts : 153
    Join date : 2013-03-15
    Age : 75
    Location : Orlando, FL

    New Member and new trigger design Empty Re: New Member and new trigger design

    Post by jaeger22 Mon May 12, 2014 4:30 am

    Thanks Chaz, I got the Picatinny style scope rail cut in last night. I got in too much of a hurry or was just ham fisted on the mil and got a couple of the spacings off a bit but I think it will still still hold a scope just fine. I ordered a cheap red dot scope last night for it.
    Here is a picture with the rail cut.


    New Member and new trigger design P1010761_zps4adc9c34
    avatar
    chaz
    Crossbow Junkie

    I live here!


    Crossbow JunkieI live here!


    Posts : 313
    Join date : 2012-04-13
    Age : 75
    Location : Texas

    New Member and new trigger design Empty Re: New Member and new trigger design

    Post by chaz Mon May 12, 2014 8:03 am

    Be careful now you wouldn't want it to look like a "tackticle weapon"  ........do you intend to blue it?...
    might look good with a case hardened finish ........ something different. Obviously you have a plan and it seems to be coming together.

    Chaz
    avatar
    jaeger22
    Workshop Savvy

    Did you see my tool collection?


    Workshop SavvyDid you see my tool collection?


    Posts : 153
    Join date : 2013-03-15
    Age : 75
    Location : Orlando, FL

    New Member and new trigger design Empty Re: New Member and new trigger design

    Post by jaeger22 Mon May 12, 2014 3:26 pm

    Not a "tackticle weapon" for sure! LOL
    No I am just feeling my way along here. I ordered some recurve limbs and I bought some wood for a stock but no clear idea yet of what I will end up with. I figured to get the limbs, come up with some way to mount them up front to allow a center shot configuration with the string just touching the barrel. (like I have made before) Then test the bow for draw length and then design the stock around the bow and release. I am not even sure if I want to go old school rifle stock or more modern pistol grip.
    What do you guys think? ??? 
    The body of the release is Aluminum so bluing is out. I could anodize but that is a lot of work and I am impatient so I am just going to paint it.   
    My main goal, at least for this phase, is to get something together to test out the release/trigger design. Then maybe plan out a more advanced build for the next go around. Maybe a reverse draw set up.  Smile
    avatar
    chaz
    Crossbow Junkie

    I live here!


    Crossbow JunkieI live here!


    Posts : 313
    Join date : 2012-04-13
    Age : 75
    Location : Texas

    New Member and new trigger design Empty Re: New Member and new trigger design

    Post by chaz Mon May 12, 2014 6:18 pm

    Yes Sir I got caught up in the pictures ( worth a thousand words ) should have read the words. At any rate ........... sure looking forward to following your progress.

    Chaz
    avatar
    jaeger22
    Workshop Savvy

    Did you see my tool collection?


    Workshop SavvyDid you see my tool collection?


    Posts : 153
    Join date : 2013-03-15
    Age : 75
    Location : Orlando, FL

    New Member and new trigger design Empty More progress

    Post by jaeger22 Tue May 13, 2014 2:33 pm

    Well I panted the release and did what I hope is the final assembly. Smile  It is a bit of a pain to put together with all the springs, pins and washers. You have to hold the part with one hand, hold the spring in place with the other hand and push the pin in with the other hand.  scratch 
    I think I had it apart and back together about a dozen times before I got all the interference and binding issues resolved because I could not see what was binding or hitting when it was together. So I had to guess, cut and try. Rolling Eyes 
    Here is a picture of it with paint. Sorry it is a bit fuzzy.

    New Member and new trigger design P1010766_zpsa86e6b5f

    I made a cheap and dirty stock blank from 3 poplar boards from Home Depot, laminated together. 2 are 1" X 6" and one 1/4" in the center for a total thickness of 1.75". I cheated and used the my ancient milling machine to do the inletting for the release before the final glue up. Almost too easy. But I like easy!  Laughing 

    New Member and new trigger design P1010768_zps0b5af937

    Here it is with both sides of the blank together checking for fit.
    New Member and new trigger design P1010772_zps50c947fe

    The 1/4" board is in the center and dropped down 5/8"  from the other two to form the grove down the center.
    Now I have to wait for the glue to dry before I can shape the stock.
    Then it will be "fun with a wood rasp" for some time. . . .
    avatar
    jaeger22
    Workshop Savvy

    Did you see my tool collection?


    Workshop SavvyDid you see my tool collection?


    Posts : 153
    Join date : 2013-03-15
    Age : 75
    Location : Orlando, FL

    New Member and new trigger design Empty Re: New Member and new trigger design

    Post by jaeger22 Wed May 14, 2014 6:09 pm

    It shoots! cheers I got it rough shaped last night but I discovered that my limbs that I ordered from The Crossbow Store.com did not get included when my order shipped. The good folks there are fixing it and have another set on the way but I was impatient to see if the trigger/release would work so I pulled the bow(prod) off an old Xbow I made sometime back. That bow actually was made from the limbs from a recurve bow I made. The handle on that bow de-laminated leaving me with an extra set of limbs. It is very long and has a long draw for a xbow. Like 25".  Shocked  Fortunately I left the new stock very long until I see what the draw length turns out to be on the new bow.
    Anyway here is what it looks like with the long prod.
    New Member and new trigger design P1010780_zps0e3ae34a

    The bow only pulls about 75# so it is not the final test but so far it works great! It has not failed to fire once, and I love the trigger! It feels like the double set triggers on my BP target rifles, crisp and light.
    The only problem I am having with it is that when I shoot, the claw ends up bouncing back into the locked position about 1/2 the time. That is annoying because I have to check each time and it if it is locked, I have to push it forward and drop the hammer to get it unlocked.   Rolling Eyes
    I will have to think about that. scratch
    I plan to spend some more quality time with my spoke shave and wood rasp tonight finshing up the stock while I think about how I am going to mount the new limbs. scratch
    Todd the archer
    Todd the archer
    Crossbow Junkie

    I live here!


    Crossbow JunkieI live here!


    Posts : 581
    Join date : 2010-02-25
    Age : 61
    Location : sellersville,pa.

    New Member and new trigger design Empty Re: New Member and new trigger design

    Post by Todd the archer Thu May 15, 2014 2:28 am

    Do you have a spring on the string claw? Set to hold it in the open position, you should only need a little tension.

    Todd
    avatar
    jaeger22
    Workshop Savvy

    Did you see my tool collection?


    Workshop SavvyDid you see my tool collection?


    Posts : 153
    Join date : 2013-03-15
    Age : 75
    Location : Orlando, FL

    New Member and new trigger design Empty Re: New Member and new trigger design

    Post by jaeger22 Thu May 15, 2014 3:05 am

    Thanks Todd. Yes there is a light spring behind the claw. I may try making it stronger. Here is what I think is happening.
    When the claw releases the string, it rotates up of course and the bottom rotates forward until it contacts the front wall. I have a small section of hard rubber there on the front wall  to cushion the impact.
    It hits hard enough to bounce back to the cocked position. The same I expect as in a conventional trigger. This happens very fast, all in a few Milliseconds. However with a conventional trigger, the shooter still has the trigger pulled at that point so the spring quickly rotates it back to the fired position before we slow humans can let off the pressure on the trigger. So we never see it locked.
    But in my set up, there is no direct connection from the trigger to the claw or latch. The latch is just driven by a spring so it locks up anytime the bottom of the claw gets back far enough and it does it very very fast.  Sad 
    The only way I can release it is to "fan"the hammer. Not a big deal, just a minor iteration  but I would like to fix it. But I have too many other details to work out first, like how I am going to mount the bow limbs. scratch  I have some ideas but need to refine the design and start making the mounting bracket.
    Thanks again,
    John
    avatar
    jaeger22
    Workshop Savvy

    Did you see my tool collection?


    Workshop SavvyDid you see my tool collection?


    Posts : 153
    Join date : 2013-03-15
    Age : 75
    Location : Orlando, FL

    New Member and new trigger design Empty Re: New Member and new trigger design

    Post by jaeger22 Thu May 15, 2014 3:43 pm

    Will the stiffer spring behind the claw solved the problem. Thanks for the idea Todd!
    Todd the archer
    Todd the archer
    Crossbow Junkie

    I live here!


    Crossbow JunkieI live here!


    Posts : 581
    Join date : 2010-02-25
    Age : 61
    Location : sellersville,pa.

    New Member and new trigger design Empty Re: New Member and new trigger design

    Post by Todd the archer Fri May 16, 2014 2:26 am

    Is the spring behind the claw the same set up as in the mock up you made in your first post? The danger is if too strong it may give too much resistance for the hammer to overcome. If you could utilize two independent springs for the claw and the hook I think it has a better chance of working.

    Todd
    avatar
    MRobin
    Tinkerer

    If there is a will, there is a way.


    TinkererIf there is a will, there  is a way.


    Posts : 67
    Join date : 2012-09-01
    Age : 34
    Location : Paris, France

    New Member and new trigger design Empty Re: New Member and new trigger design

    Post by MRobin Fri May 16, 2014 4:42 am

    Another solution would be to add a "soft" locking system for the claw to stay in fired position.
    Maybe some sort of springy piece attached to the claw, with an angular tip that would fit into a hollow in the block.
    Will not bounce anymore, and easily unlocked by the string at the end of the drawing process.
    avatar
    jaeger22
    Workshop Savvy

    Did you see my tool collection?


    Workshop SavvyDid you see my tool collection?


    Posts : 153
    Join date : 2013-03-15
    Age : 75
    Location : Orlando, FL

    New Member and new trigger design Empty Re: New Member and new trigger design

    Post by jaeger22 Fri May 16, 2014 5:38 am

    Todd, you are exactly right and I went to two independent springs in the final (so far) design.
    You can see the claw spring here:
    New Member and new trigger design Spring_zps9ecd978d
    You can't see it in this picture but the latch spring is in the bottom and pushes the horizontal  leg of the latch up. You can see that here:

    New Member and new trigger design P1010757_zps77b628b0

    Robin, yes that might work but the stiffer spring seems to have solved the problem. It may even be stiffer than I need now so at some point I may want to play with it and see if I can get to Just stiff enough to avoid it locking.

    Well I screwed up on the stock big time. Embarassed  I shoud have know this but when I got the red dot scope yesterday and mounted it, it was immediately clear that the cheek pad was WAY too low to place my eye up high and in line with scope. So I hacked it up and added wood to make the high cheek piece. Looks like crap but it seems to work. I may just paint it to hide the ugliness. Rolling Eyes  I am glad now I used a cheap piece of wood for this working prototype. I would be really bummed if I had screwed up on a nice piece of wood.
    avatar
    jaeger22
    Workshop Savvy

    Did you see my tool collection?


    Workshop SavvyDid you see my tool collection?


    Posts : 153
    Join date : 2013-03-15
    Age : 75
    Location : Orlando, FL

    New Member and new trigger design Empty Re: New Member and new trigger design

    Post by jaeger22 Wed May 21, 2014 9:44 am

    Well I have to say I really like my release and will call this experiment a success! cheers I got the new limbs in and built center shot bracket. The bow is a short 30" tip to tip. I tested the bow and it pulls #140 at 14". So I cut down the stock to fit and mounted it. Here is what my little test bed looks like:
    New Member and new trigger design P1010796_zps2518abfd
    The hammer spur also acts as a built in hook for the cocking aid as you can see here:
    New Member and new trigger design P1010793_zps050b3090
    The release has worked flawlessly so far. I think I have between 50 and 100 shots through it and no issues at all. And the trigger feels just like a rifle trigger. Crisp and lite. I did test banging on the hammer with the hammer let down and I could not make it go off. So I feel that is very safe.
    Now I can start thinking about a serious build around this release/trigger. I learned a lot building this and it is fun to shoot. But I am not wild about the short bow and resulting short power stroke. Its power stroke is only 9 1/2 inches. Or the very short bolts (18") as they bury in the target deep enough to mess up the fletching a lot. It is nice and handy, like a carbine rifle, but I am only getting 193 FPS from 140 LB with the short light arrows and that is about the same as I was getting with the huge recurve bow with the longer and therefore heaver arrows and it only pulled 75 LB. That is about what I expected because the smaller bow is almost twice he pull weight but only about 1/2 the power stroke. So I am thinking something in the 34 to 36" bow range might be just right. Or maybe I will do a compound or even a reverse compound.  scratch Fun to think about.
    John
    Todd the archer
    Todd the archer
    Crossbow Junkie

    I live here!


    Crossbow JunkieI live here!


    Posts : 581
    Join date : 2010-02-25
    Age : 61
    Location : sellersville,pa.

    New Member and new trigger design Empty Re: New Member and new trigger design

    Post by Todd the archer Wed May 21, 2014 5:19 pm

    Great job! I have made a few with similar prods, but go with 3 1/2" brace plus 10" power stroke. I am getting around 210 fps with 410 grain arrows with silencers on the string. 

    Good going and am anticipating what you will build next.

    Todd

    Sponsored content


    New Member and new trigger design Empty Re: New Member and new trigger design

    Post by Sponsored content


      Current date/time is Thu Mar 28, 2024 3:04 pm