The Arbalist Guild

Would you like to react to this message? Create an account in a few clicks or log in to continue.

Crossbows - Everything about Building, Modding, and Using your Crossbow Gear

Latest topics

» What you building?
by hullutiedemies Tue Jul 09, 2024 12:39 am

» 12th Century Chinese Crossbow Chronographed
by stuckinthemud1 Fri Nov 24, 2023 3:50 pm

» Crossbow Stock
by kenh Tue Oct 31, 2023 6:19 am

» Colletiere a Charavines continuing experiment
by stuckinthemud1 Sat Oct 07, 2023 5:36 am

» Cocking - how
by stuckinthemud1 Thu Aug 03, 2023 4:24 am

» Questions around heavy crossbow lath buildin
by stuckinthemud1 Wed Apr 26, 2023 1:10 am

» Arab Crossbow
by stuckinthemud1 Tue Apr 25, 2023 7:57 am

» prod angle, and lever trigger for sale anyone?
by stuckinthemud1 Mon Mar 20, 2023 5:54 am

» flexible string
by jasper1978 Mon Mar 20, 2023 1:25 am

» [solved]Skane/Lillohus crossbow thread
by stuckinthemud1 Sun Mar 19, 2023 7:44 am

» jens sensfelder
by jasper1978 Wed Mar 08, 2023 11:58 pm

» 400lb Windlass crossbow bolts weight and accuracy shooting high.
by stuckinthemud1 Sun Mar 05, 2023 2:53 pm

» Codex Löffelholz crossbow
by stuckinthemud1 Tue Jan 24, 2023 4:14 pm

» Digitar prodsc
by stuckinthemud1 Sun Jan 15, 2023 2:42 pm

» Troubleshooting
by Andy. Fri Jan 06, 2023 12:29 pm

» Wood Prods
by stuckinthemud1 Fri Dec 30, 2022 12:47 pm

» Colletiere a Charavines crossbow
by stuckinthemud1 Fri Dec 30, 2022 8:54 am

» Simplified Löffelhotz speedloader
by stuckinthemud1 Fri Dec 09, 2022 4:05 pm

» Fiberglass H-bows
by c sitas Sat Nov 12, 2022 8:44 am

» Bad Antler
by drawknife Sat Nov 12, 2022 3:48 am

» Anyone make their own bolts?
by Juniper Mon Oct 17, 2022 8:20 am

» Josef alm in English
by Juniper Sat Oct 15, 2022 4:22 am

» Qin/Han lock drawings
by kenh Fri Sep 23, 2022 8:16 pm

» stirrup dimensions?
by stuckinthemud1 Thu Sep 01, 2022 1:49 pm

» Skane/Lillohus lockbow information needed
by stuckinthemud1 Sun Aug 14, 2022 6:23 am


5 posters

    Forged Prod #2

    OrienM
    OrienM
    Workshop Savvy

    Did you see my tool collection?


    Workshop SavvyDid you see my tool collection?


    Posts : 195
    Join date : 2014-08-01
    Age : 48
    Location : New Mexico, USA

    Forged Prod #2 Empty Forged Prod #2

    Post by OrienM Sun Aug 24, 2014 2:20 pm

    Howdy Folks,

    Over the last few weeks I've gotten started on my new forged prod. As you may recall my last attempt used 1/4" thick steel and was far too lightweight; this one is roughly the same dimensions but 3/8" thick, and I expect a much higher draw weight...hopefully!  tongue

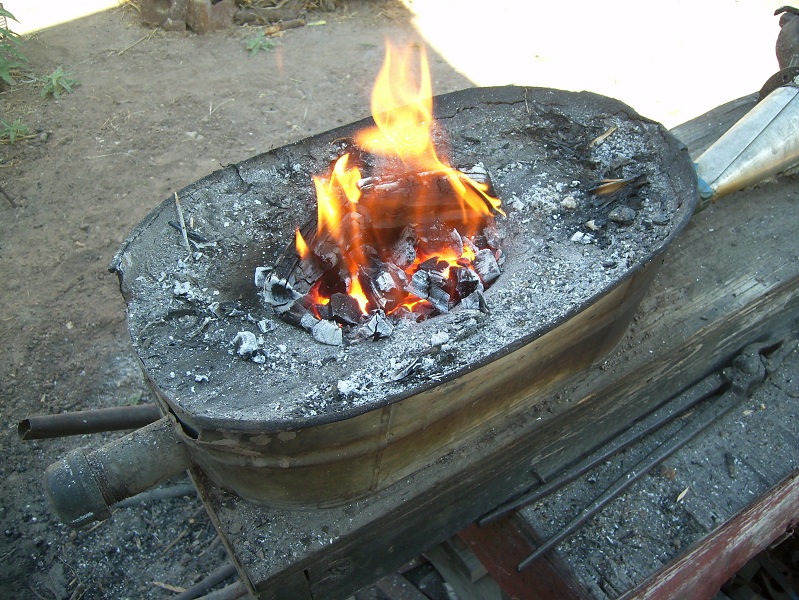
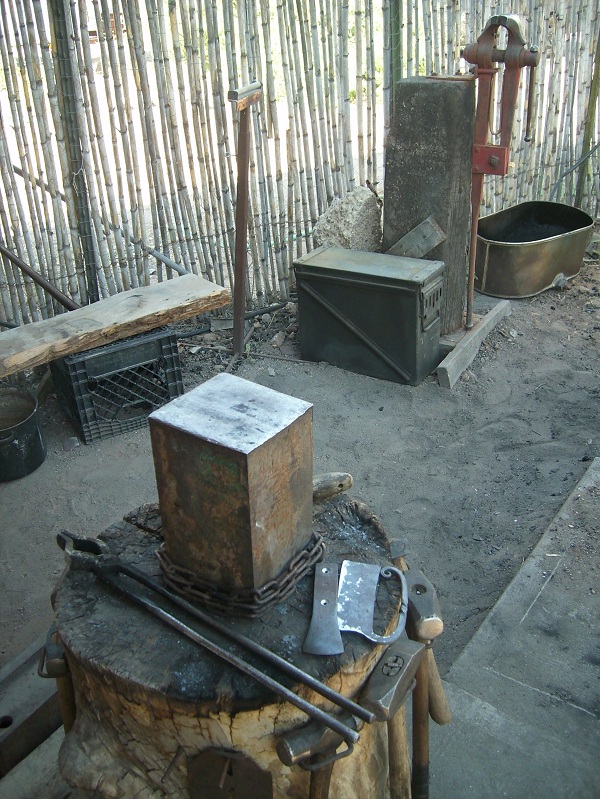
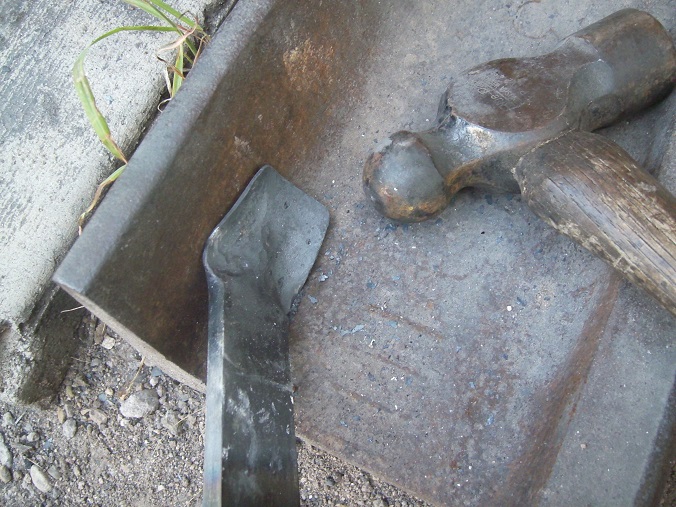
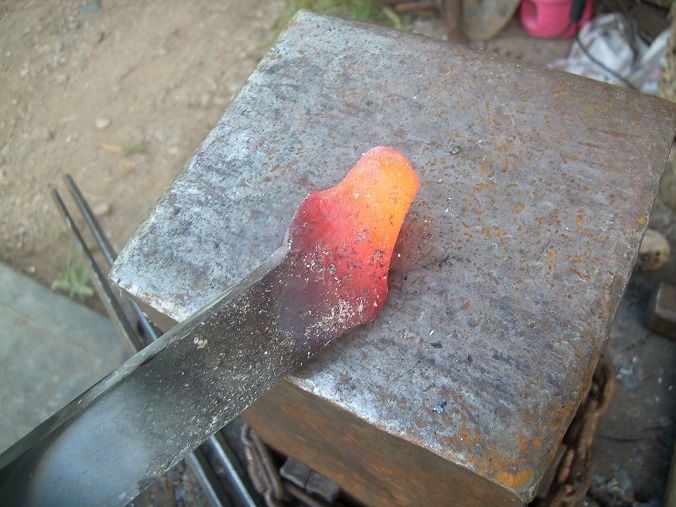
    First, a couple pics of my forge and tools. The forge is wood/charcoal fired, and is hooked to an antique hand cranked blower for the air. My anvil is just a big block of steel, and I have a selection of hammers and files as well as an angle grinder and few other power tools.

    Forged Prod #2 <a href=Forged Prod #2 011_zps69b42f91" />

    Forged Prod #2 <a href=Forged Prod #2 008_zpsaaf64b10" />


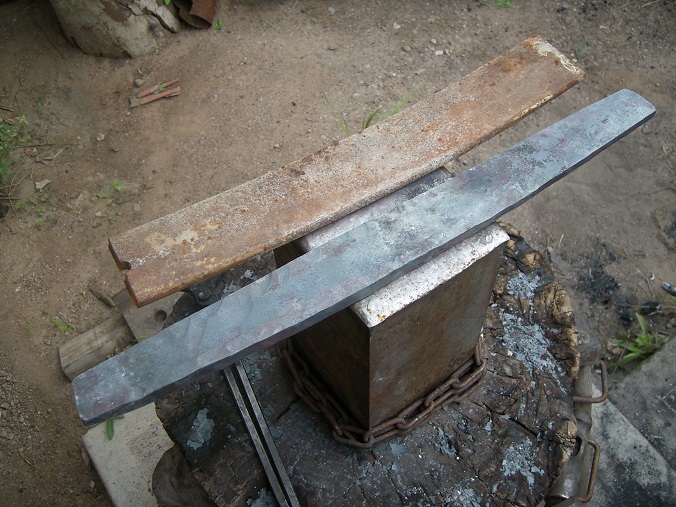
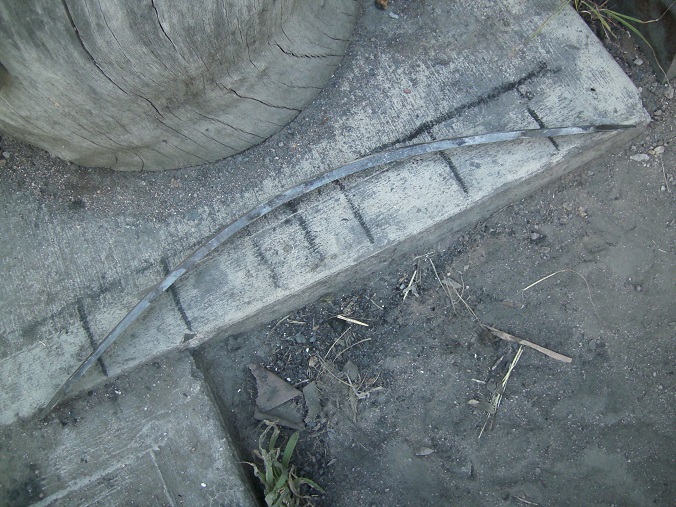
    For my prod, I used an old 5160 leaf spring, a heavy truck spring of some sort. Here's the very rough forging next to the other half of the spring:

    Forged Prod #2 <a href=Forged Prod #2 Prod2-1_zps5ede0a7e" />

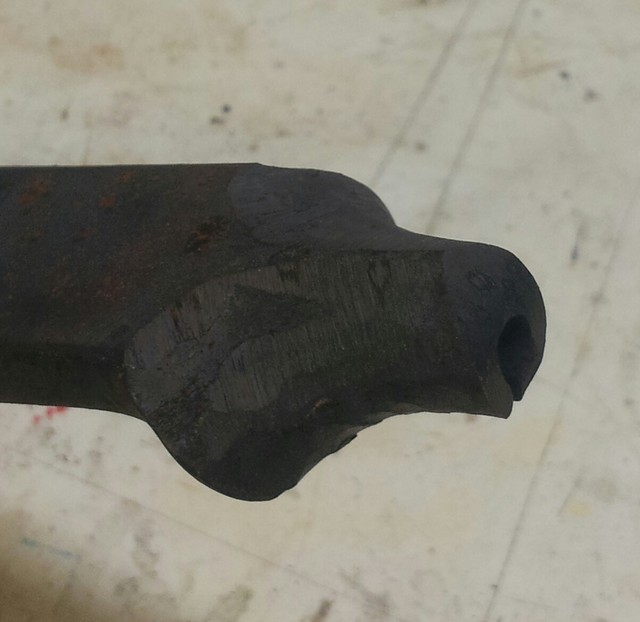
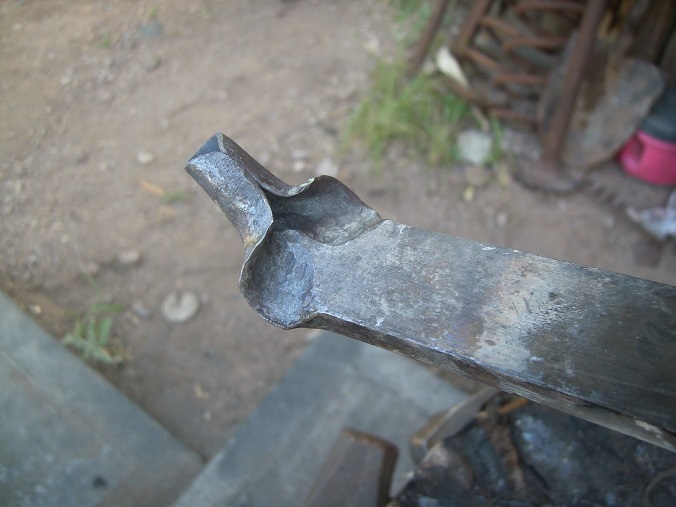
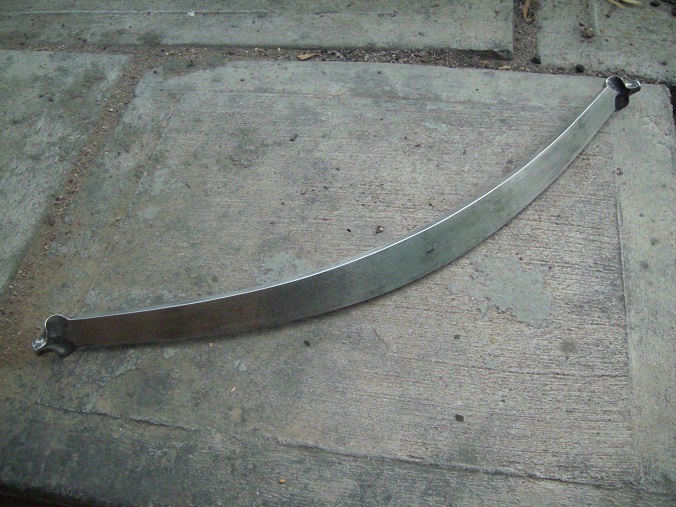
    To start with I just worked the bar down close to the intended dimensions (1 1/2" x 3/8" @ center, 1" x 9/32" @ nock transition). Based on Payne-Galloway, I made the thickness taper reduce by 1/4, and the width taper by 1/3. I went for the maximum length I could get, which turned out to be 26" (a few inches shorter than PG calls for). The reduced length should increase the draw weight, at some cost in draw length.

    Forged Prod #2 <a href=Forged Prod #2 Prod2-2_zpsf3f454fb" />


    Last edited by OrienM on Sun Aug 24, 2014 2:59 pm; edited 1 time in total
    OrienM
    OrienM
    Workshop Savvy

    Did you see my tool collection?


    Workshop SavvyDid you see my tool collection?


    Posts : 195
    Join date : 2014-08-01
    Age : 48
    Location : New Mexico, USA

    Forged Prod #2 Empty Re: Forged Prod #2

    Post by OrienM Sun Aug 24, 2014 2:34 pm

    Some more careful forging to refine the tapers, then I bent the tip rise in, and flattened out the ears for nocks:

    Forged Prod #2 <a href=Forged Prod #2 Prod2-3_zps20bae656" />

    Ground the scale off, and trimmed the 'ears':

    Forged Prod #2 <a href=Forged Prod #2 Prod2-6_zps3987fe56" />

    Then I started filing the surfaces true...once this face and the concave edge are trued up, I'll use them as a reference to measure out the other two. 

    Forged Prod #2 <a href=Forged Prod #2 Prod2-5_zps7df616c0" />

    And that's as far as I've gotten as of today. Looking forward to lots and lots of hand filing ahead... lol! 

    Thanks for looking! I'd love to hear questions, comments, dire safety warnings, guesses about draw weight, or anything else.

    A question: after the filing, I'll be looking at deflexing the prod. What sort of deflex is appropriate for a brace height of around 3 1/2"? I want a good early-draw weight, without over-stressing the prod at full draw...bit of a balancing act, I suppose.

    -Orien


    Last edited by OrienM on Sun Aug 24, 2014 2:56 pm; edited 1 time in total
    OrienM
    OrienM
    Workshop Savvy

    Did you see my tool collection?


    Workshop SavvyDid you see my tool collection?


    Posts : 195
    Join date : 2014-08-01
    Age : 48
    Location : New Mexico, USA

    Forged Prod #2 Empty Re: Forged Prod #2

    Post by OrienM Sun Aug 24, 2014 2:51 pm

    I forgot to mention, I'm hoping for around a 300-400# draw weight, with a power stroke of probably 4 1/2"-5". I'll be spanning with a wippe, so that will limit the potential weight I can deal with. I have no idea, pretty much, what kind of weight to expect out of my prod... Razz
    kenh
    kenh
    Crossbow Junkie

    I live here!


    Crossbow JunkieI live here!


    Posts : 884
    Join date : 2012-08-03
    Age : 76
    Location : Living Aboard a Sailboat in Fort Myers, FL

    Forged Prod #2 Empty Re: Forged Prod #2

    Post by kenh Sun Aug 24, 2014 4:04 pm

    Lookin' good!
    avatar
    Rizzar
    Workshop Savvy

    Did you see my tool collection?


    Workshop SavvyDid you see my tool collection?


    Posts : 194
    Join date : 2012-08-11
    Location : Germany

    Forged Prod #2 Empty Re: Forged Prod #2

    Post by Rizzar Mon Aug 25, 2014 5:51 am

    Hey, 

    It seems to me you thinned the ends on the wrong (or lets say suboptimal) side.
    As you have to smooth the string side anyway the forging would be better on the belly than the back of the prod.
    The examples I have here from a very professional maker have the same site thinned out.
    Forged Prod #2 Ends10


    To make stimations about draw weight one question: the 26" include the nocks, don´t they??

    My calcs work better on unidirectional taper, but the equation says (if nocks are about 30mm long)
    a maximum force of about 2850 N at 4.8" of draw . (Rough calculated estimation without any warranty!!!!)


    Rizzar
    Nick D
    Nick D
    Fresh Blood

    Doesn't mean
    I'm new to crossbows


    Fresh Blood Doesn't meanI'm new to crossbows


    Posts : 25
    Join date : 2014-08-04
    Location : Michigan

    Forged Prod #2 Empty Re: Forged Prod #2

    Post by Nick D Mon Aug 25, 2014 8:03 am

    Looking very nice!

    Question about the marks in the second to the last pic (they look like Sharpie lines?), what is the one on the left marking?  Is it where you'll put the deflex?
    OrienM
    OrienM
    Workshop Savvy

    Did you see my tool collection?


    Workshop SavvyDid you see my tool collection?


    Posts : 195
    Join date : 2014-08-01
    Age : 48
    Location : New Mexico, USA

    Forged Prod #2 Empty Re: Forged Prod #2

    Post by OrienM Mon Aug 25, 2014 8:39 am

    Thanks very much for the comments!

    Rizzar: thank you for the estimation of draw weight, rough or not! The 26" measure does include the nocks. Converted to pounds that looks to be over 600#...we will see if I can span this beast at all Shocked .

    At this point the prod has no defined belly or back, I can roll the nocks either way and deflex the prod appropriately. My intention was to roll them toward the flat side, as your picture shows; I think it makes for a better string-bearing surface.

    Nick: the sharpie marks show the ear transition points, 1/2, and 1/4 the length of the prod...just rough marks to let me 'eyeball' the curves more accurately. Once I have two true surfaces, I'll be marking out finer divisions to help me measure the width tapers out.
    Nick D
    Nick D
    Fresh Blood

    Doesn't mean
    I'm new to crossbows


    Fresh Blood Doesn't meanI'm new to crossbows


    Posts : 25
    Join date : 2014-08-04
    Location : Michigan

    Forged Prod #2 Empty Re: Forged Prod #2

    Post by Nick D Mon Aug 25, 2014 9:23 am

    If you do wind up with a high draw weight like that, better get to work on the cranequin!
    avatar
    Rizzar
    Workshop Savvy

    Did you see my tool collection?


    Workshop SavvyDid you see my tool collection?


    Posts : 194
    Join date : 2012-08-11
    Location : Germany

    Forged Prod #2 Empty Re: Forged Prod #2

    Post by Rizzar Mon Aug 25, 2014 9:24 am

    Hey there...


    Now I see my eyes were confused.

    You made a very high tip rise, It occured to me as if it was a deflex on the pictures.
    Yes, rolling to the Flat side is the much better way.

    But I´m afraid you will really run into problems with a tip rise like that on heavy crossbows.

    The lever action on the tiller will be enormous and can lead to loosening prod binding and breaking of the tiller itself. Talked to Jens Sensfelder about that when ordering my 2700N bow some time ago, he suggested me to stay with a flat upper prod lineinstead of chasing the high tip rise for better performance.

    Another concern is the spanning method of a wippe, you got to try it out, long lever wippes could possibly do the job, but it is a bit high poundage for that spanning device.
    You are building a simple one-axle lock? Wippes usually work only with the ability to "span" the mechanism (rotate the nut, close the claplock etc) due to no obstacles when moving the string.


    A regular warm bent, even distributed deflex should not negatively imply the draw of the prod (simple model of behavior, complex is another thing leads to an improved slingshot effect when deflexing more...), you should get your deflex near your preferred brace height with the string preventing backward bending when fireing. Dont think about adding any reflex except the angle of the nocks.
    Believe me, it´ll be difficult enough to string the prod without a cranc.


    Can you please make pictures (step by step) or a vid when forming the nocks from now on, I am curious about the technic you want to use??

    By the way, I wish you good luck with that bow.
    I would not dare to make one of that dimensions, especially when it is one of the first ones.

    Greetigs Rizz
    OrienM
    OrienM
    Workshop Savvy

    Did you see my tool collection?


    Workshop SavvyDid you see my tool collection?


    Posts : 195
    Join date : 2014-08-01
    Age : 48
    Location : New Mexico, USA

    Forged Prod #2 Empty Re: Forged Prod #2

    Post by OrienM Mon Aug 25, 2014 10:06 am

    Yeah, I may need a cranequin or a windlass, I guess Razz . I'll be able to string and test it using a come-along winch (while standing back for safety, even!) but of course that won't work that well for regular spanning. I can potentially file the thickness down some, or trim the width, if it seems completely over-the-top unmanageable.

    Thanks again, Rizzar...I'm quite new to crossbows, and prod geometry is quite different from handheld bows! I set the center of the tips at 1/2" above the upper, center edge. I can see the potential for enormous leverage there, and was intending to install large rivets vertically through the tiller on both sides of the prod to prevent cracking. (I noticed a lot of repaired cracks in this area on historical bows, by the way.) By lifting the tips some, I want to avoid high pressure of the string on the deck, and also the string "climbing the claws" of the nut and misfiring (which appeared to be caused by lack of tip rise and the correspondingly steep prod-mounting angles). I'm still feeling my way to an approprate amount of rise, and I can still reforge if necessary, too.

    The lock will be a simple, non-set-trigger, double-axle type, which I had some success with on my first build. It appears to work well with the wippe, easy enough to rotate the nut back along with the string. I'm not completely sure how it will do with a lot more weight behind it, though...

    I'd be happy to get some step-by-step photos of rolling the nocks. The technique is actually quite simple, mostly done on the anvil's edge with a small hammer.
    OrienM
    OrienM
    Workshop Savvy

    Did you see my tool collection?


    Workshop SavvyDid you see my tool collection?


    Posts : 195
    Join date : 2014-08-01
    Age : 48
    Location : New Mexico, USA

    Forged Prod #2 Empty Re: Forged Prod #2

    Post by OrienM Sun Sep 14, 2014 8:06 pm

    Checking in here with an update...I've made some more progress on my prod. The nocks are now rolled into shape, and the limbs filed and sanded smooth, ready for heat-treating.

    Next step will be to buy myself a larger quench bucket, and a few more gallons of canola oil to quench in; I'll also need to set up my ground forge, which has a 'hot spot' of some 30" so I can heat the whole prod evenly.

    I took a few more photos as I went along...observant viewers will note that I ended up rolling the nocks 'backwards', away from the flat side. I did this partly out of curiosity, and partly to make the 'ears' as wide as possible...I also like the way it looks. I hope it won't end up causing a structural problem with the nocks; we will find out soon enough if it does nooo


    Putting in the deflex...to avoid denting the limbs I used a wooden mallet over a log 'anvil':
    Forged Prod #2 Prod2-7_zps54e14184

    Using the inside curve of a piece of railroad track to start rolling the tips:
    Forged Prod #2 Prod2-9_zps9b36e326

    Using the edge of the anvil to set the 'shoulder', and continue rolling up the tip:
    Forged Prod #2 Prod2-10_zps9770e769

    For better control I used a light hammer, it took quite a few heats to get the shape where I wanted it:
    Forged Prod #2 Prod2-11_zpsb342ad62

    The final nock shape, before filing and trimming:
    Forged Prod #2 Prod2-12_zpsb0856a70

    After clean-up:
    Forged Prod #2 Prod2-13_zps84b638ad

    I'm really looking forward to the heat-treatment; once it's hardened and tempered I can start trying to bend this thing!

    what now? 
    -Orien
    kenh
    kenh
    Crossbow Junkie

    I live here!


    Crossbow JunkieI live here!


    Posts : 884
    Join date : 2012-08-03
    Age : 76
    Location : Living Aboard a Sailboat in Fort Myers, FL

    Forged Prod #2 Empty Re: Forged Prod #2

    Post by kenh Sun Sep 14, 2014 8:47 pm

    Really lookin' good there, Orien!!   Love the 'backwards rolled nocks.  Let's hope the work!
    Nick D
    Nick D
    Fresh Blood

    Doesn't mean
    I'm new to crossbows


    Fresh Blood Doesn't meanI'm new to crossbows


    Posts : 25
    Join date : 2014-08-04
    Location : Michigan

    Forged Prod #2 Empty Re: Forged Prod #2

    Post by Nick D Sun Sep 14, 2014 9:07 pm

    Nice, Orien! 

    I like using a rock hammer for rolling like that (similar to rolling sockets for arrowheads).  The long, thin, curved peen is great for that. 

    Good luck on the heat treat!
    avatar
    Rizzar
    Workshop Savvy

    Did you see my tool collection?


    Workshop SavvyDid you see my tool collection?


    Posts : 194
    Join date : 2012-08-11
    Location : Germany

    Forged Prod #2 Empty Re: Forged Prod #2

    Post by Rizzar Wed Sep 17, 2014 12:01 pm

    OrienM wrote:...observant viewers will note that I ended up rolling the nocks 'backwards', away from the flat side. I did this partly out of curiosity, and partly to make the 'ears' as wide as possible...I also like the way it looks. I hope it won't end up causing a structural problem with the nocks; we will find out soon enough if it does nooo ...


    Hey Orien.

    I like your forging skills and the simplicity behind those steps when seen on the pictures. Made myself a lot of work with my first ones, and I envy the skill when thinning out in important areas.

    But when remembering your first prod and the aim to make it right with a better and stronger one I do not understand the curiosity that led to the decision trying out to thin the nocks in the opposite direction.
    When pointing to the bending direction I intended to prevent this possibility.

    I really see structual disadvantages in the way you made it.

    No matter what material you use, every bowyer will tell you, do not leave weakpoints on the back/stretched side of the bow.
    It is like you build a yew warbow with a cut through the sapwood just before the nocks.

    If you bring this bow to its calculated maxtension, the chance that the ends will not stand the stretching forces is very high.
    If it stands the forces, the question will be: how long.

    I am sorry i have to say this, but I am concerned about your health.
    It is dangerous enough to make your own prods, but I dont get why trying exotic thoughts on the first dozens, especially in the xhundret pounds class.


    As I mentioned before, I like what you have made and appreciate your skill, but I fear you made a wrong decision...

    Greetings Rizzar /Martin
    avatar
    MRobin
    Tinkerer

    If there is a will, there is a way.


    TinkererIf there is a will, there  is a way.


    Posts : 67
    Join date : 2012-09-01
    Age : 34
    Location : Paris, France

    Forged Prod #2 Empty Re: Forged Prod #2

    Post by MRobin Wed Sep 17, 2014 1:38 pm

    Absolute lack of experience or knowledge in metal working here, but I still would agree with this last post, those tips seem dangerous to me. I don't know if it can be redone another way without ruining the whole bow.
    OrienM
    OrienM
    Workshop Savvy

    Did you see my tool collection?


    Workshop SavvyDid you see my tool collection?


    Posts : 195
    Join date : 2014-08-01
    Age : 48
    Location : New Mexico, USA

    Forged Prod #2 Empty Re: Forged Prod #2

    Post by OrienM Wed Sep 17, 2014 3:45 pm

    Thank you all for your comments! I really appreciate the feedback. I'm an experienced metalworker, but very new to making crossbows; it's great to have the more knowledgeable builders here to bounce things off of.

    I must admit, I often get ideas and feel compelled to try them out, this is probably one of those times. It's absolutely not my intention to do dangerous things and worry anyone, or be contrary on purpose!
    Despite how it may appear  sander I am very concerned about safety. Rest assured I'll taking a lot of precautions when I start testing out my prod: I'll be backing the prod with fiberglass strapping before wrapping the entire thing in duct tape, and pulling it with a "come-along" ratcheting winch at a distance, from behind a plywood baffle. I'm intending to test it to a draw length slightly longer than what I intend to actually use, and will install a leather/cordage safety strap on the finished prod, if it actually survives all this.

    Several factors led me to reverse the tips...the main one was a small remnant of the forged surface left on what's now the prod's belly. Removing it completely would have thinned the middle of the prod too much, and I thought it would be better to have it on the belly, rather than the back. The other factor, as I mentioned above, was a desire to have the 'shoulder' part of the nocks as wide as possible. My first attempt at forging these nocks had a narrower shoulder, and the string ended up looking as though it could potentially slide off. This time, I tried to exaggerate the width, and unfortunately my idea of reversing the direction left the transitional area quite wide, flat, and thinned-out.

    It actually would be totally possible to reforge these the other way. By driving a punch into the end at heat I can open the nock back up, flatten it out, and then reverse the deflexing and re-roll the ends.

    Another option is to cut the nocks off, draw out the prod a little longer, and remake them going the other way. I'll admit I'm fairly tempted to just heat treat it and test the prod to overdraw or failure brew ...(taking all the above precautions, of course!). It's definitely brutal, but it will tell me what I want to know; If a nock bends or breaks off, then I can just trim off the ends and forge new nocks going the right direction.

    Crazy idea? Or should I just bite the bullet and rework it now?
    avatar
    Rizzar
    Workshop Savvy

    Did you see my tool collection?


    Workshop SavvyDid you see my tool collection?


    Posts : 194
    Join date : 2012-08-11
    Location : Germany

    Forged Prod #2 Empty Re: Forged Prod #2

    Post by Rizzar Thu Sep 18, 2014 12:09 am

    Good morning

    Concerning those forge remnants interesting thing is that historical examples were often not perfectly plain, too. But in these occasions it is a matter it going to the max or leave higher safety.


    If you test your bow, the most dangerous part will in this situation be a breaking nock, but how to secure it without alternating the system too much.
    I can not see good precautions avoiding the nock and the string rotating/flying around the closer range.
    Of course, a completely shatterering bow will be an imminent danger, too, but this can be secured with more ease.

    Considering that you perhaps would want to shoot the bow in your hands, I see the most dangerous situation in the shot itself.
    The applied forces are brutal and alternating in direction. Vibrations will challenge every weakness.
    The situation will not be improving during the bows lifetime.


    But that is another thing.


    When working out the tips, I would suggest you to keep the middle line untouched up to the end of the nocks.
    Best solution to ensure the material tension will distribute evenly through the whole length.
    Thinning or grinding out (I cut out a leafe sized part at my prod ends when making mine, since i am not routined in drawing out metal) from the belly side with no reworking on the back ensures to have the back as plain as possible.
    Even when bending the tips forward, i´d suggest to working on the corner of the anvil instead of punching into an angle from the back, Best would be not to use any hammer strikes at all and no sharp corners.
    Try to leave as little forging marks as possible, and this counts for the inner nocks, too.
    Sand it as far, and as smooth as you can get (unidiretional with no remaining vertical scratches).


    If you think you can rework your nocks then try it. If you have to cut them down or half them to safe length.
    But be sure, try to be as perfect, as possible.

    What about your forging remnant in the prod center? Picture?
    In that case, anyway every case of a selfmade prod in that power range, I suggest a safety strap to.


    The bow is the most crucial part in a crossbow, considering building a decent crossbow takes many hours, I would not want to make any compromises that can cost me the crossbow or limit my joy on the peace of work.


    Unsurprisingly impatience is a problem with this kind of work^^

    Hope I helped you with my comments.
    But I am sure I did not write many new things in this post.

    Martin

    Sponsored content


    Forged Prod #2 Empty Re: Forged Prod #2

    Post by Sponsored content


      Current date/time is Fri Jul 26, 2024 10:24 pm