The Arbalist Guild

Would you like to react to this message? Create an account in a few clicks or log in to continue.

Crossbows - Everything about Building, Modding, and Using your Crossbow Gear

Latest topics

» 12th Century Chinese Crossbow Chronographed
by stuckinthemud1 Fri Nov 24, 2023 3:50 pm

» Crossbow Stock
by kenh Tue Oct 31, 2023 6:19 am

» Colletiere a Charavines continuing experiment
by stuckinthemud1 Sat Oct 07, 2023 5:36 am

» Cocking - how
by stuckinthemud1 Thu Aug 03, 2023 4:24 am

» Questions around heavy crossbow lath buildin
by stuckinthemud1 Wed Apr 26, 2023 1:10 am

» Arab Crossbow
by stuckinthemud1 Tue Apr 25, 2023 7:57 am

» prod angle, and lever trigger for sale anyone?
by stuckinthemud1 Mon Mar 20, 2023 5:54 am

» flexible string
by jasper1978 Mon Mar 20, 2023 1:25 am

» [solved]Skane/Lillohus crossbow thread
by stuckinthemud1 Sun Mar 19, 2023 7:44 am

» jens sensfelder
by jasper1978 Wed Mar 08, 2023 11:58 pm

» 400lb Windlass crossbow bolts weight and accuracy shooting high.
by stuckinthemud1 Sun Mar 05, 2023 2:53 pm

» Codex Löffelholz crossbow
by stuckinthemud1 Tue Jan 24, 2023 4:14 pm

» Digitar prodsc
by stuckinthemud1 Sun Jan 15, 2023 2:42 pm

» Troubleshooting
by Andy. Fri Jan 06, 2023 12:29 pm

» Wood Prods
by stuckinthemud1 Fri Dec 30, 2022 12:47 pm

» Colletiere a Charavines crossbow
by stuckinthemud1 Fri Dec 30, 2022 8:54 am

» Simplified Löffelhotz speedloader
by stuckinthemud1 Fri Dec 09, 2022 4:05 pm

» Fiberglass H-bows
by c sitas Sat Nov 12, 2022 8:44 am

» Bad Antler
by drawknife Sat Nov 12, 2022 3:48 am

» Anyone make their own bolts?
by Juniper Mon Oct 17, 2022 8:20 am

» Josef alm in English
by Juniper Sat Oct 15, 2022 4:22 am

» Qin/Han lock drawings
by kenh Fri Sep 23, 2022 8:16 pm

» stirrup dimensions?
by stuckinthemud1 Thu Sep 01, 2022 1:49 pm

» Skane/Lillohus lockbow information needed
by stuckinthemud1 Sun Aug 14, 2022 6:23 am

» need help contacting le musee Dauphinois Grenoble
by stuckinthemud1 Sat Aug 13, 2022 3:22 pm


5 posters

    Reverse limb "Test" crossbow

    Kali
    Kali
    Fresh Blood

    Doesn't mean
    I'm new to crossbows


    Fresh Blood Doesn't meanI'm new to crossbows


    Posts : 31
    Join date : 2010-01-29

    Reverse limb "Test" crossbow - Page 2 Empty Reverse limb "Test" crossbow

    Post by Kali Tue Feb 16, 2010 11:33 pm

    First topic message reminder :

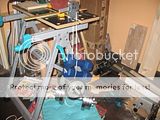
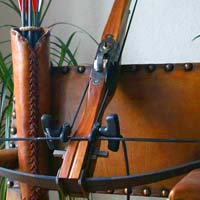
    During last weeks I started to build a "test" crossbow (in fact I just plan the design, gathered the materials and prepared some spare parts):
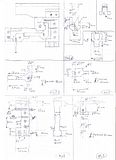
    The design to be tested: Reverse limb configuration + full compound system.
    To speed the process, I've built 2 straight limbs, using 2 layers of clear fiberglass and 2 strips of action bamboo (the laminated limbs are made using 4 laminations totaling 7 cm thickness, 4cm wideness and 45 cm in length). I will say that the limbs are pretty soft (I estimate a max draw weight of just 20kg), but, for testing purpose will be just perfect
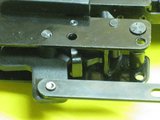
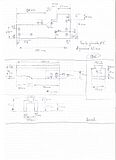
    I also designed a trigger system and made calculations regarding limbs alignment : the limbs will have to be oriented 30 grades away from the stock in order to achieve a draw length of 50cm. Aiming a draw length longer than the limbs, I had to place the trigger in the back of the riser - from this perspective, I had to design the riser a little wider, each limb being 10cm away from the stock (to be able to cook the bow by hand and not to get the rope passing over the riser)
    I also built 2 pulleys (round and with the hole in the middle). Here I made a mistake, building the pulleys with 2 x 6mm thick ball bearing inside - this leading to a 15mm overall thickness (I think that it will be too much to cut a 15mm hole in the 40mm limbs tops). This week i will build another pulleys using just 1 ball bearing, leading to just 10mm thickness.
    Unlike Ivo, i choose to build the metal spare parts to a machine shop to get better accuracy (especially for the riser that will have to be perfect aligned and for the pulleys ...). Up to the end of this week I will have to have ready the trigger mechanism components and the new pulleys. Next week I should get the riser and to start assembly the crossbow. I will start to take and display pictures as the works will progress.
    Ivo
    Ivo
    Admin
    Admin


    Posts : 1041
    Join date : 2009-11-25
    Age : 36
    Location : NJ, USA

    Reverse limb "Test" crossbow - Page 2 Empty Re: Reverse limb "Test" crossbow

    Post by Ivo Mon Mar 01, 2010 2:05 pm

    Very nice touch with a video(especially for slow people like me Reverse limb "Test" crossbow - Page 2 Icon_lol )

    The safety is usually recommended to be placed in such a way that it blocks the transitional piece used for retaining the release(in your case the piece with the bearing) and not the actual trigger hook.

    Adding a safety usually isn't a problem, especially in a trigger wit hso much space inside. The interesting moment begins when you try to think where to actually have the safety switch Reverse limb "Test" crossbow - Page 2 Icon_wink > on the side? > on the back of the trigger? > in front of the trigger hook? > incorporated into the pistol grip? >on the forearm of your crossbow? One may be easier than the other, but the other maybe more favorable in comfort of use in various environments. Reverse limb "Test" crossbow - Page 2 Icon_tongue

    As for the housing and millions of bolts sticking out...I'll be back a little later today with a few pictures of a Chinese made crossbow trigger(modern one of coarseReverse limb "Test" crossbow - Page 2 Icon_smile)
    Pavise
    Pavise
    Dear Friend, You will be Greatly Missed.
    Dear Friend, You will be Greatly Missed.


    Posts : 128
    Join date : 2010-02-07

    Reverse limb "Test" crossbow - Page 2 Empty Re: Reverse limb "Test" crossbow

    Post by Pavise Mon Mar 01, 2010 4:23 pm

    With all due respect here guys I think this trigger might not act desirably when highly loaded with string pressure. The mini roller bearing is a good idea to reduce friction but the way I see it, this simple vertical trigger lever may be overcome by reverse action originating at the claw sear which might too easily roll over the bearing. Just my observation for what it's worth.

    Let's be careful out there by testing everything before commitment in front of our fragile bodies!

    I have found RC model shops to be a good source of mini bearings as well as some that are sold by various shops that carry replacement ones for wood router bits.

    Pavise
    Kali
    Kali
    Fresh Blood

    Doesn't mean
    I'm new to crossbows


    Fresh Blood Doesn't meanI'm new to crossbows


    Posts : 31
    Join date : 2010-01-29

    Reverse limb "Test" crossbow - Page 2 Empty Re: Reverse limb "Test" crossbow

    Post by Kali Mon Mar 01, 2010 11:09 pm

    Hi Pavise,
    Thank you very much for your concern and advise.
    I was also thought myself about this during the design phase and I did tested several alignments for the claw and the bearing piece. When the claw is looked in place by the string, there is a slight angle there, moving the bearing uphill to release. All tests were conducted using a 25kg (55lb) pull weight and i can say that there is no way that the string to escape - other than pulling the trigger or braking some parts inside. Initially i used a 5mm thick aluminum housing that looked to be too unsafe to me - this why i switched to steel housing.
    Later today I will take some pictures with the "testing device" loaded with 25 kilos Smile
    Ivo
    Ivo
    Admin
    Admin


    Posts : 1041
    Join date : 2009-11-25
    Age : 36
    Location : NJ, USA

    Reverse limb "Test" crossbow - Page 2 Empty Re: Reverse limb "Test" crossbow

    Post by Ivo Tue Mar 02, 2010 1:40 am

    I think what Pavise is trying to say is that this type of trigger is "very sensitive" to increase in draw weight. So if you intend to use it with higher powered limbs you should definitely test it with an even higher draw weight test setup before proceeding...I believe you are aiming for about 100lb draw weight...right? Meaning 200lb(limbs)/2(rollers)=100lb actual draw weight? Then the testing load should be almost double that 175-195lb...That's how I would test it.

    I hear the tech guys say that it is better to have something break right
    away while testing rather than for it to break with time when you least expect it...so it is also interesting to know how such mechs are tested...how close do they let the tolerances get in the industry. Reverse limb "Test" crossbow - Page 2 Icon_question

    Anyway...test it to exceed expectations and if it isn't performing good enough and there is doubt>>>the string latch is strong stuff and a proven sear based mech made of matching material can still be made just as this one on Robin's site >>> Link ...it is for you to decide Kali...you are the man in charge of this machine and we are only making suggestions. Reverse limb "Test" crossbow - Page 2 Icon_smile

    About those pictures I promised...here we go.

    Reverse limb "Test" crossbow - Page 2 Th_IMG_3140

    If I'm correct all you would have to do is slightly countersink the holes and hammer flat a rivet pin little by little on both sides...then once you have them hammered flat I'm sure they are not going to be flush with the mech walls, so file it down slightly and finish it with a center punch tool(it will further spread the rivet end in the opening)...I simply used cutoff nails and in some places cold rolled steel rod...holding 150lb so far with no problems, but then again I have a very flat/tight trigger mech. so make sure you test yours with care accounting for the design. Good Luck! Reverse limb "Test" crossbow - Page 2 Icon_wink
    Kali
    Kali
    Fresh Blood

    Doesn't mean
    I'm new to crossbows


    Fresh Blood Doesn't meanI'm new to crossbows


    Posts : 31
    Join date : 2010-01-29

    Reverse limb "Test" crossbow - Page 2 Empty Re: Reverse limb "Test" crossbow

    Post by Kali Tue Mar 02, 2010 8:10 am

    OK, tested again with my own weight (75kilos - aprox 150lb) with very bad results - the mechanism opened itself for some reason (still unknown to me) and released the string - I've done this 3 times, and it seems that as long as the string is not moving at all - things are fine, but the slightness oscillation cause the mechanism to open ... It seems that I have to go back to the design table Sad
    Getting a small scarf during the process I fully realized what Pavise was told to me about our "fragile bodies". Thank you again for your warning.
    The fact that the trigger is still working as nothing had happened I think is pointless ...
    Still I don't fully understand what had happened or why the trigger releases just at high loads and not at all at low weights (the spring inside is strong enough to hold 25kg ?)
    Kali
    Kali
    Fresh Blood

    Doesn't mean
    I'm new to crossbows


    Fresh Blood Doesn't meanI'm new to crossbows


    Posts : 31
    Join date : 2010-01-29

    Reverse limb "Test" crossbow - Page 2 Empty Re: Reverse limb "Test" crossbow

    Post by Kali Tue Mar 02, 2010 8:57 am

    Some pictures during the tests (with 30 kilos):
    Reverse limb "Test" crossbow - Page 2 Th_IMG_1864Reverse limb "Test" crossbow - Page 2 Th_IMG_1866Reverse limb "Test" crossbow - Page 2 Th_IMG_1867
    and a short movie releasing the 30kg load:
    Reverse limb "Test" crossbow - Page 2 Th_MVI_1869
    Pavise
    Pavise
    Dear Friend, You will be Greatly Missed.
    Dear Friend, You will be Greatly Missed.


    Posts : 128
    Join date : 2010-02-07

    Reverse limb "Test" crossbow - Page 2 Empty Re: Reverse limb "Test" crossbow

    Post by Pavise Wed Mar 03, 2010 12:14 pm

    When we examine some old crossbow trigger designs we find that they are invariably of the multiplying "jamb" type. This is where the sear and latch engagement are being compressed together by the load from the string. The very early bronze Chinese example is but one we should look at. Even the "rolling nut" is designed to jamb the two parts together and this is what generally makes a crossbow trigger "hard to pull" compared to the "lighter" trigger pull on a firearm. When we add things like roller bearings to overcome this high friction effort, we also perhaps unwittingly, make it easier for reverse loads to be overcome too! It is paramount that any trigger be strong enough and the sear engaged enough to resist all attempts for the string to escape prematurely, or else we're ony inviting trouble. Likewise: nails and mild steel pins are poor choices. Better that we use "drill rod" (otherwise known as silver steel) for these most critical and highly loaded axles in our trigger-sets.

    "Safeties" although desirable and now generally incorporated in manufactured crossbows , must never be a substitute for safe conduct at all times! Keep your crossbow pointed in a safe direction and your finger OFF the trigger until ready to shoot.

    And if we are to have our trigger-box and mechanism inserted into a mortise in our wooden stock, then sufficient wood must be allowed for that in our design. A trigger-box that encompasses a claw, perhaps three quarters of an inch or 20 mm wide, will mean that the box will be quite wide and require a lot of corresponding wood to be removed; thus making our stock weak in this area. Better that we make our internal working parts about one quarter inch thick and then our completed trigger box can be kept as narrow as one half inch. This size can also allow the mortise to be a bit wider and provide for ajustment within for more precise alignment of the claw to track groove. The latter can make a huge difference in the way a crossbow shoots! Manufacturers have better control when it comes to consistency of fit because they are jigged up to avoid such errors. CNC machining and special aluminum profiles make much of this possible and perhaps hard for us hobbyists to replicate.

    Respectfully submitted.

    Pavise
    Kali
    Kali
    Fresh Blood

    Doesn't mean
    I'm new to crossbows


    Fresh Blood Doesn't meanI'm new to crossbows


    Posts : 31
    Join date : 2010-01-29

    Reverse limb "Test" crossbow - Page 2 Empty Re: Reverse limb "Test" crossbow

    Post by Kali Wed Mar 03, 2010 2:43 pm

    I think that everything you said makes perfect sense.
    Indeed, even with 30kilos of load, the ball bearing mechanism is releasing the string extremely effortless (I will appreciate that less than 1lb) - most probably there is a small reverse angle that make the trigger to release at high loads (or maybe that the mechanism itself beds at high loads, as you suggested).
    There is no way that the pins to cause that - all screws are 11/11 very hard steel and the pin that is holding the roller is chrome-vanadium steel alloy (all are harder than silver steel) ... most probably the mild steel housing is bending a bit.
    As well, you are perfectly right about the trigger-box - this one is 25mm thick ...
    Anyway, what do you think about my new design (is a kind of copy of one of Robin Allen 's designs):
    Reverse limb "Test" crossbow - Page 2 Th_Trigger_Plan_1Reverse limb "Test" crossbow - Page 2 Th_Trigger_Plan_2
    Mention that the claw and the holding piece will be rounded (the machine shop cannot cut the tool-steel in round forms, and the round design will be made by sanding)
    The 3 moving pieces will be made from tool-steel, and the housing from high carbon steel (the plates will be 2.5mm thick, and the trigger-box 15mm thick)
    Pavise
    Pavise
    Dear Friend, You will be Greatly Missed.
    Dear Friend, You will be Greatly Missed.


    Posts : 128
    Join date : 2010-02-07

    Reverse limb "Test" crossbow - Page 2 Empty Re: Reverse limb "Test" crossbow

    Post by Pavise Wed Mar 03, 2010 4:06 pm

    Hi Kali,

    Thanks for your kind comment my friend. If you examine your roller sear very carefully and somehow plot its movement when the trigger is pressed, I think you will find that the "breakover point" is very narrow; as in its arc of movement. Then as soon as this point is reached, the claw sear finds little remaining resistance and climbs over the rest of the roller quite easily. And in looking at your trigger lever I can see where it has enough mass, that with the slightest encouragement it will energise the roller sear and thus release with hardly any effort. This could be perhaps cured by using a strong enough trigger-piece return spring to keep it forced forward. But of course this would increase the trigger pull weight too. Can't win, can we?

    Your interpretation of Robin's trigger is excellent but I would advise you to make sure that the claw return spring is strong enough to keep the claw in the fully released position after shot. It is my experience that a claw can bounce back into a halfway position and make the crossbow difficult if not impossible to cock until the claw is moved by some means or another. And bear in mind that the angle of this spring to claw will change significantly from the cocked position too and I have had trouble with this part in the past. A plunger and spring is a better setup but a bit more complicated to execute neatly.

    You can round and polish the inside faces of the claws by using abrasive cord or even rubbing some suitable cord with valve grinding paste and then finishing up with something like jewellers' rouge etc. It is vitally important that the two claws be "matched" in every regard and given a fine polish with no scratch marks whatsoever. This will ensure that your string lives longer and that you get a nice smooth release every time.

    Keep up the good work Kali.

    Cheers,

    Pavise
    Ivo
    Ivo
    Admin
    Admin


    Posts : 1041
    Join date : 2009-11-25
    Age : 36
    Location : NJ, USA

    Reverse limb "Test" crossbow - Page 2 Empty Re: Reverse limb "Test" crossbow

    Post by Ivo Wed Mar 03, 2010 11:18 pm

    A thought I have about axles made from nails/steel rods is they can be case hardened...and given that case hardening can be up to 2mm deep these pins can be hardened practically to the core...am I right?

    The rail construction you showed us Kali, any new thought on it? I have been looking at the new crossbows that have been displayed at the ATA show and a good number of those had plastic or composite arrow tracks...also the Leopro gallery I posted has a great deal of photos displaying the assembly of the arrow track where a milled block insert is placed in the square U profile.

    Plunger/slider.....I have to agree that the plunger/slider block safety is a bit sensitive to precision in it's manufacture, one little problem(well not really a problem)that I encountered while making mine is that once the lock is unloaded and the latch is in rested position - it will not allow you to set it back into "safe" mode...not that it's necessary when the crossbow is unloaded Reverse limb "Test" crossbow - Page 2 Icon_smile , still it is definitely something to investigate Reverse limb "Test" crossbow - Page 2 Icon_study

    I second what Pavise said ... Keep it up Kali! Reverse limb "Test" crossbow - Page 2 Icon_king
    Ivo
    Ivo
    Admin
    Admin


    Posts : 1041
    Join date : 2009-11-25
    Age : 36
    Location : NJ, USA

    Reverse limb "Test" crossbow - Page 2 Empty Re: Reverse limb "Test" crossbow

    Post by Ivo Sun Mar 07, 2010 2:11 am

    So Kili,

    Are you redoing the trigger completely?

    It's just I wanted to mention this one little thing about incorporating it into the arrow track.

    I've seen a lot of custom crossbows using two strips of aluminum something 1/8" thick..the arrow track itself was either wood or plastic. Now...wood/plastic track was sandwiched in between two aluminum strips and by making the strips a bit longer than the track material a space for the trigger mech was provided....sort of like in my build except made teh strips the same length track was...this would allow one to incorporate the trigger into the rail and cover all the holes...in fact it will allow you ti use regular pins for axles and only a few bolts to hold it in place...in fact you can countersink the holes used by bolts and use machine screws instead...that way everything will be flush with the surface.Reverse limb "Test" crossbow - Page 2 Icon_smile
    Kali
    Kali
    Fresh Blood

    Doesn't mean
    I'm new to crossbows


    Fresh Blood Doesn't meanI'm new to crossbows


    Posts : 31
    Join date : 2010-01-29

    Reverse limb "Test" crossbow - Page 2 Empty Re: Reverse limb "Test" crossbow

    Post by Kali Sun Mar 07, 2010 4:36 am

    Hi there,
    I was out of town for a few days and I didn't progressed too much with the trigger ... but, yes - I'm rebuilding the trigger from scratch - this time with a much more solid design. Still debating if to use the presented design (the copy of the Robin's design) or to use this idea:
    http://webarcherie.com/forum/index.php/topic/13411-construction-dune-arbalete/page__st__170

    I'm also waiting for a design idea from a romanian friend that is successfully using it in a 180lb steel limbs crossbow.
    For me will be much more convenient to use a claw holding the string downward, as i'm planing to extend the arrow track into the trigger mechanism (and the 2 square aluminum tubes are 10mm in height ...).
    Talking about the arrow track, I've found a very interesting material that can be used : polyamide. Is a kind of very hard plastic that can be machined very smooth and is also light weight. Inserted in a aluminum U shape, as Ivo suggested should be a winning formula. I can also outsource it from a local shop Smile
    Anyway, If I will use the polyamide arrow track - this will be for the next crossbow - for this one I will stick with the aluminum rail.
    Thank you very much for your advices and encouragements
    Ivo
    Ivo
    Admin
    Admin


    Posts : 1041
    Join date : 2009-11-25
    Age : 36
    Location : NJ, USA

    Reverse limb "Test" crossbow - Page 2 Empty Re: Reverse limb "Test" crossbow

    Post by Ivo Sat Mar 13, 2010 12:19 am

    Thank you for the link Kali Reverse limb "Test" crossbow - Page 2 Icon_biggrin ...fascinating site, I signed up right away(even thou I had to translate every button separately using a translator Reverse limb "Test" crossbow - Page 2 Icon_lol )

    The builder from buildalong uses an Excalibur trigger, which in my opinion is a classic and with the materials you have, can easily be a wining combination. Reverse limb "Test" crossbow - Page 2 Icon_smile

    As for the track idea...I believe Leopro has the plastic block insert in their design. Did you check out that gallery I linked to

    How do you plan on mounting the stirrup...the squre profile is a bit thin, don't you think? First thing that jumped to my mind is adding a strip of steel just under the main square profile...anyway, I'm awaiting to be surprised as we are all different here and have some unique ideas. Reverse limb "Test" crossbow - Page 2 Drunken_smilie
    Kali
    Kali
    Fresh Blood

    Doesn't mean
    I'm new to crossbows


    Fresh Blood Doesn't meanI'm new to crossbows


    Posts : 31
    Join date : 2010-01-29

    Reverse limb "Test" crossbow - Page 2 Empty Re: Reverse limb "Test" crossbow

    Post by Kali Sun Mar 14, 2010 2:27 pm

    Hi Ivo,
    Indeed, the French guy is looking to know very well what he is doing, and is very skillful is metalworking.
    Not to many notable achievements for my project ... just that I managed to repair my milling machine that had some pinion broken - not i don't need anymore the machine shop for help :
    Reverse limb "Test" crossbow - Page 2 Th_IMG_1873
    I also got back the riser - that is not looking very well :
    Reverse limb "Test" crossbow - Page 2 Th_IMG_1874Reverse limb "Test" crossbow - Page 2 Th_IMG_1875Reverse limb "Test" crossbow - Page 2 Th_IMG_1876
    as you can see, they cut in the wrong direction the groove that is stabilizing the limbs ...
    I also started to work on the new trigger:
    Reverse limb "Test" crossbow - Page 2 Th_IMG_1871Reverse limb "Test" crossbow - Page 2 Th_IMG_1872
    as usual, the pieces are from carbon steel. This time I will also use carbon steel for the housing (3mm thick). All internal pieces are at least 9mm in thickness , hope that this time will hold.
    Regarding the arrow track, i think that, after all - i will use some setup similar to yours (2 aluminum plates squeezing some plywood inside. This setup is giving me more confidence than the thin aluminum tube. Me too, I was thought about to use the steel strip (but inside the tube), but the added weight is too much (using your setup, the rail will be lighter and safer)
    Ivo
    Ivo
    Admin
    Admin


    Posts : 1041
    Join date : 2009-11-25
    Age : 36
    Location : NJ, USA

    Reverse limb "Test" crossbow - Page 2 Empty Re: Reverse limb "Test" crossbow

    Post by Ivo Wed Mar 17, 2010 8:54 pm

    Well I don't know about lighter Reverse limb "Test" crossbow - Page 2 Icon_biggrin or safer Reverse limb "Test" crossbow - Page 2 Icon_biggrin ...feels more like a log to me Reverse limb "Test" crossbow - Page 2 Icon_biggrin Reverse limb "Test" crossbow - Page 2 Icon_biggrin Reverse limb "Test" crossbow - Page 2 Icon_biggrin but it will certainly be "quiter" than the hollow tube.

    ~safer~...I'm thinking of drilling and countersinking some holes to put in a few dozen screws along it's length and the same thing for the angles making up the rail...I noticed the french guy did it too. I'm sure only after doing that I can safely say that it is safe. Reverse limb "Test" crossbow - Page 2 Icon_jokercolor

    ~Trigger safety~ >>>small spring Reverse limb "Test" crossbow - Page 2 Icon_smile for the safety switch was a problem in my case, If I knew where to get it around the house I wouldn't have to twist my arms to make it work. I found out recently after a lighter broke that it has a very nice spring in it right under the spark-wheel. Reverse limb "Test" crossbow - Page 2 Icon_biggrin Quality of spring may vary, so I had to go through a few different lighters. Reverse limb "Test" crossbow - Page 2 Icon_lol

    I also got back the riser - that is not looking very well :

    What's wrong with it? Reverse limb "Test" crossbow - Page 2 Icon_scratch


    Last edited by Admin on Wed Mar 17, 2010 11:28 pm; edited 1 time in total (Reason for editing : correcting mistakes)
    Kali
    Kali
    Fresh Blood

    Doesn't mean
    I'm new to crossbows


    Fresh Blood Doesn't meanI'm new to crossbows


    Posts : 31
    Join date : 2010-01-29

    Reverse limb "Test" crossbow - Page 2 Empty Re: Reverse limb "Test" crossbow

    Post by Kali Wed Mar 17, 2010 11:35 pm

    I did outsourced small springs from a door locking mechanism, but your idea with the lighter spring is by far better Smile
    On the other hand, it seems that we have a very similar way of thinking ... I also thought about countersinking holes, locking the rail with screws - i even ordered some nice screws ends to cover the top of the screw that get outside the rail
    The riser is usable, but the machine shop did cut the limbs stabilizing grooves horizontally rather perpendicular to the limb as was instructed in the scheme. Another issue is that they didn't cut the holes for the limbs' screws (this will be difficult for me to do it, as is very difficult the lock the riser in the milling machine in the correct position).
    There is another design issue (my fault this time) - the limbs are too close to the arrow track top, making cooking by hand very difficult.
    After some other researches lately (especially seeing 10 times Robin's vids:) ), i get to the idea that the rail should integrate the trigger as one piece, otherwise, the slightness bend between the rail/ riser/ trigger will cause real problems) - The initial idea was to screw the rail together with the riser and trigger (basically, to squeeze the riser between the rail and the trigger mechanism using two locking screws).
    From this perspective, the riser should pass under the rail and be fixed into the rail. This will also give enough clearance for cooking.
    I will keep you posted as works progressed ... thank you again for yours very useful advices Smile
    Ivo
    Ivo
    Admin
    Admin


    Posts : 1041
    Join date : 2009-11-25
    Age : 36
    Location : NJ, USA

    Reverse limb "Test" crossbow - Page 2 Empty Re: Reverse limb "Test" crossbow

    Post by Ivo Thu Mar 18, 2010 5:41 am

    Oh man, I just zoomed in on it....Kali you have every right to go to the market and grab the biggest fish out of the barrel to slap that machinist with!
    Reverse limb "Test" crossbow - Page 2 763750

    I'm just speechless after seeing this, so you'll have to give me moment while I go unload a few clips into a block of teflon coated obsidian(I'm sure that's the same material as that machinists brain).Reverse limb "Test" crossbow - Page 2 918311
    Kali
    Kali
    Fresh Blood

    Doesn't mean
    I'm new to crossbows


    Fresh Blood Doesn't meanI'm new to crossbows


    Posts : 31
    Join date : 2010-01-29

    Reverse limb "Test" crossbow - Page 2 Empty Re: Reverse limb "Test" crossbow

    Post by Kali Sat Mar 20, 2010 11:21 pm

    The new trigger:
    Reverse limb "Test" crossbow - Page 2 Th_MVI_1879Reverse limb "Test" crossbow - Page 2 Th_MVI_1880
    It looks much stronger and more reliable than the last one.
    As usual, the "hard pieces" (the claw and the holder) are carbon steel, the bolts for those are 6mm thick and made from chrome-vanadium steel, the housing is 3mm thick carbon steel, the locking screws are made from high resistant steel (i tried to machine one of these with a HSS endmill and the endmill broken ...). The material that is holding the springs and everything in place is "textolite" - a kind of hard laminated textile (the hardness is in between hard wood and soft aluminum)
    The 3 long screws will lock the mechanism into the aluminum rail ... this being the reason for the large clearance under the claw (the claw should rest on arrow track).
    Ivo
    Ivo
    Admin
    Admin


    Posts : 1041
    Join date : 2009-11-25
    Age : 36
    Location : NJ, USA

    Reverse limb "Test" crossbow - Page 2 Empty Re: Reverse limb "Test" crossbow

    Post by Ivo Sun Mar 21, 2010 8:32 pm

    Nice presentation Kali Reverse limb "Test" crossbow - Page 2 Icon_biggrin

    It would be cool if one day our posts were 90% video based...oh by the way HTML is active in this forum so you can embed the videos using the HTML Embed code that Photobucket provides, that way the videos will play right in the page(not sure if they will all start playing automatically thou Reverse limb "Test" crossbow - Page 2 Icon_lol ), but it will save some loading time by eliminating the redirecting.

    I've heard about Textolit before, there is a variety of different ones and their use as a trigger mech spacer material is a fun choice. Reverse limb "Test" crossbow - Page 2 Icon_biggrin There are people I know who even used a form of textolit to make compound cams. Reverse limb "Test" crossbow - Page 2 Icon_smile >>>Link (Pictures are in form of URL links)

    Trigger work looks really good...I can feel the presence of that milling machine bringing things up to pace. All in all looks to be very well thought out "clean" craftsmanship Reverse limb "Test" crossbow - Page 2 Icon_biggrin . The "locking screw" material sounds very familiar, I have a few drills at work designed for drilling die-stone(a very hard plaster), tried resharpening...wasted a few cutting discs, but didn't even scratch it...literally the polish on it was still perfect. Wonder what alloy that is and how to work with it. Reverse limb "Test" crossbow - Page 2 Icon_cyclops

    How did it turn out with the riser, did you send it back to the milling center for a redo? I would.

    ~Also a though... You mentioned that the limbs are too close, so if you were to send it back they could mill the limb pockets to a wider angle so you don't twist your arms to make it work. Reverse limb "Test" crossbow - Page 2 Icon_smile


    Last edited by Ivo on Mon Mar 22, 2010 12:24 am; edited 1 time in total
    Kali
    Kali
    Fresh Blood

    Doesn't mean
    I'm new to crossbows


    Fresh Blood Doesn't meanI'm new to crossbows


    Posts : 31
    Join date : 2010-01-29

    Reverse limb "Test" crossbow - Page 2 Empty Re: Reverse limb "Test" crossbow

    Post by Kali Sun Mar 21, 2010 11:53 pm

    Hi Ivo,
    You're right that vids make a huge difference, especially in understanding how a mechanism works.
    This one i will say that is a very good quality for hobbyist craftsman, but still far away from some "factory machined" device.
    Repairing the vertical mill, I didn't recalibrate again the surfaces (the vertical alignment of the drill) and there occurred a small 2-3 degrees angle between the drill and the working table. So, all pieces machined are locked in mechanism in a slight angle. In fact, what concerns me more is the claw: the tail is slightly inclined - the difference between the top and the low end of the tail is about 1mm, that is not that much (usually you will be happy with this alignment if pieces are done by hand) , but is not perfect Smile ...
    on the other hand, I'm a bit reluctant to start machining a new claw, mainly because is very time consuming - the steel is very hard, and I have to work with very low feeding speeds ... doing this manually it takes 5-6 hours of careful machining work to get the claw ready (the mini-mill can work in bursts of 8 minutes with 2 minutes pause for cooling).
    The textolit is a very good material for a lot of things - is harder than wood and is not bending in time. As well, is hardly affected by water/ grease/ oil, etc. The drawback is that is almost as heavy as aluminum, but for less straight, and is difficult to machine it right (you have to work with high speeds and very sharp tools not to get out the textile fibers. Working with low speeds or high feeds will break the material or the fibers will be left out in a irregular form.
    I will not go back to the machine shop, as they are very busy - this being the reason why it took so long to work the riser ... and they made it in big hurry (the perfect way to make mistakes). Anyway, realizing that they made the wrong cut, the price for the piece was a little more than the aluminum cost , so i don't have a reason to ask them to re-done the piece.
    I will build a new riser by my own - it will take some time, but that's it.
    On the other hand, I think that I will start to move ahead to finish this first crossbow using the "classical" design (limbs in front of the arrow track), and I will left the RDT design for the next one. In this respect, I ordered two crossbow recurve limbs (carbon).
    Keep in touch, Bogdan
    Ivo
    Ivo
    Admin
    Admin


    Posts : 1041
    Join date : 2009-11-25
    Age : 36
    Location : NJ, USA

    Reverse limb "Test" crossbow - Page 2 Empty Re: Reverse limb "Test" crossbow

    Post by Ivo Thu Mar 25, 2010 3:06 am

    Good Day Kali,

    I will not go back to the machine shop, as they are very busy

    Very sad to hear your decision. You invested in the costly material, You provided the blueprint plan of the riser, ...it cost you time and money...and the machine shop screws it up in the end. I work with milling centers and if something is even the tiniest bit off from the model that I provided I melt down their mailbox and telephone lines...I highly suggest you at least try to get some compensation from these guys or get them to make proper adjustments.

    I was going to suggest in case you were able to get the milling center to at least mill the limb pockets correctly, you could cut the riser in half and fabricate a mount to which you could bolt these halves under any angle. What do you think? Save the carbon limbs for your next project? Reverse limb "Test" crossbow - Page 2 Icon_smile
    Kali
    Kali
    Fresh Blood

    Doesn't mean
    I'm new to crossbows


    Fresh Blood Doesn't meanI'm new to crossbows


    Posts : 31
    Join date : 2010-01-29

    Reverse limb "Test" crossbow - Page 2 Empty Re: Reverse limb "Test" crossbow

    Post by Kali Thu Mar 25, 2010 4:13 am

    There is a pretty different culture in States than here regarding the precision and quality of the work. Here, the idea is that a small and not so profitable order don't worth a very good quality ...
    Initially, the machine shop didn't want to work my piece at all, because they were busy with some really serious orders of thousands of euros. So they sent this small order to be worked by the most unexperienced machinist, and the work proved not to be that simple ...
    The aluminum cost (standard 6060 Al) was 20 usd, and they charge me for the final piece with 25 usd (including the Al) - so, there is too less to worth the trouble of melting down the phone wire Smile)
    If I will cut the riser in half - it will be very difficult to find a safe way to be secured to the main body (the riser is just 20mm in thickness). From my side, I already abandoned this riser design idea ...
    On the other hand, I found another two solutions to build the arrow track and the main body and I will make some experiences these days Smile
    Today I'm re-working the trigger having in mind the motto "learn to be precise" - this time i'm working with 0.05mm tolerances using two dial indicators and carbide endmills - i will take some pictures to show you what i mean ...
    Warhammer1
    Warhammer1
    Tinkerer

    If there is a will, there is a way.


    TinkererIf there is a will, there  is a way.


    Posts : 68
    Join date : 2011-04-02

    Reverse limb "Test" crossbow - Page 2 Empty Hello Folks - Warhammer1

    Post by Warhammer1 Sun Apr 03, 2011 5:36 am

    Hello folks - finally joined up after lurking for a couple of years. You guys do such nice work while I still work with a hammer and hacksaw LOL.
    I do a lot of research work on ballistas for my friend Nick and his big inswinger ballista with 5000 plus pounds of pull. He is busy making a new set of hickory limbs for "Firefly" and hopefully testing will give him a new personal best speed well above 400fps with a 7500 grain bolt.
    I am kinda a nutcase where torsion "ballista"s are concerned and have many designs I've yet to build. I am getting a few used older railess designs from ebay for conversion to inswinger torsion machines. I like the ugly old Jennings devastor and and early PSE railess designs (pre-tac).
    No idea how to post videos here and cant even manage a picture. If anyone would like to see a vid of my frankenstein Scorpyd shooting away, please pm me your email address. I'll send you mine so the video doesnt get put into "junk" mail folder.
    Torsion Rules! Reverse limb "Test" crossbow - Page 2 524936 Reverse limb "Test" crossbow - Page 2 524936 Reverse limb "Test" crossbow - Page 2 524936
    Hotspur
    Hotspur
    Workshop Savvy

    Did you see my tool collection?


    Workshop SavvyDid you see my tool collection?


    Posts : 150
    Join date : 2012-06-28
    Location : British Columbia, Canada

    Reverse limb "Test" crossbow - Page 2 Empty Re: Reverse limb "Test" crossbow

    Post by Hotspur Mon Feb 25, 2013 11:32 pm

    Ivo wrote:...?

    More inspiration Very Happy

    Reverse limb "Test" crossbow - Page 2 4d677112 Reverse limb "Test" crossbow - Page 2 16ba7510 Reverse limb "Test" crossbow - Page 2 D89ac910

    This one was made by a Ukrainian guy...don't ask...I was not able to understand what this guy was talking about as he was talking in "shortened" heavy duty street slang...[/spoiler]

    Curious on the design of the Ukrainian - would it not make more sense to have the power-stroke end on the front side of the cams? Have the cams rotate in the other direction for another 3" travel?

    Sponsored content


    Reverse limb "Test" crossbow - Page 2 Empty Re: Reverse limb "Test" crossbow

    Post by Sponsored content


      Current date/time is Fri Apr 26, 2024 9:01 pm