The Arbalist Guild

Would you like to react to this message? Create an account in a few clicks or log in to continue.

Crossbows - Everything about Building, Modding, and Using your Crossbow Gear

Latest topics

» 12th Century Chinese Crossbow Chronographed
by stuckinthemud1 Fri Nov 24, 2023 3:50 pm

» Crossbow Stock
by kenh Tue Oct 31, 2023 6:19 am

» Colletiere a Charavines continuing experiment
by stuckinthemud1 Sat Oct 07, 2023 5:36 am

» Cocking - how
by stuckinthemud1 Thu Aug 03, 2023 4:24 am

» Questions around heavy crossbow lath buildin
by stuckinthemud1 Wed Apr 26, 2023 1:10 am

» Arab Crossbow
by stuckinthemud1 Tue Apr 25, 2023 7:57 am

» prod angle, and lever trigger for sale anyone?
by stuckinthemud1 Mon Mar 20, 2023 5:54 am

» flexible string
by jasper1978 Mon Mar 20, 2023 1:25 am

» [solved]Skane/Lillohus crossbow thread
by stuckinthemud1 Sun Mar 19, 2023 7:44 am

» jens sensfelder
by jasper1978 Wed Mar 08, 2023 11:58 pm

» 400lb Windlass crossbow bolts weight and accuracy shooting high.
by stuckinthemud1 Sun Mar 05, 2023 2:53 pm

» Codex Löffelholz crossbow
by stuckinthemud1 Tue Jan 24, 2023 4:14 pm

» Digitar prodsc
by stuckinthemud1 Sun Jan 15, 2023 2:42 pm

» Troubleshooting
by Andy. Fri Jan 06, 2023 12:29 pm

» Wood Prods
by stuckinthemud1 Fri Dec 30, 2022 12:47 pm

» Colletiere a Charavines crossbow
by stuckinthemud1 Fri Dec 30, 2022 8:54 am

» Simplified Löffelhotz speedloader
by stuckinthemud1 Fri Dec 09, 2022 4:05 pm

» Fiberglass H-bows
by c sitas Sat Nov 12, 2022 8:44 am

» Bad Antler
by drawknife Sat Nov 12, 2022 3:48 am

» Anyone make their own bolts?
by Juniper Mon Oct 17, 2022 8:20 am

» Josef alm in English
by Juniper Sat Oct 15, 2022 4:22 am

» Qin/Han lock drawings
by kenh Fri Sep 23, 2022 8:16 pm

» stirrup dimensions?
by stuckinthemud1 Thu Sep 01, 2022 1:49 pm

» Skane/Lillohus lockbow information needed
by stuckinthemud1 Sun Aug 14, 2022 6:23 am

» need help contacting le musee Dauphinois Grenoble
by stuckinthemud1 Sat Aug 13, 2022 3:22 pm


+4
ZigiMan
chaz
kenh
Gnome
8 posters

    Pistol Build #2

    Gnome
    Gnome
    Crossbow Junkie

    I live here!


    Crossbow JunkieI live here!


    Posts : 451
    Join date : 2011-10-16
    Age : 60
    Location : North Georgia

    Pistol Build #2 Empty Pistol Build #2

    Post by Gnome Sun Mar 03, 2013 7:29 am

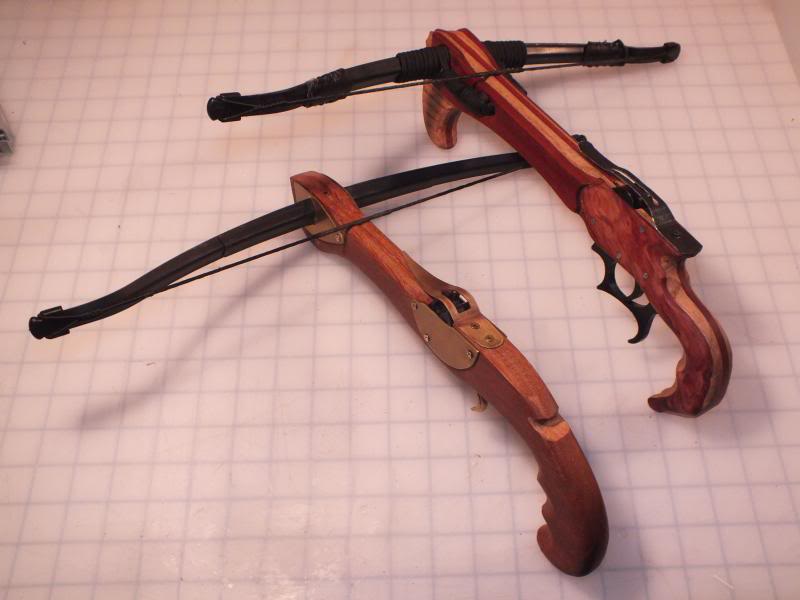
    Hey all! After what seems like ages I've finally had enough time at the workbench to develop a new design. It's still a work in progress, but since it's now fully functional I thought it was time to share.
    Pistol Build #2 DSCF0426_zps225464d9
    I had several goals with this build, which is basically version 2.0 of my first pistol, https://thearbalistguild.forumotion.com/t618-crossbow-3-pistol-1
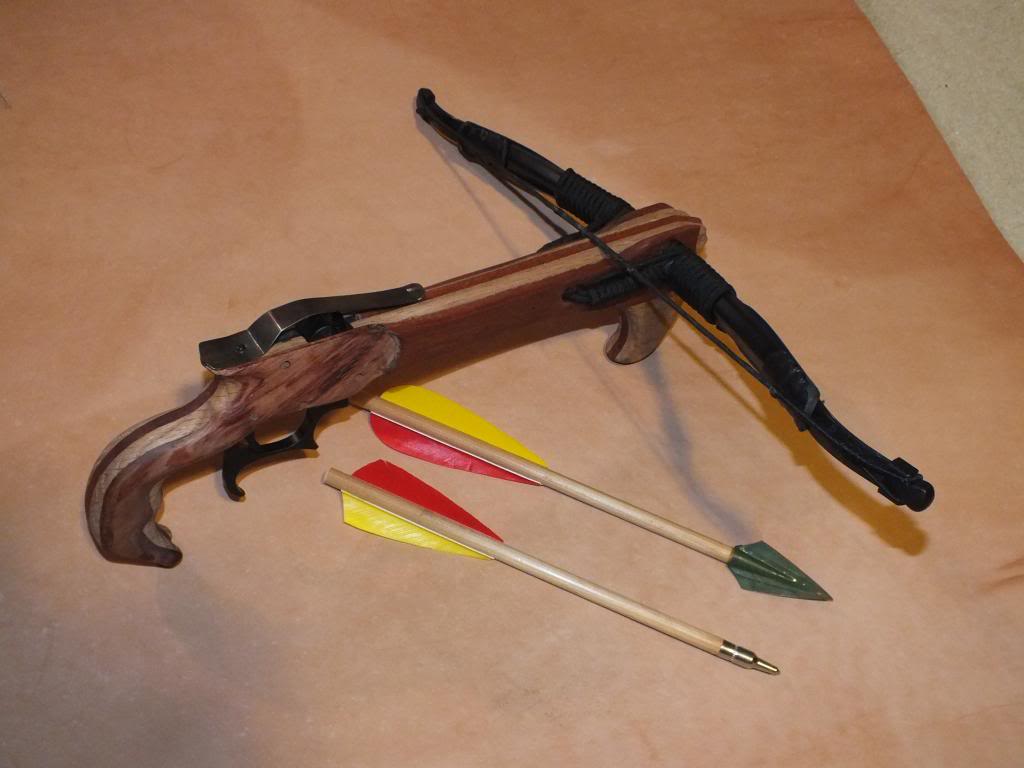
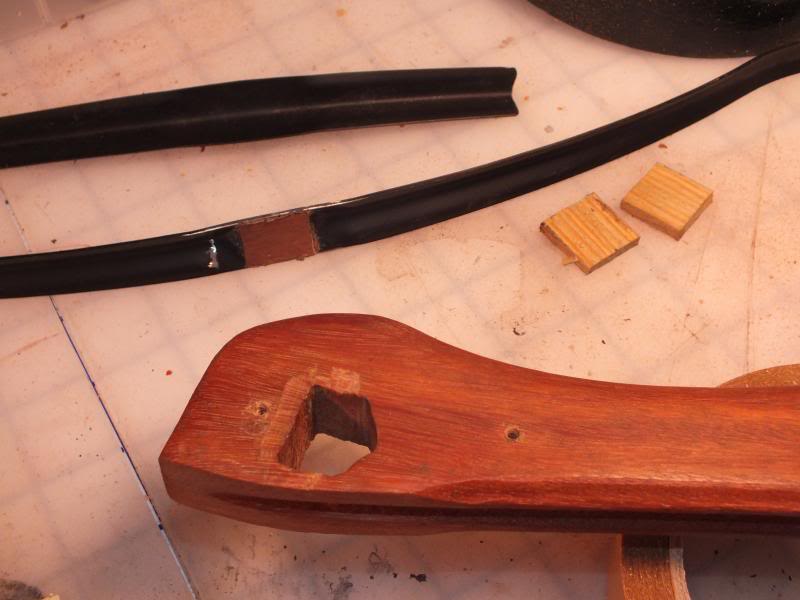
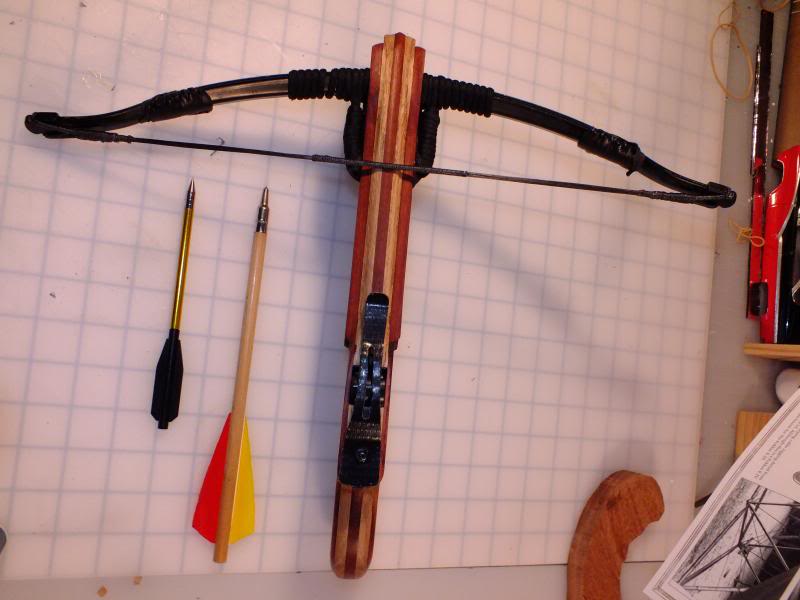
    Of course I wanted to increase the power, which was accomplished by adding another inch of draw and another leaf to the spring- there are two full length steel prods (here's an Amazon link if you'd like to know what I'm referring to: http://www.amazon.com/Performance-Crossbow-Metal-Replacement-Prod/dp/B009XXGA18/ref=sr_1_3?ie=UTF8&qid=1362316775&sr=8-3&keywords=steel+crossbow+prod), plus one cut to about 2/3. I've got another piece on the bench cut to 1/3, to be added later if I think it can take it.
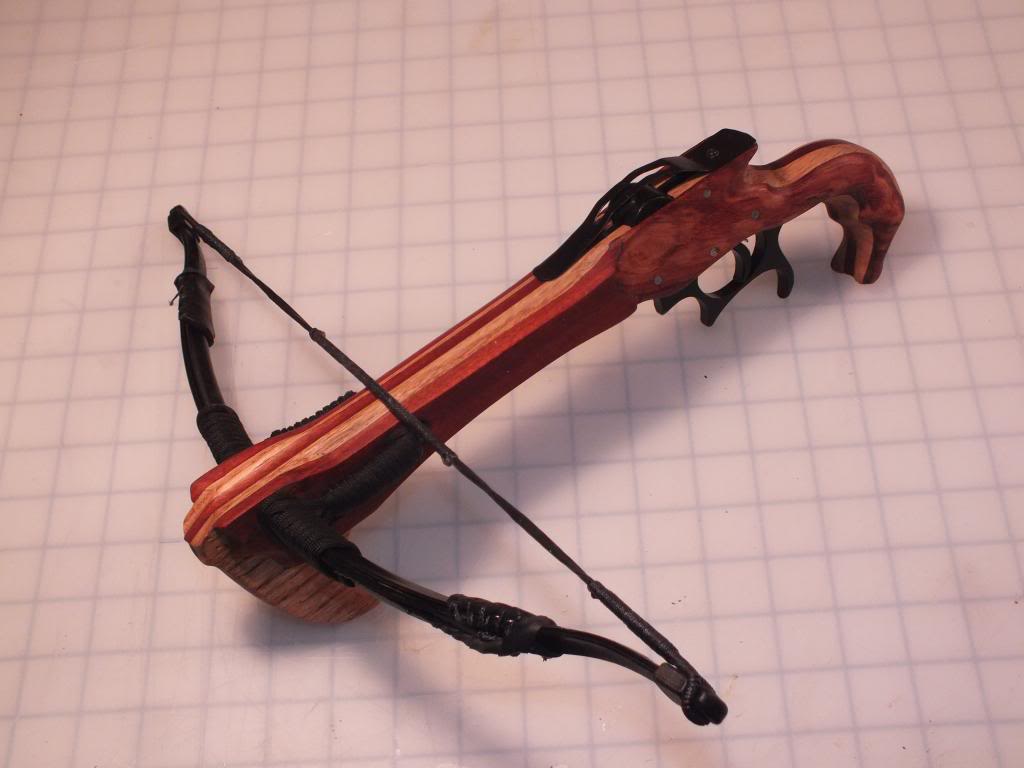
    I also wanted to use up stuff I had lying around the shop rather than spending any money, it is tax season! So far so good there. The stock is a laminate with a 1/4" bloodwood center, then 14" red oak running the full length, more bloodwood up front and 1/8" bubinga to beef up the nut socket and grip area.
    Pistol Build #2 DSCF0427_zps7ad23bf5
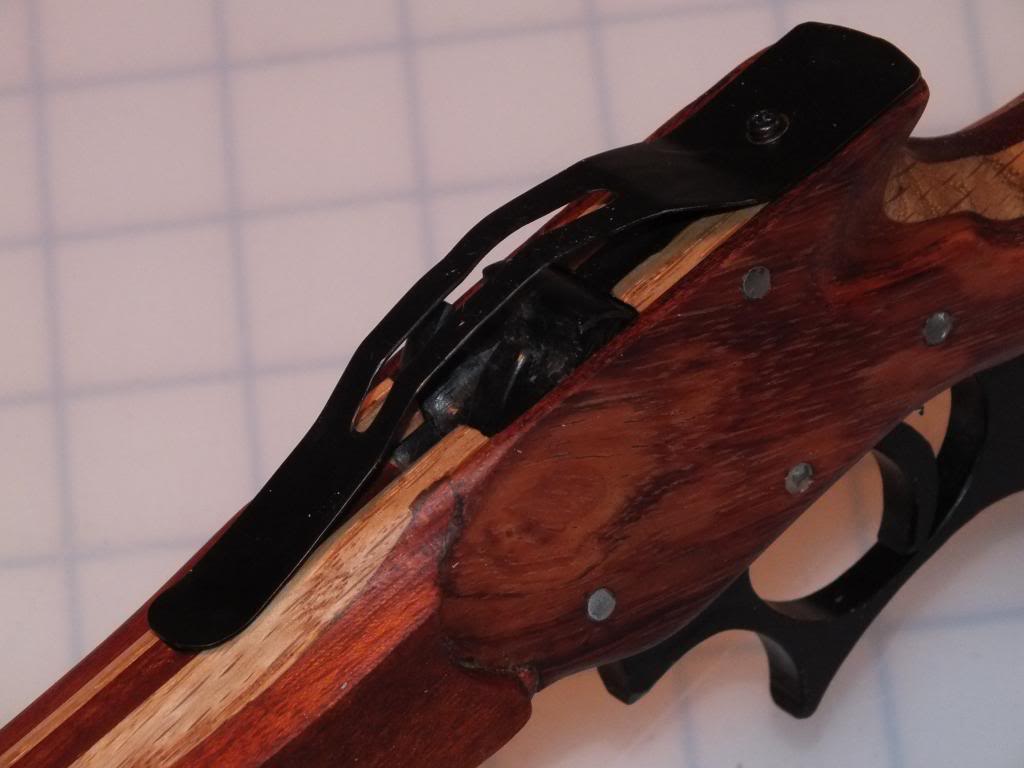
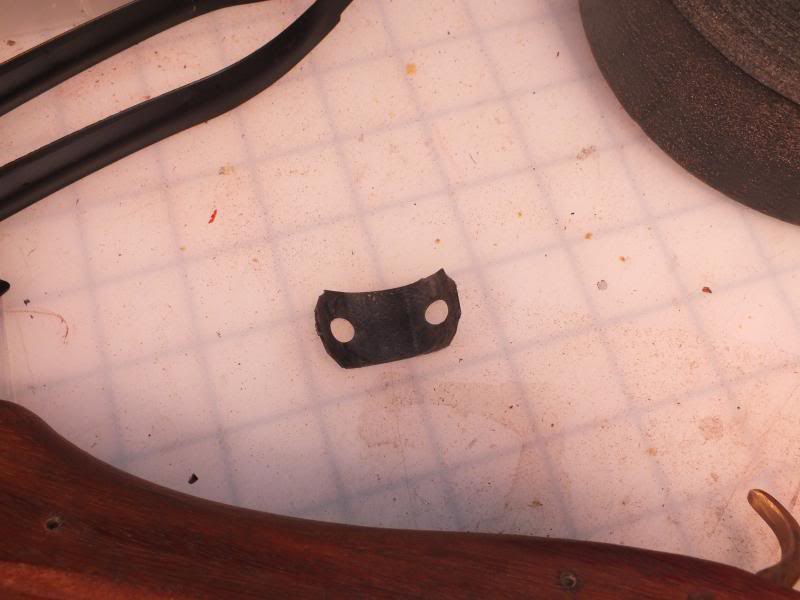
    Most interesting, to me at least, is the lock/release mech, made from 1/4" Delrin sheet. I'd been toying with this idea for a while, and for this initial use I kept the mech design simple. There are no steel axle pins, the pins are just to make sure the trigger housing stays rigidly in place. Four was overkill, I determined, two pins would have been plenty. The whole assembly slides in from the bottom and the fit is very precise. Before you start oohhing and ahhing over the crazy carving skills required for achieving this kind of precision, I better confess that I designed it on the computer and cut the mech, center bloodwood, and red oak using a Zund digital cutting table with a router module http://www.zund.com/index.asp?topic_id=2485&m=2485&g=2529
    I stole the nut from my first pistol, I'll have to make a new one to get that unit back together. I didn't think I needed a sear insert on that one since it was low pressure, brass on delrin, and I think I need it even less here where it is delrin on delrin. I've test fired this beastie a few dozen times and so far the mech works beautifully- the pull is smooth, precise, and essentially effortless, and so far no appreciable wear or deformation.
    Pistol Build #2 DSCF0428_zps532d5f89
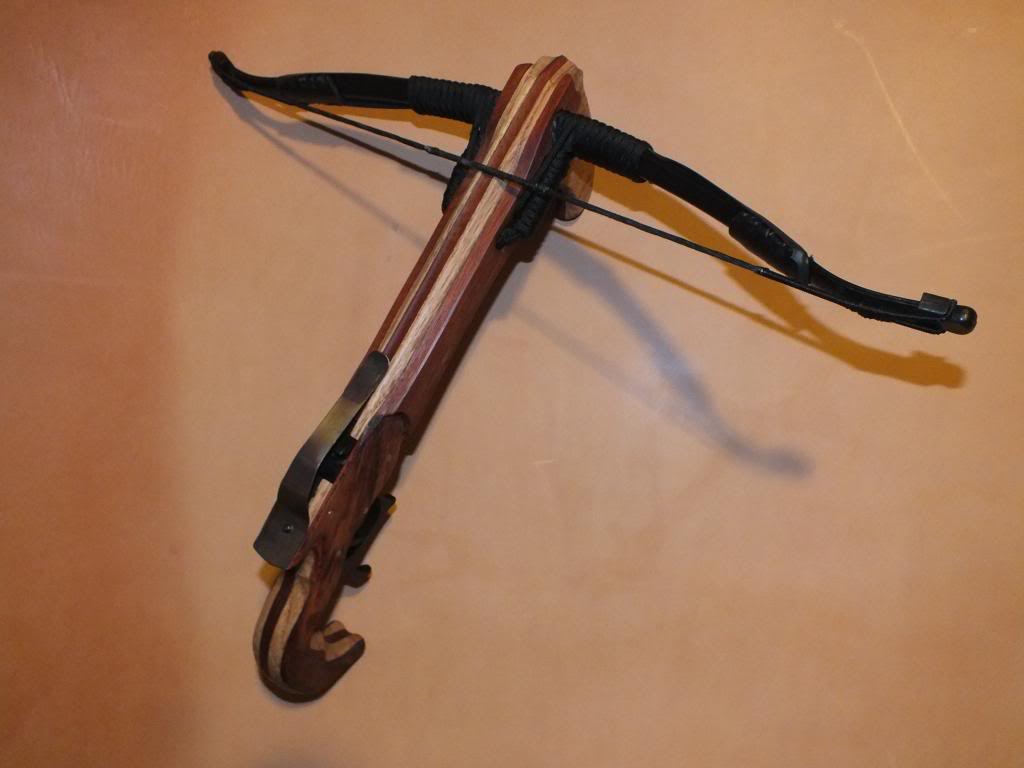
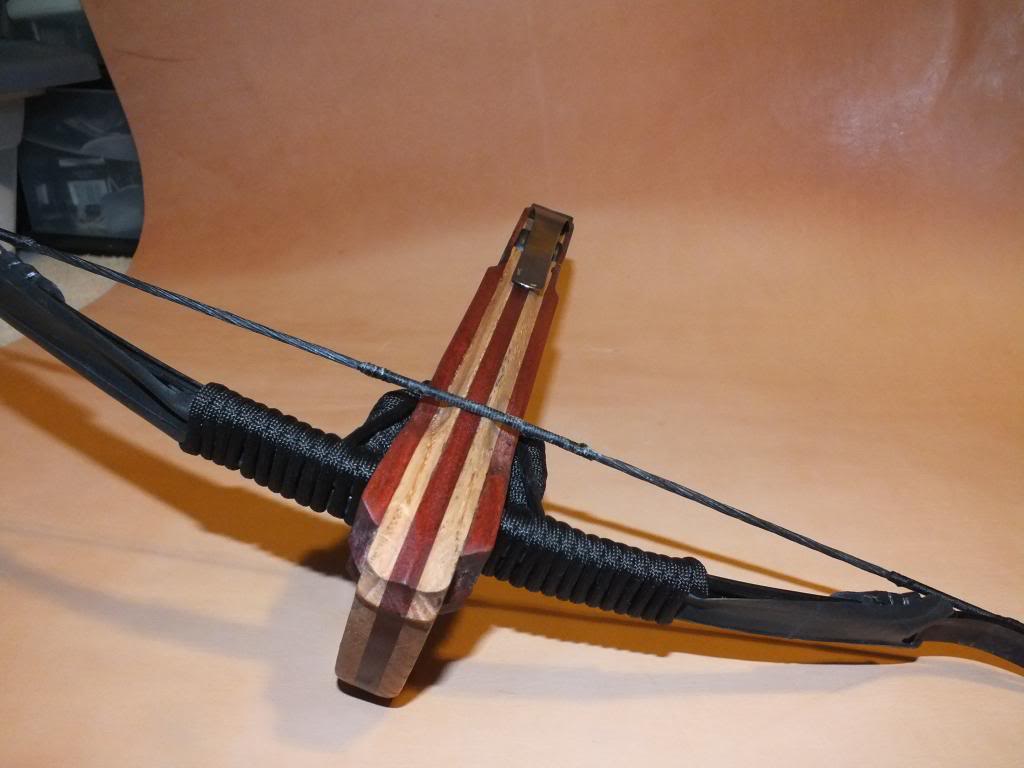
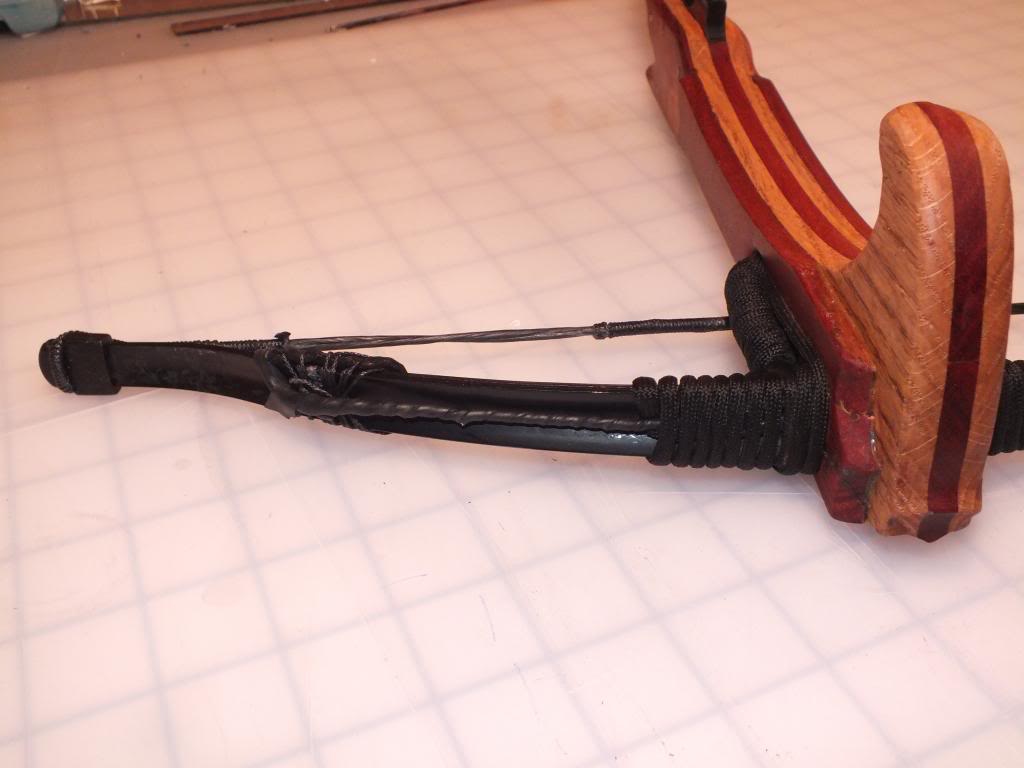
    This is my first attempt at a cord-bound prod. Well, truthfully, what you see here is my sixth or seventh attempt at tying on the same prod! I tried a lot of different materials I had lying around before settling on the paracord, mainly because it was all I had left. After having to cut off so many attempts and start over so many times, I decided to work toward a method that could be untied fairly easily, and that's what we see here. That's one piece of cord about 7 feet long, centered in the hole and wrapped around the prod twice on each side, looped around the bundle about 13 times and then drawn back through to exit the bundle at the rear. I then drew it tight and pulled it under the bundle against the stock to further tighten and secure it, and wrapped the excess around each side of the prod and tucked it under at the ends. I did not cut off the extra length because it is required for this method, the wraps have to stay loose enough to pull the cord back through before tightening down. I wrapped the bundle around my finger and the loops going around the prod to keep things straight and then pulled the wraps tight one at a time.
    Pistol Build #2 DSCF0429_zpse4a55d56
    I had to put leather pads over the ends of the 2/3 length prod leaf, no matter how I smoothed and shaped the ends the string would get cut there every time I fired. I used up three strings before I solved that issue. I don't want to wrap the entire prod, but I don't want it to look like crap like it does now, either. Right now there is a section of bicycle inner tube around the prod inside the socket to cushion and tighten that fit, it's ends tapered with holes in them that are looped around the pads. So right now my leaf-spring prod assembly is functional but ugly, and that won't do.
    Oh, and another issue with my first pistol is that it was difficult to cock since there was nothing to hold onto for any kind of leverage. D'oh! That's what the "horn" on front is for. I've got a cocking rope I modified for this one that has only one handle, with both ends of the rope attached. My idea was that you would hold the "horn" in one hand and draw back the cocking device with the other, like drawing a standard bow or slingshot. I've done it, but it doesn't work well for two reasons- first, I'm not as strong as I think I am, and second, the angle is wrong, as in there shouldn't be any angle. Your grip on the stock would have to be in line with the tension of the string, like a stirrup is usually placed, or else the stock wants to tilt and wiggle away and the string and nut don't want to meet up. So instead I put that horn under the arch of my foot, steady the stock with one hand and draw with the other.
    Pistol Build #2 DSCF0430_zps4e5e583e

    I'll also need to make my own strings. I've been using the strings that came with the prods, but they aren't up to this much tension. They tend to stretch rather than break.

    Pistol Build #2 DSCF0431_zps33c92d43


    Last edited by Gnome on Sun Mar 03, 2013 8:56 am; edited 1 time in total (Reason for editing : spelling)
    kenh
    kenh
    Crossbow Junkie

    I live here!


    Crossbow JunkieI live here!


    Posts : 883
    Join date : 2012-08-03
    Age : 75
    Location : Living Aboard a Sailboat in Fort Myers, FL

    Pistol Build #2 Empty Re: Pistol Build #2

    Post by kenh Sun Mar 03, 2013 10:09 am

    Really very nice pistolbow, Gnome. I'm jealous. I think you're on to something there with Delrin action parts; it'll be interesting to see how they wear over time. Too bad more of us don't have fancy cutting tables.

    I like the idea of "loose laminate' stacking those commercial prods. Are yours flat? Or V shaped in the center like the one in my avatar?
    Gnome
    Gnome
    Crossbow Junkie

    I live here!


    Crossbow JunkieI live here!


    Posts : 451
    Join date : 2011-10-16
    Age : 60
    Location : North Georgia

    Pistol Build #2 Empty Re: Pistol Build #2

    Post by Gnome Sun Mar 03, 2013 11:41 am

    Kenh,
    Thanks! The prods are just like yours with the "V" cross section. This is the plan I was working with and the final digital cut shapes. I don't have unlimited access to the cutter, unfortunately. I work in a sign shop and my boss let's me run an occasional personal project if I use my own or scrap material and it doesn't take long. That's the really seductive part of any automated fabrication equipment, it took me literally 15 minutes to cut pieces that would have taken hours and hours doing by hand.
    Pistol Build #2 Pistol2Final_zpsd48086c6
    Gnome
    avatar
    chaz
    Crossbow Junkie

    I live here!


    Crossbow JunkieI live here!


    Posts : 313
    Join date : 2012-04-13
    Age : 75
    Location : Texas

    Pistol Build #2 Empty Re: Pistol Build #2

    Post by chaz Sun Mar 03, 2013 12:38 pm

    Gnome,

    Fantastic ! Nice trigger mechanism design ! What a neat project.

    Chaz
    Gnome
    Gnome
    Crossbow Junkie

    I live here!


    Crossbow JunkieI live here!


    Posts : 451
    Join date : 2011-10-16
    Age : 60
    Location : North Georgia

    Pistol Build #2 Empty Re: Pistol Build #2

    Post by Gnome Mon Mar 04, 2013 8:42 am

    Thanks, Chaz. I spent a couple hours plinking with it yesterday. I wore out a couple commercial strings and right now it's shooting high and to the right, but I have to say it's a fun little weapon. I made a new string but I'm not going to put it on until I take everything apart and rework the bolt track and try a new idea for the prod binding.

    Gnome
    ZigiMan
    ZigiMan
    Tinkerer

    If there is a will, there is a way.


    TinkererIf there is a will, there  is a way.


    Posts : 79
    Join date : 2012-12-07
    Location : Tel-Aviv, Israel

    Pistol Build #2 Empty Re: Pistol Build #2

    Post by ZigiMan Tue Mar 05, 2013 3:47 am

    As usual Gnome, you have made a beautiful work!
    If you have more pictures of the building process I believe that a lot of us will be happy to see.
    Keep on the good work!
    Waiting to see what you up to for the next project...

    ZigiMan
    Gnome
    Gnome
    Crossbow Junkie

    I live here!


    Crossbow JunkieI live here!


    Posts : 451
    Join date : 2011-10-16
    Age : 60
    Location : North Georgia

    Pistol Build #2 Empty Re: Pistol Build #2

    Post by Gnome Wed Mar 06, 2013 6:27 am

    Thanks, Zigiman. This build went so fast it was pretty much over before I thought of taking photos! The planning and sketching went on for months, but the cutting, gluing, and carving was really just a few hours spread over a 4 day period. Then I got stuck: the trickiest part of the whole process was figuring out how to string it. Putting that much tension in such a small package brings up a new set of problems compared to full size weapons. I'll post some pictures of my successful solution when I get back in the shop, it involves a rubber reinforced bastard string looped over the prod itself and modified C clamps to hold it in place.
    Gnome
    Gnome
    Gnome
    Crossbow Junkie

    I live here!


    Crossbow JunkieI live here!


    Posts : 451
    Join date : 2011-10-16
    Age : 60
    Location : North Georgia

    Pistol Build #2 Empty Re: Pistol Build #2

    Post by Gnome Sat Mar 09, 2013 6:10 am

    I decided to leave the prod installed and focus on refining the bolt-track and making the string. below is my string making jig with my new string on top, a brand new commercial string in the middle, and below that an identical commercial string after a couple dozen live firings. They are at angles to demonstrate their comparative length. I know I'm losing power-stroke with the shorter, stiffer string and resultant taller brace height, but there was way too much downforce on the track. I removed quite a bit of wood there also, and I think I have the geometry right now. The only downside to these cheap steel prods is that there is no upswing to the tips at all, and the prod socket has to be angled much more than usual, and is a bit hard to calculate when you start stacking them. In the background you can see the weapon with bastard string and clamps on, with the cocking rope in place and ready to span.Pistol Build #2 DSCF0433_zps70fb13ed

    These are the small C-clamps used with the bastard string, I had to grind them out to match the curved shape at the ends of the prod to get them to stay put. This isn't something to skimp on, the clamps have to be small yet strong enough to take the pressure. I went through a couple sets of cheaper clamps that just bent and deformed under the pressure and flew off at inconvenient moments. Luckily, no pickles were harmed in the making of this crossbow. Pistol Build #2 48679
    Pistol Build #2 DSCF0436_zps926dec6d

    Here the bastard string is cocked and the new string in place, ready for me to put the cocking devise back on to release the tension. I always wear heavy rappelling gloves during this process, I like all my fingers and want to keep them. You'll notice that the loops of the bastard string are quite large, large enough to place the real string ends through easily. As I learned the hard way and forgot a couple times, that is the only way to get the bastard string off once it's strung without cutting it off.
    Pistol Build #2 DSCF0437_zps7f71380c

    I was going to cut off all the rubber from the bicycle tube I used that extended outside of the binding, but I liked the function it served to keep my leather pads in place. So I just tidied it up by trimming off some excess and twisting it up to make it fit tighter. Still a little weird looking, but an improvement, I think.
    Pistol Build #2 DSCF0447_zpsf1d6d91e

    I reworked the shape of the bolt clip, it is still too tall so I cut a notch out of it to help with sighting. I also painted it it black, the scrap of steel I used doesn't take to my normal bluing process very well. I'll probably make a new one once I figure out the final shape I want.
    Pistol Build #2 DSCF0446_zps30824003

    Now I need to get a battery for my Chrony so I can collect some real data, but the shorter, heavier string feels like an improvement so far. That plus the refinement to the bolt track have resulted in much more consistent placement, though I've only put a few shots through it as currently configured. There is a bit of felt recoil, I think it definitely contributes to my shots flying high. I've found the most accureate grip to be two handed, with my offhand up front on the horn. Next I need to whip up a big batch of bolts for it, I'm cutting down some old 5/16" cedar target arrows to 9", using the crimped on points already installed on those lengths and gluing Zwickey broadheads on the rest. Got to keep the varmints in check.
    Pistol Build #2 DSCF0445_zps3882fc68
    Gnome


    Last edited by Gnome on Sat Mar 09, 2013 6:15 am; edited 1 time in total (Reason for editing : layout)
    avatar
    chaz
    Crossbow Junkie

    I live here!


    Crossbow JunkieI live here!


    Posts : 313
    Join date : 2012-04-13
    Age : 75
    Location : Texas

    Pistol Build #2 Empty Re: Pistol Build #2

    Post by chaz Sat Mar 09, 2013 6:50 am

    Gnome.

    Very nice build job!Pictures and narrative information is great ! I really like the the whole design and especially the whole trigger mechanism unit, the way the gaurd is incorporated. A lot of thought and skill is demonstrated.

    Thanks for sharing !

    Chaz
    avatar
    chaz
    Crossbow Junkie

    I live here!


    Crossbow JunkieI live here!


    Posts : 313
    Join date : 2012-04-13
    Age : 75
    Location : Texas

    Pistol Build #2 Empty Re: Pistol Build #2

    Post by chaz Sat Mar 09, 2013 6:52 am

    The slot in the bolt clip for sighting is also a nice look.

    Chaz
    Gnome
    Gnome
    Crossbow Junkie

    I live here!


    Crossbow JunkieI live here!


    Posts : 451
    Join date : 2011-10-16
    Age : 60
    Location : North Georgia

    Pistol Build #2 Empty Re: Pistol Build #2

    Post by Gnome Sat Mar 09, 2013 12:37 pm

    Pistol Build #2 DSCF0448_zps096cf0c0Pistol Build #2 DSCF0449_zps31b064ac
    Here's my first set of target bolts, or "parlour darts," as I like to call them, and my first 3 broadheads. Something about this build makes me think it belongs in a billiard room with a big cork target. Anyhow, I put in one of my full size quarrel tips for comparison. Quite unintentionally, the proportions of the darts looks very similar to me. I used the same commercial feather fletches, just trimmed and bobbed about 3/4 inch from the stock 4"

    Gnome
    Gnome
    Gnome
    Crossbow Junkie

    I live here!


    Crossbow JunkieI live here!


    Posts : 451
    Join date : 2011-10-16
    Age : 60
    Location : North Georgia

    Pistol Build #2 Empty Re: Pistol Build #2

    Post by Gnome Sun Mar 17, 2013 3:23 pm

    Well I wanted a shorter and heavier string and it came out as planned, but I erred in making it a bit too short. The brace height and downforce were exactly what I had in mind, but the commercial plastic nock tips weren't up to it and after about a half dozen successful firings, one of them would shatter every time it was fired! I did that three times before giving up on that string, luckily I have another project on the bench that I think it might be perfect for and none of the three shots were actually misfires so I think my prod leaves are OK.
    Pistol Build #2 DSCF0452_zps53e51eb9
    So then I knew I needed to make a string that was the same length as the manufactured polyester ones that wouldn't stretch so bad or carve my own nocks out of Derlin. I didn't feel like doing either, so I cobbled together a quiver for my Zwickey darts instead:
    Pistol Build #2 DSCF0458_zpsb83bc048
    Then I got busy putting my first pistol bow back together since I scavenged parts off it for the new build, namely the nut and one of the prods after I bent one. I no longer had two full length prods as it was equipped with before, so I rigged it up temporarily with the short span I ended up not using. Unlike my new one with the paracord binding, this pistol has prod installation using my patented "wooden wedge method what I stole off Todd the Archer" technique. An additional step involves getting a flat surface for the wedges to ride against, since these pressed steel prod leaves have a V cross section. I have a piece of walnut carved to fit the cavity and tacked in place with double sided tape:
    Pistol Build #2 DSCF0460_zps9d512b5c
    New to this bow is a rubber backing to cushion the socket, I went much more modest with the cut of inner tube here:
    Pistol Build #2 DSCF0462_zps0c668dca
    The rubber pad in place. Behind it is one of the many brave but cheap steel pistol prods mangled in this whole glorious effort.
    Pistol Build #2 DSCF0463_zps542f747d
    I think I could have lived without the rubber on this one since it is a much lighter weight design, but it helps keep the prods locked together during handling.Then I drove in the two wedges to lock the prod in place, in this case the wedges are just a standard pine shim from the hardware store, split in half to fit the socket. I know I'm going to be tearing this one down again when I get more of these bitty steel prods in (just ordered half a dozen more!) so I didn't bother cutting some from ash or walnut, as I normally would.
    Pistol Build #2 DSCF0464_zpse0cd2538
    I tapped them in from both sides at the same time with two small hammers, carefully cut off the excess with a razor saw and screwed on the brass plates that help keep them locked.

    So then I had to carve a new nut. On my new build I made a measurement error I didn't catch until it was too late, I made the nut cavity 1" diameter instead of slightly bigger to accomodate a 1" diameter nut! So I had to file and scrape and sand and polish away some of the circumfrence to get it to move freely, and then it was too small to go back into the weapon I stole it from. I don't know how evident it is in my photo, but the nut I just made to go into my first pistol, the still unpolished one on the left, is larger than the one on the right and they are not interchangeable.
    Pistol Build #2 DSCF0470_zps0de80f40
    So here they are together and functional for the first time. I never got any clever, feasable ideas for a cocking method for pistol #1, so I gave up and carved a notch in it to use the same cocking rope I made for #2. Because of the lighter draw weight and shorter draw distance, as well as the better leverage provided by the longer grip, this one can be easily armed using the rope cocker with only two hands. I also carved away quite a bit of the bolt track, It had pretty ridges that were just in the way. Now it's mostly flat except for a much shallower groove. It's a fun little shooter with lightweight ammo, I ordered a bunch of those little multicolored PVC bolts, now I just need a big dartboard target!
    Pistol Build #2 DSCF0468_zps76021376
    I'm kinda slow sometimes. It took me about 4 hours to realize the implication of what any of you reading this post probably thought of right away. "Hey... I've got two one-handed firing crossbows. And I have two hands. Therefore...Lightbulb!" I burned up pretty much the whole afternoon practicing my zombie take down double tap!
    Gnome
    Todd the archer
    Todd the archer
    Crossbow Junkie

    I live here!


    Crossbow JunkieI live here!


    Posts : 581
    Join date : 2010-02-25
    Age : 62
    Location : sellersville,pa.

    Pistol Build #2 Empty Re: Pistol Build #2

    Post by Todd the archer Sun Mar 17, 2013 6:07 pm

    Nice work and very creative!

    Todd
    kenh
    kenh
    Crossbow Junkie

    I live here!


    Crossbow JunkieI live here!


    Posts : 883
    Join date : 2012-08-03
    Age : 75
    Location : Living Aboard a Sailboat in Fort Myers, FL

    Pistol Build #2 Empty Re: Pistol Build #2

    Post by kenh Sun Mar 17, 2013 6:49 pm

    Sweet!
    avatar
    OverlyComplicatedGag
    Fresh Blood

    Doesn't mean
    I'm new to crossbows


    Fresh Blood Doesn't meanI'm new to crossbows


    Posts : 7
    Join date : 2012-01-21

    Pistol Build #2 Empty Re: Pistol Build #2

    Post by OverlyComplicatedGag Mon Mar 18, 2013 5:44 pm

    Cool project.

    Here's your training goal. (Try not to groan)https://www.youtube.com/watch?v=WByqPqwBrzs

    tongue
    ZigiMan
    ZigiMan
    Tinkerer

    If there is a will, there is a way.


    TinkererIf there is a will, there  is a way.


    Posts : 79
    Join date : 2012-12-07
    Location : Tel-Aviv, Israel

    Pistol Build #2 Empty Re: Pistol Build #2

    Post by ZigiMan Tue Mar 19, 2013 7:02 am

    Gnome, I am really enjoying reading your posts. I like the detailed, informative descriptions of yours!
    And of course, as I wrote before, nice work!

    ZigiMan
    Gnome
    Gnome
    Crossbow Junkie

    I live here!


    Crossbow JunkieI live here!


    Posts : 451
    Join date : 2011-10-16
    Age : 60
    Location : North Georgia

    Pistol Build #2 Empty Re: Pistol Build #2

    Post by Gnome Tue Mar 26, 2013 3:33 pm

    Thanks, ZigiMan! I'm officially calling this one done now that I finally made a string that works well. Good thing I got it right this try, now I'm out of serving!
    Pistol Build #2 DSCF0493_zps92372f12
    This one is just the right length and shows no sign of stretching after a couple dozen shots. I got some commercial darts, much smaller than the ones I cobbled together but almost exactly the same weight, 9 grams. I love the way they fly but the plastic tails break way too easy. Both types are pretty accurate at short ranges and both average about 200 feet per second. My broadheads are 14 grams and I only get about 170 fps. Got to do something about that.
    Anyhow, this one has been a real joy to develop and shoot! I need to spend some time with my full size bows now- I picked one up the other day and scared myself with how big and dangerous it looked after so many weeks of focusing on this little toy.
    Gnome
    kram57
    kram57
    Fresh Blood

    Doesn't mean
    I'm new to crossbows


    Fresh Blood Doesn't meanI'm new to crossbows


    Posts : 2
    Join date : 2014-07-02
    Age : 67
    Location : London UK

    Pistol Build #2 Empty pistol xbow fps.

    Post by kram57 Wed Jul 09, 2014 8:10 am

    200fps with a 9gm bolt is no mean feat!  That would take someone out at 20/30 yards if it was a head shot?  I on the other hand have somewhat cheated the DIY on my pistol xbow..I added another 3/4 length 80lb prod to a standard 80lb self loading cobra pistol xbow...I squeezed this extra prod alongside (two bows) so its gone from 160fps with a 10gm bolt to around 250fps.  With a 7gm bolt I have gone just over the 300fps.  But I have been using up tp 16gms which fly around 185fps but has a lot of punching power!   Its said that kinetic is king..but ive found its not allways the case? It depends on which material youre shooting at..like ..wood or metal etc..as speed sometimes penetrates better than weight depending on the target substance.
    Anatine Duo
    Anatine Duo
    Tinkerer

    If there is a will, there is a way.


    TinkererIf there is a will, there  is a way.


    Posts : 65
    Join date : 2013-10-07
    Location : Muskoka, Canada

    Pistol Build #2 Empty Re: Pistol Build #2

    Post by Anatine Duo Thu Jul 10, 2014 4:26 am

    Great lines on that pistol and I love the simplicity of the mech (even though it looks difficult to cut precisely.
    avatar
    chaz
    Crossbow Junkie

    I live here!


    Crossbow JunkieI live here!


    Posts : 313
    Join date : 2012-04-13
    Age : 75
    Location : Texas

    Pistol Build #2 Empty Re: Pistol Build #2

    Post by chaz Thu Jul 10, 2014 4:30 pm

    Nicely done

    Chaz
    Gnome
    Gnome
    Crossbow Junkie

    I live here!


    Crossbow JunkieI live here!


    Posts : 451
    Join date : 2011-10-16
    Age : 60
    Location : North Georgia

    Pistol Build #2 Empty Re: Pistol Build #2

    Post by Gnome Thu Jul 10, 2014 5:35 pm

    Thanks for checking this one out, folks! Well over a year later this is still one of my favorites. It's held up pretty well, though the two full length steel prods have begun to take a set, bending a bit just at the end of the shorter one. I have quite a few spares lying around, though.

    Kram, regarding it's stopping power at 20 or 30 yards... well, I haven't thought of it in those terms, but I think you're being a bit optimistic! I haven't targeted anything further than six or eight yards with it, and it hits plenty hard at that distance, but I have a feeling such a light bolt would slow down quite a bit with distance. I actually get much better accuracy with it when I don't aim- just take quick snap shots, point and shoot without aiming much at all. It's very ergomic that way.

    Gnome

    Sponsored content


    Pistol Build #2 Empty Re: Pistol Build #2

    Post by Sponsored content


      Current date/time is Fri Apr 26, 2024 11:12 pm