The Arbalist Guild

Would you like to react to this message? Create an account in a few clicks or log in to continue.

Crossbows - Everything about Building, Modding, and Using your Crossbow Gear

Latest topics

» [solved]Skane/Lillohus crossbow thread
by stuckinthemud1 Sat Aug 10, 2024 3:16 pm

» Colletiere a Charavines continuing experiment
by stuckinthemud1 Fri Aug 02, 2024 7:13 am

» What you building?
by hullutiedemies Tue Jul 09, 2024 12:39 am

» 12th Century Chinese Crossbow Chronographed
by stuckinthemud1 Fri Nov 24, 2023 3:50 pm

» Crossbow Stock
by kenh Tue Oct 31, 2023 6:19 am

» Cocking - how
by stuckinthemud1 Thu Aug 03, 2023 4:24 am

» Questions around heavy crossbow lath buildin
by stuckinthemud1 Wed Apr 26, 2023 1:10 am

» Arab Crossbow
by stuckinthemud1 Tue Apr 25, 2023 7:57 am

» prod angle, and lever trigger for sale anyone?
by stuckinthemud1 Mon Mar 20, 2023 5:54 am

» flexible string
by jasper1978 Mon Mar 20, 2023 1:25 am

» jens sensfelder
by jasper1978 Wed Mar 08, 2023 11:58 pm

» 400lb Windlass crossbow bolts weight and accuracy shooting high.
by stuckinthemud1 Sun Mar 05, 2023 2:53 pm

» Codex Löffelholz crossbow
by stuckinthemud1 Tue Jan 24, 2023 4:14 pm

» Digitar prodsc
by stuckinthemud1 Sun Jan 15, 2023 2:42 pm

» Troubleshooting
by Andy. Fri Jan 06, 2023 12:29 pm

» Wood Prods
by stuckinthemud1 Fri Dec 30, 2022 12:47 pm

» Colletiere a Charavines crossbow
by stuckinthemud1 Fri Dec 30, 2022 8:54 am

» Simplified Löffelhotz speedloader
by stuckinthemud1 Fri Dec 09, 2022 4:05 pm

» Fiberglass H-bows
by c sitas Sat Nov 12, 2022 8:44 am

» Bad Antler
by drawknife Sat Nov 12, 2022 3:48 am

» Anyone make their own bolts?
by Juniper Mon Oct 17, 2022 8:20 am

» Josef alm in English
by Juniper Sat Oct 15, 2022 4:22 am

» Qin/Han lock drawings
by kenh Fri Sep 23, 2022 8:16 pm

» stirrup dimensions?
by stuckinthemud1 Thu Sep 01, 2022 1:49 pm

» Skane/Lillohus lockbow information needed
by stuckinthemud1 Sun Aug 14, 2022 6:23 am


+7
asken92
hullutiedemies
c sitas
Gnome
Anatine Duo
jaeger22
Hermit
11 posters

    RDT experiments

    avatar
    jaeger22
    Workshop Savvy

    Did you see my tool collection?


    Workshop SavvyDid you see my tool collection?


    Posts : 153
    Join date : 2013-03-15
    Age : 76
    Location : Orlando, FL

    RDT experiments - Page 2 Empty RDT experiments

    Post by jaeger22 Mon Jan 19, 2015 4:53 am

    First topic message reminder :

    I am inspired by  Patandjliand and Ali but want to incorporate some ideas of my own. I started with the cams. I have an old lathe and mil but neither cuts shapes well that are not either round or straight. Strait lines on the mill are easy but cam shapes, not so much. So I redesigned the cams to use round shapes except for cut outs that are just to lighten the cam. I don't know if they will yield the kind of draw force curve I am looking for yet, I need to build limbs and make strings, but here is what I have so far:
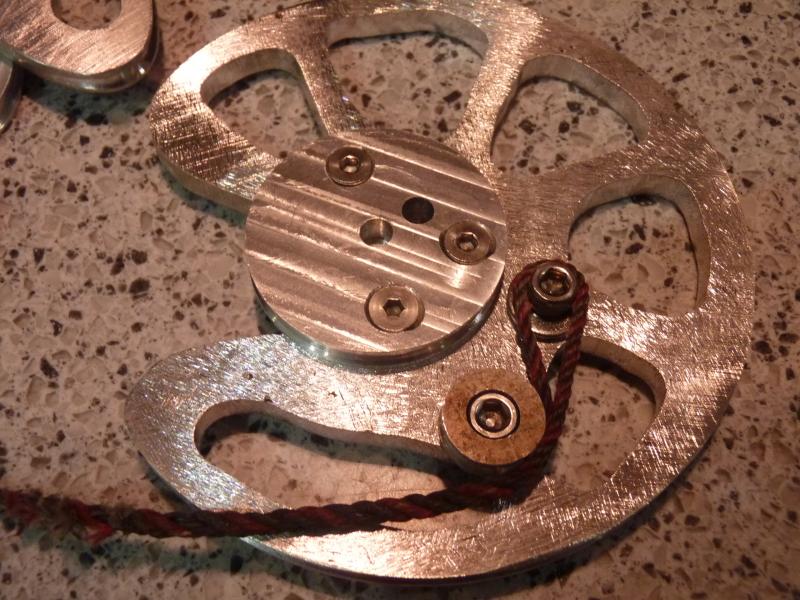
    RDT experiments - Page 2 P1020117_zps760c2916

    Instead of one elongated power cam I am using a 2 piece cam consisting of one eccentric round main cam and a smaller offset "button" to give similar geometry to the single cam. This allowed me to machine the cam parts on the lathe,
    The main or string cam is actually a perfect circle around the axle except for the cut out notch for the string attachment.
    More to come. ..
    avatar
    jaeger22
    Workshop Savvy

    Did you see my tool collection?


    Workshop SavvyDid you see my tool collection?


    Posts : 153
    Join date : 2013-03-15
    Age : 76
    Location : Orlando, FL

    RDT experiments - Page 2 Empty Re: RDT experiments

    Post by jaeger22 Sun Feb 15, 2015 10:38 am

    Thought I would post a progress update but first I want to give a shout out of thanks to Ali.j for his tip on changing strings. (see his video tip https://www.youtube.com/watch?feature=player_embedded&v=P4uu3y7jo1w) When I thought about it I realized that the technique would work for the first string by using a longer bow string to start with. I just used an old recurve bowstring I had in the shop. It is long enough to just slip right on once the power cam strings are on and they are fairly easy to do by hand. A bit like using a bastard string to brace a conventional crossbow.
    So the first big problem was related to the issue Hermit and I talked about above. The power cam string is anchored to the axle to the side of the cams. This causes an unbalanced load on the limbs and results in a bit of twist. Not a huge problem if it is not too much because the strings should follow the deep groove on the outside of the cams. But it is a much bigger problem for my two part power cam that consists of two round cams. As the cam rotates, the power cam string must transfer from the small round cam to the large cam. You see that here:
    RDT experiments - Page 2 P1020142_zps3xhgbxmd
    The string is on the small cam to start and as cam set rotates from pulling the main string back, the power cam string will be picked up by the larger power cam but there is about a 2"gap.
    Unless the whole cam is twisted! Shocked Then the string will miss the cam groove and slip off to the side. Sad  So my experiment showed why a single piece cam if better even if harder to make. With a single cam, the string will continuously track the groove. 
    Here is how much limb twist I started with:
    RDT experiments - Page 2 P1020138_zpsop62iuo0

    So I thought about how to take the twist out of the limb and came up with two possibilities. First, make the top limbs weaker so the offset load would pull the limb straight. The second is to change the angle of the base mount a bit to counter the twist angle. I ended up doing a little of both. Weaking the top limbs helped a lot but it still had a little twist so I angled the wood below the base mount a bit. Now it looks like this:
    RDT experiments - Page 2 P1020140_zpszrwlniof

    The double thickness limbs kind of work. They haven't exploded yet but the strength is less than 1/2 what I was looking for. I expect the glass content of the blanks I started with is too low. But I will continue withe these for now and think about replacements. Also, I knew my main string was a bit short and I was only getting 18"of total draw, so I made a temporary string a 4 inches longer for a test to see if it would give me the full 20" draw I designed it for. That worked perfect so tonight I will make the real one. Starting on the stock today! cheers
    More to come,
    John
    ali.j
    ali.j
    Tinkerer

    If there is a will, there is a way.


    TinkererIf there is a will, there  is a way.


    Posts : 76
    Join date : 2013-10-30
    Age : 30
    Location : iran- shiraz

    RDT experiments - Page 2 Empty Re: RDT experiments

    Post by ali.j Sun Feb 15, 2015 3:38 pm

    hom nice job. i made 2 rdt crossbow too.

    https://thearbalistguild.forumotion.com/t1120-my-home-made-crossbows

    if you have gustion juts ask me.
    ali.j
    ali.j
    Tinkerer

    If there is a will, there is a way.


    TinkererIf there is a will, there  is a way.


    Posts : 76
    Join date : 2013-10-30
    Age : 30
    Location : iran- shiraz

    RDT experiments - Page 2 Empty Re: RDT experiments

    Post by ali.j Sun Feb 15, 2015 5:37 pm

    jaeger22  dowenload this video link. i think its useful for you.
    is 12 minutes  show to you how change and take in press strings and .....

    http://s5.picofile.com/file/8171226242/avc_amozesh_bastan.mp4.html

    how to dowemload? 
    RDT experiments - Page 2 14_15142128053476881
    avatar
    jaeger22
    Workshop Savvy

    Did you see my tool collection?


    Workshop SavvyDid you see my tool collection?


    Posts : 153
    Join date : 2013-03-15
    Age : 76
    Location : Orlando, FL

    RDT experiments - Page 2 Empty Re: RDT experiments

    Post by jaeger22 Mon Feb 16, 2015 4:27 am

    Thanks Ali, when I click the link I see a video of you (I assume) assembling a Scorpion Crossbow. It was interesting and gave me some more ideas. I have very much enjoyed following your builds with the excellent videos. cheers
    Thanks again,
    John
    Gnome
    Gnome
    Crossbow Junkie

    I live here!


    Crossbow JunkieI live here!


    Posts : 451
    Join date : 2011-10-16
    Age : 60
    Location : North Georgia

    RDT experiments - Page 2 Empty Re: RDT experiments

    Post by Gnome Mon Feb 16, 2015 7:58 am

    John I noticed the same type of twist on Ali's build and wondered about it- I searched quite a few videos of commercial RDT crossbows being drawn and fired and saw no evidence of it, so I wonder what they are doing differently? At first I thought it might be because they use one limb per side split only where it needs to be to house the cams like the Scorpyd, but then I saw the Barnett version that looks like it uses two separate limbs per side like yours, and those cams stayed straight, too. Hmmm.
    Gnome
    avatar
    Hermit
    Workshop Savvy

    Did you see my tool collection?


    Workshop SavvyDid you see my tool collection?


    Posts : 245
    Join date : 2013-09-10

    RDT experiments - Page 2 Empty Re: RDT experiments

    Post by Hermit Mon Feb 16, 2015 8:38 am

    Patandjali was the first to build this type of bow,his English was limited,but he never mention twist in his limbs being a problem,or having to shape his limbs to counteract it.I wonder if he had this problem,and if he did,what he did to solve it.Could be there's a lot more experimenting and re-design to be done..........
                              Hermit.
    ali.j
    ali.j
    Tinkerer

    If there is a will, there is a way.


    TinkererIf there is a will, there  is a way.


    Posts : 76
    Join date : 2013-10-30
    Age : 30
    Location : iran- shiraz

    RDT experiments - Page 2 Empty Re: RDT experiments

    Post by ali.j Mon Feb 16, 2015 9:23 am

    yes. my firend  Patandjali    ( telivil ) is a dear firend he help me soo mach. irest he comented in my video and i see his chanel. wow was wonderful. i ask he some gustion about his crossbow and re disgned elemenst. i see hes oldets progects in .szip.hu and I met there with his friends.I saw a few others there all are crofestman Very Happy my rdt has some difrents. my cam is 5% smaller and drow long is 52 cm. and some details. 
    in new rdt crossbow i change smal cam and limbs and concter limbs ( leg limbs )

    http://rifles.ir/showthread.php?tid=209&page=43
    avatar
    c sitas
    Crossbow Junkie

    I live here!


    Crossbow JunkieI live here!


    Posts : 547
    Join date : 2012-11-24

    RDT experiments - Page 2 Empty Re: RDT experiments

    Post by c sitas Mon Feb 16, 2015 11:42 am

    Where the problem comes from is the take up cables. They are being pulled to one side to make clearance for the fletching. I had a similar problem.What I did was reposition the wheels as best I could to one side .  Then push the take up cables as far as you can the other direction. Also I took as much side pressure as possible off the take up cables. It did leave me with just barely enough clearance for the fletching. If your using feathers this is not quite as critical. We have the same trouble in archery all the time.I am using wood and fiberglass limbs so bending is not an option . I wouldn't hesitate to cock a steel limb if I could. That would go a long ways to help out here.I suppose I could shim one side of my limb, but I really don't like the thought of silly little loose parts that could be lost and go unnoticed for a time. CAUSE you would just know when this will take place.
    avatar
    jaeger22
    Workshop Savvy

    Did you see my tool collection?


    Workshop SavvyDid you see my tool collection?


    Posts : 153
    Join date : 2013-03-15
    Age : 76
    Location : Orlando, FL

    RDT experiments - Page 2 Empty Re: RDT experiments

    Post by jaeger22 Mon Feb 16, 2015 1:24 pm

    Good thoughts guys. I am thinking the answer for split limbs it to make the top limb weaker or as Sitas talked about, move the cam off center so the pull of the cables is more centered. Or some of each. If the top limb was SLIGHTLY reduced in thickness it would weaken it enough to allow the off center pull to bring the limb pair in straight. I just thinned the width because it was easier but now the top limb is noticeably thinner than the bottom ones. It did make a huge difference though. If the gap at the end of my limbs is wide enough, I want to look at adding additional spacers to get the cam off center like Sitas talked about.
    Patandjali and Ali used heavy steel car springs and did not split them all the way into separate limb half's so that may have helped. Patandjali could have angled the base mount a bit but he didn't talk about it and I can't tell from the pictures. Lots of ways to skin this cat but I expect it will take some tinkering. Good thing I like to tinker! Laughing

    Sitas wrote:I am using wood and fiberglass limbs so bending is not an option

    Can you elaborate on these limbs? Did you glue them up or adapt from something existing? I am think about making some like these for the next round. I have glued up many recurve limbs but I am not sure where to start for glass and laminate thickness for limbs as heavy as we need here.
    Thanks,
    avatar
    Hermit
    Workshop Savvy

    Did you see my tool collection?


    Workshop SavvyDid you see my tool collection?


    Posts : 245
    Join date : 2013-09-10

    RDT experiments - Page 2 Empty Re: RDT experiments

    Post by Hermit Mon Feb 16, 2015 6:30 pm

    There was a series of videos on you tube a year or so ago,by a Scotsman.I can't remember his name or the name of his videos,except that he called his bow'A poacher's crossbow'it was a conventional bow,but the limbs folded.The point of this ramble is,he made a series of videos about constructing his bow,and one section dealt with limb construction.His limbs were solid fibreglass,and his draw weight (he said) was around 250lbs.I don't know if his videos are still on you tube.Making limbs out of fibreglass in tedious,but not difficult.You need a 2 part wooden mould(easy to make)you need the right kind of fibreglass(the strands all oriented in the same direction)specialist firbreglass suppliers will have it.When laying up the fibreglass,you need to put sufficient resin on so that when the mould is clamped together,there will be no air bubbles.Saran wrap applied to the moulds will prevent the fibreglass sticking to it.The job is messy,(you need gloves)and the polyester resin stinks,so it's an outside job,but as I said,not a difficult one.
    avatar
    c sitas
    Crossbow Junkie

    I live here!


    Crossbow JunkieI live here!


    Posts : 547
    Join date : 2012-11-24

    RDT experiments - Page 2 Empty Re: RDT experiments

    Post by c sitas Mon Feb 16, 2015 6:49 pm

    As for my limbs,  They are a matched set I took off of a factory made Jennings T Star. It was a sin to tear something like this bow apart but--.I gave them new life. I don't know for how long though. I'm pulling close to 130# out of these limbs. They were originally made the pull 60# on a compound. I'm pulling them like a regular bow, no cam help. I also made a winch to fit the job. Turned out nice. There was someone on here that started one similar, but I never found where he finished it.
    avatar
    c sitas
    Crossbow Junkie

    I live here!


    Crossbow JunkieI live here!


    Posts : 547
    Join date : 2012-11-24

    RDT experiments - Page 2 Empty Re: RDT experiments

    Post by c sitas Wed Feb 18, 2015 8:48 am

    Hey guys; Did you see Ali's last post . Near the end he has a picture or two. If you study the way he has his take up cables setup, I think you'll fix most of your bad tilting of you cams.In my archery experience I would say that it's extreme. BUT, you gota do what you gota do.As long as things don't fly apart --good to go .Each circumstance is different.Having a 150# of pressure come apart when your not expecting it is not for the faint of heart. Nice thing though, it's traveling away from you. I've had several such goings on and  I always expect this until my bow has proven otherwise. When we build such things we always know we're on our own . I would never steer some one bad on purpose.  Although it works for me your mileage could vary, so to speak.I'm just speaking in general here, not just about our cams.
    ali.j
    ali.j
    Tinkerer

    If there is a will, there is a way.


    TinkererIf there is a will, there  is a way.


    Posts : 76
    Join date : 2013-10-30
    Age : 30
    Location : iran- shiraz

    RDT experiments - Page 2 Empty Re: RDT experiments

    Post by ali.j Thu Feb 19, 2015 3:05 am

    Very Happy Very Happy

    RDT experiments - Page 2 19_1514243415770661

    RDT experiments - Page 2 19_15142434157719542
    avatar
    jaeger22
    Workshop Savvy

    Did you see my tool collection?


    Workshop SavvyDid you see my tool collection?


    Posts : 153
    Join date : 2013-03-15
    Age : 76
    Location : Orlando, FL

    RDT experiments - Page 2 Empty Re: RDT experiments

    Post by jaeger22 Fri Feb 20, 2015 5:13 am

    Very cute Ali! Smile  A miniature RTD cross bow. LOL

    sitas wrote:Near the end he has a picture or two. If you study the way he has his take up cables setup, I think you'll fix most of your bad tilting of you cams.

    I am not really sure what you mean here but if you mean that the through hole for the cables is a bit low and therefore pulling down on the power cable, that would pull them more off center and make the lean worse. I chose to make the through hole close to dead in line with the cables and that put a bit of bend in the main string to go over the top of barrel. To fix the lean I did three things, I lightened the top limb some, I added a few washers to the power cable side of the cam to make it a bit off center (both of those helped some) and I made mounting blocks with just a bit of taper. That actually ended up tilting the cams slightly the other way so I had to re-cut the taper to .05"over the 2"width of the taper block or about 1.4 degrees.
    Here is what it looked like when I first put in the taper blocks;

    RDT experiments - Page 2 P1020149_zpsrlaqqp3r
     And here is a shot of the taper blocks so you can see how little taper is required;

    RDT experiments - Page 2 P1020146_zpspsmtz9ld
     So you can see that you can get almost any limb tilt you want with just a small amount of lean angle in the limb mounts. If was welding up a cradle I would built in a small angle. But it would be much harder to adjust later! Smile 
    I still have a lot of work to do but it is starting to look a little like a cross bow. Very Happy It is a pig though, and weighs around 15 LB at this point. Shocked  I need to put it on a diet by cutting away all material that is not critical.
    avatar
    c sitas
    Crossbow Junkie

    I live here!


    Crossbow JunkieI live here!


    Posts : 547
    Join date : 2012-11-24

    RDT experiments - Page 2 Empty Re: RDT experiments

    Post by c sitas Fri Feb 20, 2015 8:51 am

    Jaeger, looking at your pictures of the setup I'd say you hit a home run.And by going through the stock you don't have excess baggage hanging  on the outer parts of the bow. I like it ,and I'd be fairly certain it'll shoot like it looks. Good job. I don't know where Ali's last two pic came from, they weren't what I was talking about.But you figured it out.I see your hammer lock.Also you have a plenty of metal. I think starting out ,we all have a tendencey "to make sure it don't break". You know what I mean, that's where the" pig " comes from.
    avatar
    stealthmicro
    Fresh Blood

    Doesn't mean
    I'm new to crossbows


    Fresh Blood Doesn't meanI'm new to crossbows


    Posts : 2
    Join date : 2015-01-30

    RDT experiments - Page 2 Empty Re: RDT experiments

    Post by stealthmicro Sat Feb 21, 2015 1:42 am

    Wow Really great work ,im looking forward to the rest of your build a some test fire shots,im going to start on a rdt crossbow build soon too.      Thanks  !!!
    avatar
    jaeger22
    Workshop Savvy

    Did you see my tool collection?


    Workshop SavvyDid you see my tool collection?


    Posts : 153
    Join date : 2013-03-15
    Age : 76
    Location : Orlando, FL

    RDT experiments - Page 2 Empty Re: RDT experiments

    Post by jaeger22 Sat Feb 21, 2015 9:12 am

    Thanks Guys! I appreciate the feed back! Yes I see lots of places I can trim weight off the "pig" but I figured I would try to get it shooting first. And with all these "experiments" I sure some will be failures and I will have to come up with alternatives. I already know I will eventually need better stronger limbs but as long as these don't blow up on me I want to keep moving and testing.
    So this is what I came up with for the string stops. It is just a strip cut from a motorcycle inter-tube and then stuffed into a short section bicycle inter-tube. The strip is wrapped around a 1/4 bolt and the length is cut just short enough that the bicycle tube will slide over top with a nice snug fit. The bracket that holds it is just cut from aluminum angle. 
    RDT experiments - Page 2 P1020153_zpshyp7gxvs

    So with this done I was ready for the first test shot! And the very first arrow flew great! Very Happy
    Then disaster. Sad  I was trying to cock it for a second shot and managed to dry fire it. Shocked It exploded. Mad
    Purely my own stupid fault. Embarassed  I knew I needed to make a special cocking rig for this type bow due to the acute string angle but I thought I could get away with a few test shots using a regular rope and pulley type cocking device.   NOT!! With the dry fire the tips that hold the shaft for the cams all let go and the cams came flying out.
    So I am in the process or replacing the tips. This time with much beefier dimensions. 
    Here they are waiting for the high strength epoxy to harden.
    RDT experiments - Page 2 P1020151_zpspwuzuj6y

    The material is laminated epoxy/maple that I had left over from a gun stock project. It is the strongest non metal material I have around the shop but if it fails again I will have to look for something stronger.
    Now to figure out how those RDT bow stringers work and how to make one! scratch
    avatar
    c sitas
    Crossbow Junkie

    I live here!


    Crossbow JunkieI live here!


    Posts : 547
    Join date : 2012-11-24

    RDT experiments - Page 2 Empty Re: RDT experiments

    Post by c sitas Sat Feb 21, 2015 3:20 pm

    Hey Jaeger, might as well give and make a winch. They are very simple to do. I blocked mine. This way it is easier to use . You can cock with just one hand cranking . The other is free to do what ever. Also think about making a dry fire catch. This also is very simple.i just use 0ne 1/4" 20 bolt and one locating dowel to hold it on my stock. You can leave it on or take it off.
    Gnome
    Gnome
    Crossbow Junkie

    I live here!


    Crossbow JunkieI live here!


    Posts : 451
    Join date : 2011-10-16
    Age : 60
    Location : North Georgia

    RDT experiments - Page 2 Empty Re: RDT experiments

    Post by Gnome Sat Feb 21, 2015 3:36 pm

    Sorry for the setback, but it seems they are a necessary evil to allow real progress. It can't be a coincidence that it isn't the first time an experimental build is armed and fired that it fails, but the 2nd time. I think that's happened to me about 3 or 4 times that I can think of. The shock of the first release is bound to bring any weaknesses to light, I guess, but it isn't until that 2nd draw that the pain becomes obvious!
    BTW, my own experiments with a reverse-draw cam design is progressing, but slowly because I'm trying to buy a house and don't want to get to deep into a full scale project until the move is over. Hopefully I'll have a much better shop space! I don't want to post anything until I have real results to show, but in the meantime here's a teaser: think compound-micro-ballista.
    Gnome
    ali.j
    ali.j
    Tinkerer

    If there is a will, there is a way.


    TinkererIf there is a will, there  is a way.


    Posts : 76
    Join date : 2013-10-30
    Age : 30
    Location : iran- shiraz

    RDT experiments - Page 2 Empty Re: RDT experiments

    Post by ali.j Sun Feb 22, 2015 8:41 am

    i try disigne a mini rdt. Will be weaker and smaller

    RDT experiments - Page 2 22_15142461925979271  RDT experiments - Page 2 22_15142461926047722


    Last edited by ali.j on Mon Feb 23, 2015 8:38 am; edited 1 time in total
    avatar
    jaeger22
    Workshop Savvy

    Did you see my tool collection?


    Workshop SavvyDid you see my tool collection?


    Posts : 153
    Join date : 2013-03-15
    Age : 76
    Location : Orlando, FL

    RDT experiments - Page 2 Empty Re: RDT experiments

    Post by jaeger22 Sun Feb 22, 2015 6:16 pm

    Yes a winch might be a good idea when I get some stronger limbs. Right now these limbs are only pulling 55 LB. I can actually cock it by hand even with the string pinch.
    This is what I came up with for a shuttle for the stringer:
    RDT experiments - Page 2 P1020160_zpskccaatyr

    And here it is strung:
    RDT experiments - Page 2 P1020156_zpsosp9nxrl
    I got everything fixed and was able to get off a few shots and also put a few through the crony.
    I was getting 170 FPS which is a bit disappointing but about what I expected for 55 LB limbs.
    These cams give good mechanical advantage but they are way too heavy for a low weight set of limbs. I think next I will experiment with seeing how much weight I can take off the cams and how much it effects the FPS. But the main thing will be to design and build a new and heaver set of limbs. I am thinking composite with bo-tuff,  and wood core like I used in the past for re-curves but much thicker. I have some designing and figuring out to do. scratch And then I have to order materials. That will take time but while I am waiting I have lots to experiment with.
    Ali, good luck with your mini design. Please keep us posted.
    avatar
    c sitas
    Crossbow Junkie

    I live here!


    Crossbow JunkieI live here!


    Posts : 547
    Join date : 2012-11-24

    RDT experiments - Page 2 Empty Re: RDT experiments

    Post by c sitas Sun Feb 22, 2015 6:58 pm

    Hey  Jaeger; possible more to gain if you looked at your limb mounts.I was in the same boat at 13# When I redone things I ended up a little over 8#. Just flapping my jaws, but it looks like a lot involving the mounts. Bumpers also, I took mine off. I noticed the store bought mostly don't use them. Their claim to fame is supposed to be for speed. I don't need speed. I'll take kinetic energy over speed any day. Besides, a heavy arrow helps make a quite bow. It helps suck all the energy out of it.Stock from the trigger back , close to 3/4 of a pd. I chopped mine off and went with a sliding aluminum butt plate. I guess that's what they call a bull pup.When I sacrificed the butt end I was able to trade for my winch.No matter what you have a great machine started there.
    Geezer
    Geezer
    Master Crossbowyer
    Master Crossbowyer


    Posts : 1194
    Join date : 2010-01-12
    Age : 76
    Location : Austin, Texas, USA

    RDT experiments - Page 2 Empty Re: RDT experiments

    Post by Geezer Sun Feb 22, 2015 8:30 pm

    Geezer here: Pardon me for sticking my oar in here.  I don't do anything with pulley-bows, but generally speaking, you won't see bumpers on any sort of medieval bow.  In fact, I think they'll cause excessive wear to your bowstring, maybe the prod as well.  I think you'd be better off extending the fore-end of the bolt-track further forward, to let the string bring itself to a halt, or perhaps look into fitting a bit of a deceleration-ramp ahead of the stopping point. If you do it right, the ramp need not cause the bolt to loft.  Medieval bows that were fitted with horn/sinew prods often had a rise in the 'table' about where the string should rest... I suspect that was to soften the stop at the end of the run... working on the assumption that hard stops on a glued together prod probably eventually ended up making the glued-up prod delaminate.  Anyhow, a longer fore-end with some sort of decleration ramp would probably result in less string wear and a quieter bow... though it would be a bit longer.  Just thinkin.... Geezer.
    avatar
    jaeger22
    Workshop Savvy

    Did you see my tool collection?


    Workshop SavvyDid you see my tool collection?


    Posts : 153
    Join date : 2013-03-15
    Age : 76
    Location : Orlando, FL

    RDT experiments - Page 2 Empty Re: RDT experiments

    Post by jaeger22 Mon Feb 23, 2015 4:29 am

    Good point Geezer and I thought about the same thing, just make the barrel a few inches longer. But I noticed that every RTD I have seen, both commercial and homemade seem to have some kind of stop. Maybe just for noise or to prevent the string from getting caught on the end. But maybe there is a tendency for the string to jump off the cam if there is no stop! Shocked  I don't really know. scratch So in this case I just assumed that since everyone seemed to be adding the stops, there is a very good reason for them and did the same. They are soft rubber and should not hurt the string. 
    As far as limb mounts, yes that is a key factor in the pull weight. I played around a bit with the angle and width to try to get the "right" amount of pre-stress. I basically want as much pre-stress as I can get without the limbs being over stressed at full draw. I may be able to get a bit more but will not really know when I get to the "too much" level of pre-stress until the limb explodes. I don't know how much these solid glass limbs can stand so I have tried to error on the conservative side.
    Sounds like another good experiment to try after I finish playing the "how light can I make the cams" game. Laughing
    avatar
    jaeger22
    Workshop Savvy

    Did you see my tool collection?


    Workshop SavvyDid you see my tool collection?


    Posts : 153
    Join date : 2013-03-15
    Age : 76
    Location : Orlando, FL

    RDT experiments - Page 2 Empty Re: RDT experiments

    Post by jaeger22 Wed Feb 25, 2015 6:03 am

    Wow! I am shocked! This experiment was definitely a learning event. . . . .
    I machined more material off the cams and then drilled a bunch of holes everywhere I thought I could get away with it and not weaken the cam too much. Before this the cams weighed 240 Grams each. This lightening exercise reduced it to 195 grams each. About a 18% reduction. This is what they look like now:
    RDT experiments - Page 2 P1020162_zpsnu0k8mpv

    So this should make the arrow velocity jump way up right? . . .NOT!!! It went from an average of 170 FPS to 171 FPS Shocked Shocked Shocked A whole 1 FPS faster for 18% lighter cams.
    I conclude that it is not worth spending a huge amount of time reducing the cam weight.
    Next I plan to increase pre-stress to see if I can get the pull weight up without breaking the limbs.

    Sponsored content


    RDT experiments - Page 2 Empty Re: RDT experiments

    Post by Sponsored content


      Current date/time is Tue Nov 26, 2024 10:44 pm