The Arbalist Guild

Would you like to react to this message? Create an account in a few clicks or log in to continue.

Crossbows - Everything about Building, Modding, and Using your Crossbow Gear

Latest topics

» What you building?
by hullutiedemies Tue Jul 09, 2024 12:39 am

» 12th Century Chinese Crossbow Chronographed
by stuckinthemud1 Fri Nov 24, 2023 3:50 pm

» Crossbow Stock
by kenh Tue Oct 31, 2023 6:19 am

» Colletiere a Charavines continuing experiment
by stuckinthemud1 Sat Oct 07, 2023 5:36 am

» Cocking - how
by stuckinthemud1 Thu Aug 03, 2023 4:24 am

» Questions around heavy crossbow lath buildin
by stuckinthemud1 Wed Apr 26, 2023 1:10 am

» Arab Crossbow
by stuckinthemud1 Tue Apr 25, 2023 7:57 am

» prod angle, and lever trigger for sale anyone?
by stuckinthemud1 Mon Mar 20, 2023 5:54 am

» flexible string
by jasper1978 Mon Mar 20, 2023 1:25 am

» [solved]Skane/Lillohus crossbow thread
by stuckinthemud1 Sun Mar 19, 2023 7:44 am

» jens sensfelder
by jasper1978 Wed Mar 08, 2023 11:58 pm

» 400lb Windlass crossbow bolts weight and accuracy shooting high.
by stuckinthemud1 Sun Mar 05, 2023 2:53 pm

» Codex Löffelholz crossbow
by stuckinthemud1 Tue Jan 24, 2023 4:14 pm

» Digitar prodsc
by stuckinthemud1 Sun Jan 15, 2023 2:42 pm

» Troubleshooting
by Andy. Fri Jan 06, 2023 12:29 pm

» Wood Prods
by stuckinthemud1 Fri Dec 30, 2022 12:47 pm

» Colletiere a Charavines crossbow
by stuckinthemud1 Fri Dec 30, 2022 8:54 am

» Simplified Löffelhotz speedloader
by stuckinthemud1 Fri Dec 09, 2022 4:05 pm

» Fiberglass H-bows
by c sitas Sat Nov 12, 2022 8:44 am

» Bad Antler
by drawknife Sat Nov 12, 2022 3:48 am

» Anyone make their own bolts?
by Juniper Mon Oct 17, 2022 8:20 am

» Josef alm in English
by Juniper Sat Oct 15, 2022 4:22 am

» Qin/Han lock drawings
by kenh Fri Sep 23, 2022 8:16 pm

» stirrup dimensions?
by stuckinthemud1 Thu Sep 01, 2022 1:49 pm

» Skane/Lillohus lockbow information needed
by stuckinthemud1 Sun Aug 14, 2022 6:23 am


+8
mac
8fingers
Todd the archer
SilasMontgommeri
jake-owa
blangas
Ivo
Gnome
12 posters

    First build

    Gnome
    Gnome
    Crossbow Junkie

    I live here!


    Crossbow JunkieI live here!


    Posts : 451
    Join date : 2011-10-16
    Age : 60
    Location : North Georgia

    First build Empty First build

    Post by Gnome Mon Nov 07, 2011 2:29 pm

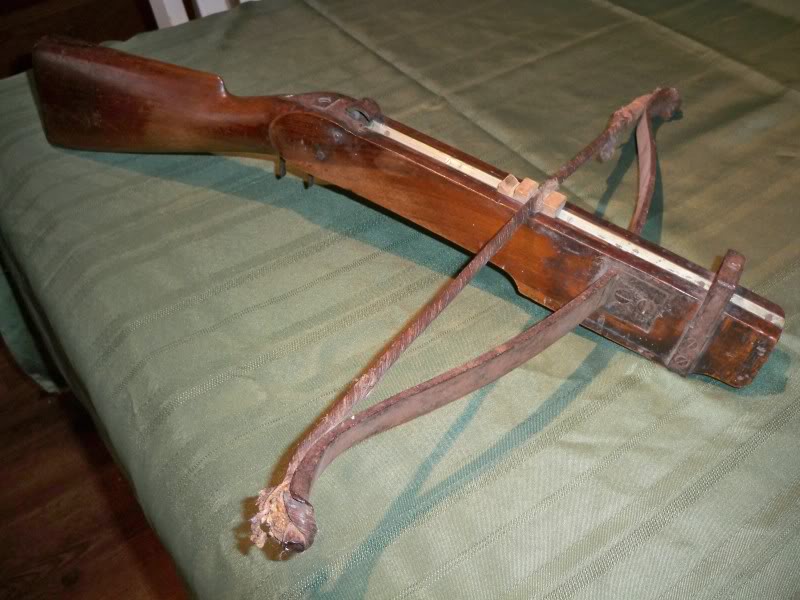
    This was the initial plan I came up with for my first complete build, designed around Alchem's 200ish pound prod. A few things changed along the way during construction, but I stuck pretty religiously with their plans for the business end. My goal is medieval military utility, throwing short, heavy bolts, but I wanted a more modern grip, trigger and shoulder stock.

    First build Final_compositesideview

    And this is an updated detail of the trigger/lock mech.

    First build Lockfinal

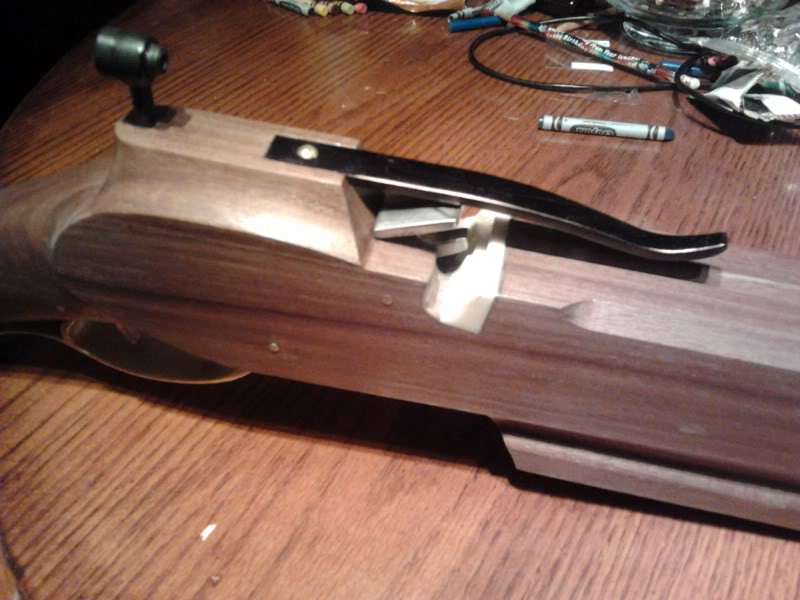
    I cut the stock from a solid chunk of walnut. I had planned on a contrasting wood for the track, and this became a necessity when I discovered the walnut to be a bit splintery and soft in the track area. So the insert was much thicker than I had originally planned, but this had the added benefit of making cutting the cavity for the trigger much more straightforward. I originally thought I would use some exotic and spectacular hardwood, but I had a stick of oak from Lowe's just the right size on my workbench so there you have it. I like the contrast, and I know I have a strong glue joint, but I sunk a couple of hidden screws into each end just to be safe. I drilled the socket for the nut all the way through and carved a couple of oak inserts to glue in later, once I had fitted the nut. One is in place in this photo.

    First build Rough

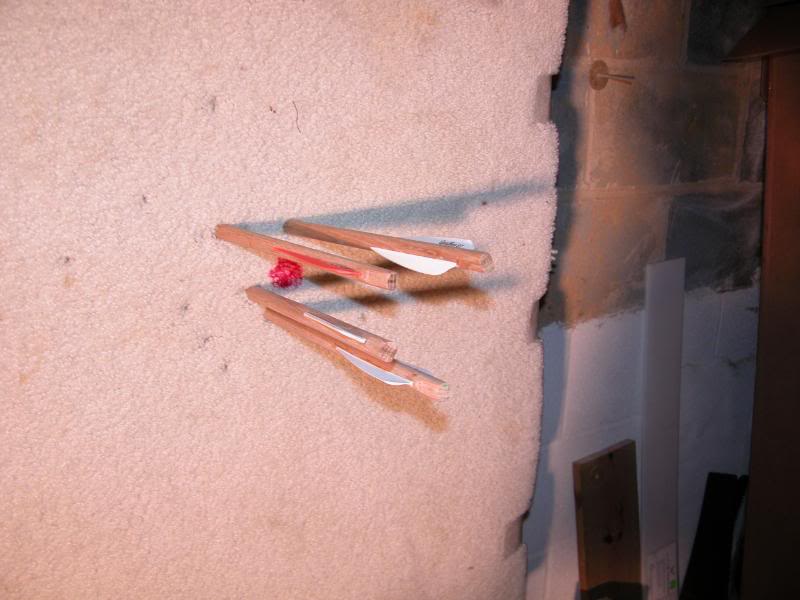
    Here's most of the bits I fabricated, also one of 6 prototype bolts I built. It's 1/2" oak dowel, 1/2" aluminum tube, and 1/2" steel rod, and weighs about 2.2 ounces. I think it's pretty good considering I don't have tools to make them properly, I'm proud of them but it's doubtful I'll make any more since I found out I can get 1/2" quarrel points from Richard Head Longbows for $1.76 each.

    First build Parts

    I ordered a couple of Derlin nut blanks from Alchem, but in the meantime found I could get my own 1.5" Derlin rod from Amazon, and did so. I also got a slab of 1" UHMW for future experiments, as well as UHMW adhesive tape. I cut a couple of blanks and got carving with my dremel and files. It was the first time I worked with this plastic and I'm pleased with the results so far, though installing the steel sear reinforcement was a bear. I cut the slot for it with an abrasive wheel in the dremel, then cut a utility knife blade to the same circular shape as the cut, with slightly roughed side edges for grip, then carefully and gingerly pounded the crap out of it with a big hammer until it was seated properly and I couldn't pull it out. That derlin is tough stuff.

    First build Nut

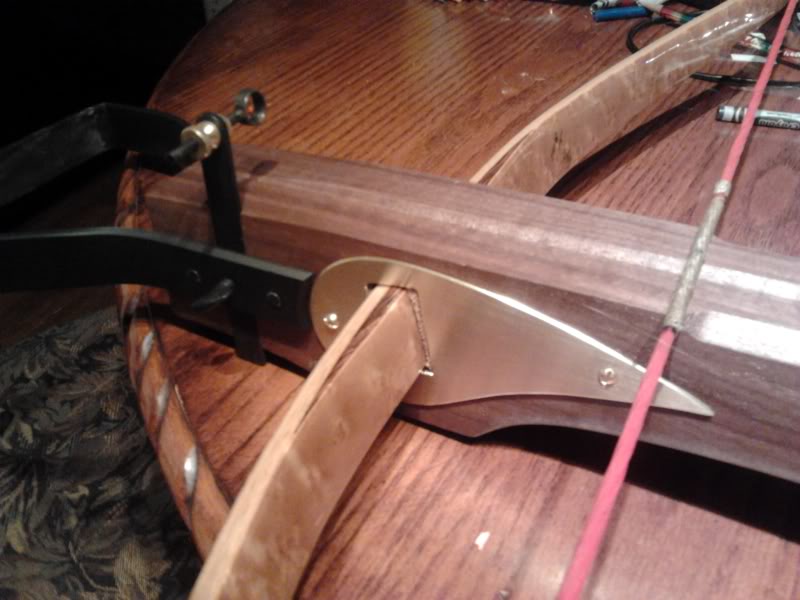
    Finally, here's a shot of the completed lock area. The wood finish is just linseed oil and beeswax. I've left the track groove very shallow so that I can fine tune that once the prod is installed and I can see how deep it should be based on the position of the string. The tongue is also not in it's final shape, I'm sure.

    First build Tongue

    That's about as far as I can go until I have the prod and irons in my hands, and probably further than I should have gone. In the meantime I'm thinking about what kind of sights I'd like to install, and also thinking of making a bench spanning device out of a scissor-type car jack.

    Whaddya think?

    Gnome
    Ivo
    Ivo
    Admin
    Admin


    Posts : 1041
    Join date : 2009-11-25
    Age : 36
    Location : NJ, USA

    First build Empty Re: First build

    Post by Ivo Mon Nov 07, 2011 6:29 pm

    Looks good for your first one. Smile

    Whaddya think?

    I think it's awesome. Very Happy And I do have a little bit of advise to make it a little better too...primarily on the trigger. Wink

    Right now it looks like the leverage ratio between the trigger and the sear is about [1:1]...or in other words - no mechanical advantage. You don't want that. Smile

    First build Lockfi11

    Trigger components can be viewed as levers...it's all they are really. Change the length of the lever / shift the fulcrum (axel) and the mechanical advantage changes. Try breaking it down a bit.

    First build Lockfi13

    Also, it's a good idea to pay close attention to the engagement angle of the sear. Check out the *Triggers topic* for more info, we discussed the common issues with sears in that one.

    Good luck,

    Ivo


    Last edited by Ivo on Tue Nov 08, 2011 12:44 pm; edited 1 time in total
    Gnome
    Gnome
    Crossbow Junkie

    I live here!


    Crossbow JunkieI live here!


    Posts : 451
    Join date : 2011-10-16
    Age : 60
    Location : North Georgia

    First build Empty Re: First build

    Post by Gnome Tue Nov 08, 2011 4:07 am

    Thanks for the input, Ivo, and especially for sketching out what you meant, otherwise I may not have gotten it. I must admit I wasn't thinking of leverage in those terms- I guess I normally think of lever advantage in terms of moving a great weight, and here I was focused on getting the end of the lever out of the way of the weight. I can see, though, that the pressure applied to those parts under drawn weight, combined with any friction generated by their surfaces if they are not set at a precise angle could require much more effort to move than I anticipated. Back to the lab!
    blangas
    blangas
    Fresh Blood

    Doesn't mean
    I'm new to crossbows


    Fresh Blood Doesn't meanI'm new to crossbows


    Posts : 22
    Join date : 2011-10-04
    Location : Australia

    First build Empty Re: First build

    Post by blangas Tue Nov 08, 2011 1:10 pm

    Love your work so far gnome. I think the concept of blending medieval with modern is very cool. By sticking with the tried and true rolling nut system and alchems plans you can't really go too far wrong. I am considering something along similar lines for my next project, although I want to blend fantasy style with modern.
    Cheers for the timber finish tips, you're right, I did start with a couple of scabby old peices of ply I found lying around at work, and its true what they say: you can't polish a turd. I will try to source somthing a little more exotic for my next effort.
    jake-owa
    jake-owa
    Workshop Savvy

    Did you see my tool collection?


    Workshop SavvyDid you see my tool collection?


    Posts : 145
    Join date : 2010-11-06

    First build Empty Re: First build

    Post by jake-owa Tue Nov 08, 2011 2:15 pm

    Try putting some pressure on the nut and pulling the trigger. If the nut moves the slightest bit back before releasing your trigger weight will be too high. With that 200lb bow I would definitely opt for the mechanical advantage of a three piece trigger as mentioned. Also, not sure how the axle of the nut will react and if it might stretch at those draw weights. Geezer would know more...
    Gnome
    Gnome
    Crossbow Junkie

    I live here!


    Crossbow JunkieI live here!


    Posts : 451
    Join date : 2011-10-16
    Age : 60
    Location : North Georgia

    First build Empty Re: First build

    Post by Gnome Wed Nov 09, 2011 4:06 pm

    The nut has no axle, just the tongue over the top to make sure it stays in the socket. I've tried a couple of different approaches to simulating the pressure of the drawn string, from looping a coat hanger wire around my foot to hooking up a few rubber bungee cords. So far it seems to operate pretty smooth and easy, but of course I don't think I'm approaching the actual force that would be involved. If I have time this weekend I may mount up one of my 150lb fiberglass prods temporarily and launch a few darts into the dirt and see how that feels.
    SilasMontgommeri
    SilasMontgommeri
    Fresh Blood

    Doesn't mean
    I'm new to crossbows


    Fresh Blood Doesn't meanI'm new to crossbows


    Posts : 6
    Join date : 2011-11-09
    Age : 34
    Location : Fort Worth, TX

    First build Empty Re: First build

    Post by SilasMontgommeri Wed Nov 09, 2011 4:49 pm

    I love the design, especially the pistol grip. I can't wait to see how the finished product comes out!
    Gnome
    Gnome
    Crossbow Junkie

    I live here!


    Crossbow JunkieI live here!


    Posts : 451
    Join date : 2011-10-16
    Age : 60
    Location : North Georgia

    First build Empty Re: First build

    Post by Gnome Wed Nov 09, 2011 6:33 pm

    Thanks, Silas. I was trying to apply ergonomics I knew I was comfortable with to the medieval model. With all the brass it ended up looking kinda steam-punk, I think, so if it doesn't work out as a crossbow I'll strap a trombone on it and sell it to a steam-punk LARPer as a Vernian mega discombobulator.jocolor
    SilasMontgommeri
    SilasMontgommeri
    Fresh Blood

    Doesn't mean
    I'm new to crossbows


    Fresh Blood Doesn't meanI'm new to crossbows


    Posts : 6
    Join date : 2011-11-09
    Age : 34
    Location : Fort Worth, TX

    First build Empty Re: First build

    Post by SilasMontgommeri Thu Nov 10, 2011 7:33 am

    A couple of newbie questions for ya.

    What did you use to cut that pistol grip into the stock? I've no idea.

    Second, Where does everyone get these beautiful metal trigger components? Are you making them yourself or do you order them? It'll be a fun new venture if I have to make them myself; I've never really worked to much with metal, only wood. And I have a bad feeling about making the trigger pieces from wood Laughing
    Gnome
    Gnome
    Crossbow Junkie

    I live here!


    Crossbow JunkieI live here!


    Posts : 451
    Join date : 2011-10-16
    Age : 60
    Location : North Georgia

    First build Empty Re: First build

    Post by Gnome Sat Nov 12, 2011 4:58 am

    Silas,
    Everything I've provided images of so far I made myself. Metal working isn't that hard with the right tools, and of course an appreciation for the different qualities of the different materials. This trigger I cut from a 1/4" plate of mild steel from the hardware store using an angle grinder, then cleaned up with a dremel- first with a sanding drum tip and then a sanding flap wheel. The tip that interfaces with the nut was cold forged to increase the thickness from 1/4" to about 7/16" to increase the load-bearing area. By "cold forged" I mean I beat on it with a hammer against an anvil plate to flatten it out.For me that is one of the most satisfying aspects of working with metal. First build 520919 Provided I don't chuck this design in favor of the much sexier version Ivo presented, I will polish it up further with increasingly fine grades of sandpaper. Then I'll case harden that tip, heating it up and adding carbon to the surface to make it more wear resistant- the piece of steel I wedged in the nut for a sear is much harder steel. I'll have to be sure that these parts fit together as well as possible and are polished as shiny as I can get them.
    Oh, and as for carving out the pistol grip, I cut the prolile of the whole stock out with a jigsaw, and the "thumbhole" I started drilling a bunch of holes around the perimeter with a drill press, connected the dots with the jigsaw, used a sanding disk in an angle grinder for rough stock removal, and finished up with the dremel. Yeah, I like my power tools.
    Gnome
    Gnome
    Gnome
    Crossbow Junkie

    I live here!


    Crossbow JunkieI live here!


    Posts : 451
    Join date : 2011-10-16
    Age : 60
    Location : North Georgia

    First build Empty Re: First build

    Post by Gnome Wed Nov 23, 2011 5:31 pm

    I got my package from Alchem! Yay! I rushed out to the shop and put everything together for a test fit. Overall very happy, though of course I'll have to break everything down again to tweak the fit and finish.
    Gnome
    Gnome
    Crossbow Junkie

    I live here!


    Crossbow JunkieI live here!


    Posts : 451
    Join date : 2011-10-16
    Age : 60
    Location : North Georgia

    First build Empty Re: First build

    Post by Gnome Fri Nov 25, 2011 6:56 am

    I just had to knock everything together for a test fit, and overall I think it's coming together well. I'll have to break it all down again as there is still a lot of work to do on the track as well as fine tuning the fit of the irons, and of course putting the final finish on the metal parts. Still a lot to do on the trigger mech, too, and unfortunately it's all going to have to wait a while. A lot can happen in the time span from deciding to build a crossbow and actually having all the parts together, and for me it's an interstate move and a new job, and all that goes with it. I will have a shop space in my new digs, though not as suited to really intensive stuff involving showers of sparks, roiling clouds of sawdust, and roaring open flames, but it will do.

    First build DSCN0166small
    Gnome
    Gnome
    Crossbow Junkie

    I live here!


    Crossbow JunkieI live here!


    Posts : 451
    Join date : 2011-10-16
    Age : 60
    Location : North Georgia

    First build Empty Finishing up first project

    Post by Gnome Tue Jan 24, 2012 2:37 pm

    Finally got my new shop space set up so that I could get back to work on this one. I'd been trying to think up a brilliant plan for iron sights, and in the end did what I often do, resort to whatever interesting bits I find laying about. In this case, a pin from a bow sight and some aluminum bar stock. Also, as usual, I got something kinda fundamental backwards, the back sight should be taller and graduated for elevation while the front only needs to be high enough not to interfere with the projectiles. But I got it zeroed in as well as I could given the limited range in my shop, only 20 feet.
    My home made heavy quarrels hit really, really hard! Very satisfying. My trigger pull is also really hard, not so satisfying! I may redesign the trigger, or just use what I've learned on my next build and call this one a "safety feature."
    I'll break it all down one more time to make everything pretty, painted, and/or weatherproofed and post a shot or two of that, then it's on to my next project, which I've already assembled most of the components for.
    First build DSCN0026First build DSCN0030First build DSCN0029First build DSCN0031
    Todd the archer
    Todd the archer
    Crossbow Junkie

    I live here!


    Crossbow JunkieI live here!


    Posts : 581
    Join date : 2010-02-25
    Age : 62
    Location : sellersville,pa.

    First build Empty Re: First build

    Post by Todd the archer Tue Jan 24, 2012 3:43 pm

    I think you did a very nice job!


    Yeah triggers are a science unto itself. Hope on your next project it goes better.


    I do like your sights as well, here's some pics of my sights on my latest project.

    First build Lock

    First build Front

    Got the front sight from Lancaster Archery and made the rear sights from bolts. Like yours all adjustment is done with the front sight.


    Todd


    Last edited by Todd the archer on Tue Jan 24, 2012 3:45 pm; edited 1 time in total (Reason for editing : add info)
    Ivo
    Ivo
    Admin
    Admin


    Posts : 1041
    Join date : 2009-11-25
    Age : 36
    Location : NJ, USA

    First build Empty Re: First build

    Post by Ivo Thu Jan 26, 2012 1:46 pm

    Man that is a clever build...actually builds since Todd is chipping in with closeups too. Smile

    I really like the idea with using bow irons to hold the front sight like that. Can't tell from the picture,Gnome, did you take some wood out to fit the sigh? That would be a logical move considering bow irons need to be the same distance form the mid line.

    Anyway, very nice finish up and the trigger suggestion stands...I think you can just go ahead and reconfigure it for better performance at any comfortable for you time.

    Good Job and Thanks for sharing,

    Ivo
    Gnome
    Gnome
    Crossbow Junkie

    I live here!


    Crossbow JunkieI live here!


    Posts : 451
    Join date : 2011-10-16
    Age : 60
    Location : North Georgia

    First build Empty Re: First build

    Post by Gnome Thu Jan 26, 2012 2:20 pm

    Thanks Todd, and Ivo. Yes, I removed enough of the stock for the sight to fit flush under the iron, and it's held in place with two small screws. The aluminum is cut to fit snugly against the prod and stirrup. I've drawn up some templates to rework the trigger along the lines you suggested, which I'll try to cut when I am ready to cut steel for my next piece. I live in a townhouse now and don't want to piss off the new neighbors by cranking up the angle grinder too often!
    avatar
    8fingers
    Workshop Savvy

    Did you see my tool collection?


    Workshop SavvyDid you see my tool collection?


    Posts : 200
    Join date : 2011-04-06
    Location : Chetwynd, BC, Canada

    First build Empty Re: First build

    Post by 8fingers Thu Jan 26, 2012 2:29 pm

    I got an AC adapter (700 amps) to get AC from my pickup so I could do the noisy stuff in remote locations. Add a Workmate and a clamp on vice, workshop to go.
    Gnome
    Gnome
    Crossbow Junkie

    I live here!


    Crossbow JunkieI live here!


    Posts : 451
    Join date : 2011-10-16
    Age : 60
    Location : North Georgia

    First build Empty Re: First build

    Post by Gnome Sun Jan 29, 2012 6:19 am

    Todd,
    I was following your build progress on that piece avidly, I really like the overall design. One question- how is the prod secured in the socket? I'm thinking of going that route for my next build and can't seem to find any specific information on that. I've already reinvented the wheel a few times lately!
    Todd the archer
    Todd the archer
    Crossbow Junkie

    I live here!


    Crossbow JunkieI live here!


    Posts : 581
    Join date : 2010-02-25
    Age : 62
    Location : sellersville,pa.

    First build Empty Re: First build

    Post by Todd the archer Sun Jan 29, 2012 1:07 pm

    Hi Gnome, thanks for your interest in my project.


    As to how my prod is secured is really quite simple. I made a retangular hole through the tiller that is as tall as the prod is wide but wider than the prod's thickness, say around 1/2" more. Then insert prod through hole and install two wooden wedges from opposite sides of the stock/tiller but both in front of the prod. They are tapped in very snuggly and then trimmed flush with with the sides of the stock/tiller. They are in turn held captive by the brass cover plates.


    If you look closely at the picture you might be able to see I put a thin piece of cork behind the prod. I figured this give the prod something soft to bear against. But having used it some found it too soft and allows the prod to rotate a little. I plan to dissassemble latter to refinish the stock and when I reassemble will replace the cork with a wood spacer.


    Got the idea for this method from an old swiss made crossbow I bought on ebay that is close to 100 years old.

    First build Oldcrossbow004


    Todd
    mac
    mac
    Master Weaponsmith
    Master Weaponsmith


    Posts : 561
    Join date : 2010-12-23
    Location : Near Philly USA

    First build Empty Re: First build

    Post by mac Sun Jan 29, 2012 1:53 pm

    Todd,

    That's a nice find! Have you dared to shoot it, or do you fear for the state of the string?

    It has a slider like a bullet bow, but a track like it was made for bolts. What's your take on that, and what is the slider made of?

    Is that a set trigger that I see? Does it still work OK?

    It looks from the wear in the varnish, like it has seen a lot of use in its day...mostly by a "right eyed" shooter.
    Todd the archer
    Todd the archer
    Crossbow Junkie

    I live here!


    Crossbow JunkieI live here!


    Posts : 581
    Join date : 2010-02-25
    Age : 62
    Location : sellersville,pa.

    First build Empty Re: First build

    Post by Todd the archer Sun Jan 29, 2012 2:35 pm

    Hi Mac, sadly I it can not be shot . Mainly because the prod has a crack near the center where it passes through the stock but also the string is in very poor shape. looks like it was broken then repaired. This is the way I received it with out the trigger gaurd or rear sight. It has a short length of pull to the trigger so I am thinking it was a youth crossbow. The double set trigger mechanism still works fine although the sled/slider catch doesn't hold weight because I believe the sears are too worn.


    The slider is wood although it doesn't appear original but probably resembles the original. I think it shot short featherless bolts like modern competitive crossbows use.


    This crossbow was an inspiration for my last crossbow I built.


    Todd
    mac
    mac
    Master Weaponsmith
    Master Weaponsmith


    Posts : 561
    Join date : 2010-12-23
    Location : Near Philly USA

    First build Empty Re: First build

    Post by mac Mon Jan 30, 2012 7:02 am

    Todd,

    It is a shame that the bow is cracked.....

    Mac
    Gnome
    Gnome
    Crossbow Junkie

    I live here!


    Crossbow JunkieI live here!


    Posts : 451
    Join date : 2011-10-16
    Age : 60
    Location : North Georgia

    First build Empty Re: First build

    Post by Gnome Sat Mar 31, 2012 1:01 pm

    First build DSCN0079

    I couldn't resist posting one more picture of my first effort, a glamour shot with everything as done as it's likely to get- the final touches being getting the irons and stirrup polished and blued, and the sights painted. I gave a lot of thought to a redesigned release mech and a new nut either black or tan colored, but after putting a hundred or so shots through it I'm thinking more along the lines of "if it ain't broke, don't fix it." The trigger pull remains stiff, but it's precise, and I've gotten used to it, so it feels pretty natural now and doesn't bother me a bit. The accuracy still surprises me, must be beginners luck because my 2nd bow doesn't shoot that straight-yet. I designed this one to shoot 1/2" diameter, 14" long bolts, as pictured, but I was pleasantly surprised to find that it shoots the 3/8" diameter, 16" long bolts that I designed for my 2nd bow even better, I just had to tweak the shape of the bolt clip a bit.
    avatar
    chaz
    Crossbow Junkie

    I live here!


    Crossbow JunkieI live here!


    Posts : 313
    Join date : 2012-04-13
    Age : 75
    Location : Texas

    First build Empty Re: First build

    Post by chaz Fri Apr 20, 2012 5:42 am

    Todd, from what I could tell in the picture I like the wood prod. Did you build it and what is the draw weight? Beautiful work on the stock and sites as well.

    Chaz
    Todd the archer
    Todd the archer
    Crossbow Junkie

    I live here!


    Crossbow JunkieI live here!


    Posts : 581
    Join date : 2010-02-25
    Age : 62
    Location : sellersville,pa.

    First build Empty Re: First build

    Post by Todd the archer Sat Apr 21, 2012 5:03 am

    Thanks Chaz, the prod is actually a wood and fiberglass composite prod made by Elk Ridge Archery. Draw weight is about 155 pounds.


    Todd

    Sponsored content


    First build Empty Re: First build

    Post by Sponsored content


      Current date/time is Sat Jul 27, 2024 1:25 am