


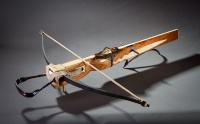
I built this crossbow a few months ago mainly as an experiment. I've made plenty of bows so this was an experiment to see just how easily (or not so easily) I could construct a crossbow that resembled a medieval bow. Originally I intended to make a munitions bow - in other words a simple no frills bow as would have been carried into war versus an elaborate bow such as would've been used for hunting. I followed two main sources of information in constructing this crossbow. First, the basic plan was taken from the basic layout given on the Alchem site.
http://www.alcheminc.com/plan.gif
The prod (110# draw weight), stirrup, delrin roller nut, and tickler (trigger) were all purchased from Alchem.
http://www.alcheminc.com/crossbow.html
My second source of information was a very informative build-along found here:
http://www.stormthewalls.kicks-ass.net/Crossbows/crossbows.htm
The prod is nice and has a rubber bit shrink wrapped around the middle, ostensibly to hold both halves together in the event of a catastrophic failure. This would be assuming that your bindings wouldn't hold the halves in place I guess. It's a good prod but it's no where near thick enough to approximate the appearance of most metal medieval crossbow prods. The stirrup and tickler are okay as well, but would need something done to them to dress up the appearance. As it is they're more sort of mildly decorative approximations of what you'd see on real period 'bows. Finally, I didn't take any pictures during constructionve so I'll have to do my best to describe some of the challenges as I came across them during construction.
Here is a side view:

View showing the table:

View of the bottom:

View of roller nut and side plates:

I the above photo you should be able to see one of my first mess-ups - the roller nut. I attempted to make a screw-in sear as was shown in the build-along, however the first mess up was drilling all the way through nut instead of only part way in. I should've used a drill bit stop but either I forgot or it slipped. So, I had a hole all the way through. Well, no problem I thought I'll just fill it in with epoxy. Ultimately the screw-in sear didn't work as it kept moving, even after the epoxy had cured. I now think the hole drilled may not have been bored the right size for the hole threader I used. So, I removed the threaded rod sear and instead cut a slot in the nut and inserted a plate sear as is shown in the Alchem plan. Another thing to note at this time is the wood veneer "lock plates." Something similar is shown in the build along but no pictures of historic bows that I've seen show any similar veneer plates covering the area on either side of the nut. I'd be hesitant to say this isn't historically accurate but at this point I reserve judgment until I see photos of a historic bow with this treatment. In future I'd fashion metal lock plates or something that resembles ivory, bone, or horn as those appear more in keeping with a historic sporting bow. The roller nut was bound into the socket with artificial sinew which does give a historically accurate appearance.
Next is a close-up of the serving protecting the loops of the skein.

This is a case of another mess up. I got the stitching pattern of the serving correct but I used Dacron B50 to serve the loops instead of something more durable like actual braided serving thread or fine hemp cord.
Close up of hemp binding of the prod and stirrup.

Now this is something I did get right. I searched until I found hemp cord that had I believe a 100# test rating. However, the cord is fairly thick and thus meant I needed to make the binding hole in the prod larger than what was shown on the Alchem plan. First the prod was bound on with a patch of thick leather between the prod and the tiller as a cushion. After the prod was bound on and tightened down with artificial sinew the stirrup was bound on using the same hemp cord in a simple cross pattern. Note on this picture you can see a good close up of the table. Originally the tiller of the bow was made from two pieces of 5/4 walnut glued together with a 5/16" thick piece of cherry over laid on the top of the tiller as the bows table. I routed a V groove for the channel the quarrel would rest in. However, I mess up lining up the socket for the roller nut and thus my quarrel groove was too low. In addition, I damaged part of the top of the tiller when boring out the hole that accommodates the trigger lever mechanism. So, suddenly it seemed a better idea to turn the munitions bow into a sporting bow.
So, rather than go to the trouble of overlaying bone or horn I went with a thin piece of Baltic Birch plywood which I primed with gesso then painted with acrylic paint that approximated the color of ivory. Fortunately the brush strokes in the gesso primer and the paint help to mimic the striations seen in ivory. I also scored some grooves into the surface crosswise to give the appearance of the "ivory" being applied in multiple sections. Another problem that presented itself was that the hole bored to accommodate the trigger mechanism was pretty rough, so metal washers had to be added in to either side of the trigger lever to keep it tracking properly throughout its range of motion. Also, the bottom of the lever opening got boogered up a bit so I had to add another "decorative" overlay to hide that mistake. Also, to dress up the bow some and give more of an appearance of a sporting bow I added the decorative inlay strips on the sides similar to what was used in the build along I was following. Again, this makes a nice decorative detail but I've seen no pictures of historic bows with any kind of similar thin strip of decoration. Also, if something like this had been used, it wouldn't have been a thin strip glued in place but would've actually been individual pieces of wood laid down before the ivory was glued over the top of tiller.
All in all it was a good learning experience and it is a functional piece. It is easy and fun to shoot and has a surprisingly flat trajectory at least out to 30 - 40 yards. The bolts for the bow were made using 23/64" Port Orford Cedar shafts with 125 grain field points and two 5 1/2" shield cut fletches. So far the bow has been a real hit at the various SCA archery events I've brought it to. Even though it's no where near period accurate in terms of decorative details it's still far more decorative than the other crossbows I've seen being shot by other SCA members locally. Needless to say, knowing what I know now and having a LOT more research under my belt I know my next two crossbows will be MUCH better looking and MUCH more historically accurate. Anyway, if any of you have further questions regarding the construction and my experiences, feel free to ask. Also, I can take some more photos and post them if there is any particular area you'd like to see in more detail.
http://www.alcheminc.com/plan.gif
The prod (110# draw weight), stirrup, delrin roller nut, and tickler (trigger) were all purchased from Alchem.
http://www.alcheminc.com/crossbow.html
My second source of information was a very informative build-along found here:
http://www.stormthewalls.kicks-ass.net/Crossbows/crossbows.htm
The prod is nice and has a rubber bit shrink wrapped around the middle, ostensibly to hold both halves together in the event of a catastrophic failure. This would be assuming that your bindings wouldn't hold the halves in place I guess. It's a good prod but it's no where near thick enough to approximate the appearance of most metal medieval crossbow prods. The stirrup and tickler are okay as well, but would need something done to them to dress up the appearance. As it is they're more sort of mildly decorative approximations of what you'd see on real period 'bows. Finally, I didn't take any pictures during constructionve so I'll have to do my best to describe some of the challenges as I came across them during construction.
Here is a side view:
View showing the table:
View of the bottom:
View of roller nut and side plates:
I the above photo you should be able to see one of my first mess-ups - the roller nut. I attempted to make a screw-in sear as was shown in the build-along, however the first mess up was drilling all the way through nut instead of only part way in. I should've used a drill bit stop but either I forgot or it slipped. So, I had a hole all the way through. Well, no problem I thought I'll just fill it in with epoxy. Ultimately the screw-in sear didn't work as it kept moving, even after the epoxy had cured. I now think the hole drilled may not have been bored the right size for the hole threader I used. So, I removed the threaded rod sear and instead cut a slot in the nut and inserted a plate sear as is shown in the Alchem plan. Another thing to note at this time is the wood veneer "lock plates." Something similar is shown in the build along but no pictures of historic bows that I've seen show any similar veneer plates covering the area on either side of the nut. I'd be hesitant to say this isn't historically accurate but at this point I reserve judgment until I see photos of a historic bow with this treatment. In future I'd fashion metal lock plates or something that resembles ivory, bone, or horn as those appear more in keeping with a historic sporting bow. The roller nut was bound into the socket with artificial sinew which does give a historically accurate appearance.
Next is a close-up of the serving protecting the loops of the skein.
This is a case of another mess up. I got the stitching pattern of the serving correct but I used Dacron B50 to serve the loops instead of something more durable like actual braided serving thread or fine hemp cord.
Close up of hemp binding of the prod and stirrup.
Now this is something I did get right. I searched until I found hemp cord that had I believe a 100# test rating. However, the cord is fairly thick and thus meant I needed to make the binding hole in the prod larger than what was shown on the Alchem plan. First the prod was bound on with a patch of thick leather between the prod and the tiller as a cushion. After the prod was bound on and tightened down with artificial sinew the stirrup was bound on using the same hemp cord in a simple cross pattern. Note on this picture you can see a good close up of the table. Originally the tiller of the bow was made from two pieces of 5/4 walnut glued together with a 5/16" thick piece of cherry over laid on the top of the tiller as the bows table. I routed a V groove for the channel the quarrel would rest in. However, I mess up lining up the socket for the roller nut and thus my quarrel groove was too low. In addition, I damaged part of the top of the tiller when boring out the hole that accommodates the trigger lever mechanism. So, suddenly it seemed a better idea to turn the munitions bow into a sporting bow.
So, rather than go to the trouble of overlaying bone or horn I went with a thin piece of Baltic Birch plywood which I primed with gesso then painted with acrylic paint that approximated the color of ivory. Fortunately the brush strokes in the gesso primer and the paint help to mimic the striations seen in ivory. I also scored some grooves into the surface crosswise to give the appearance of the "ivory" being applied in multiple sections. Another problem that presented itself was that the hole bored to accommodate the trigger mechanism was pretty rough, so metal washers had to be added in to either side of the trigger lever to keep it tracking properly throughout its range of motion. Also, the bottom of the lever opening got boogered up a bit so I had to add another "decorative" overlay to hide that mistake. Also, to dress up the bow some and give more of an appearance of a sporting bow I added the decorative inlay strips on the sides similar to what was used in the build along I was following. Again, this makes a nice decorative detail but I've seen no pictures of historic bows with any kind of similar thin strip of decoration. Also, if something like this had been used, it wouldn't have been a thin strip glued in place but would've actually been individual pieces of wood laid down before the ivory was glued over the top of tiller.
All in all it was a good learning experience and it is a functional piece. It is easy and fun to shoot and has a surprisingly flat trajectory at least out to 30 - 40 yards. The bolts for the bow were made using 23/64" Port Orford Cedar shafts with 125 grain field points and two 5 1/2" shield cut fletches. So far the bow has been a real hit at the various SCA archery events I've brought it to. Even though it's no where near period accurate in terms of decorative details it's still far more decorative than the other crossbows I've seen being shot by other SCA members locally. Needless to say, knowing what I know now and having a LOT more research under my belt I know my next two crossbows will be MUCH better looking and MUCH more historically accurate. Anyway, if any of you have further questions regarding the construction and my experiences, feel free to ask. Also, I can take some more photos and post them if there is any particular area you'd like to see in more detail.


 Private messages