The Arbalist Guild

Would you like to react to this message? Create an account in a few clicks or log in to continue.

Crossbows - Everything about Building, Modding, and Using your Crossbow Gear

Latest topics

» 12th Century Chinese Crossbow Chronographed
by stuckinthemud1 Fri Nov 24, 2023 3:50 pm

» Crossbow Stock
by kenh Tue Oct 31, 2023 6:19 am

» Colletiere a Charavines continuing experiment
by stuckinthemud1 Sat Oct 07, 2023 5:36 am

» Cocking - how
by stuckinthemud1 Thu Aug 03, 2023 4:24 am

» Questions around heavy crossbow lath buildin
by stuckinthemud1 Wed Apr 26, 2023 1:10 am

» Arab Crossbow
by stuckinthemud1 Tue Apr 25, 2023 7:57 am

» prod angle, and lever trigger for sale anyone?
by stuckinthemud1 Mon Mar 20, 2023 5:54 am

» flexible string
by jasper1978 Mon Mar 20, 2023 1:25 am

» [solved]Skane/Lillohus crossbow thread
by stuckinthemud1 Sun Mar 19, 2023 7:44 am

» jens sensfelder
by jasper1978 Wed Mar 08, 2023 11:58 pm

» 400lb Windlass crossbow bolts weight and accuracy shooting high.
by stuckinthemud1 Sun Mar 05, 2023 2:53 pm

» Codex Löffelholz crossbow
by stuckinthemud1 Tue Jan 24, 2023 4:14 pm

» Digitar prodsc
by stuckinthemud1 Sun Jan 15, 2023 2:42 pm

» Troubleshooting
by Andy. Fri Jan 06, 2023 12:29 pm

» Wood Prods
by stuckinthemud1 Fri Dec 30, 2022 12:47 pm

» Colletiere a Charavines crossbow
by stuckinthemud1 Fri Dec 30, 2022 8:54 am

» Simplified Löffelhotz speedloader
by stuckinthemud1 Fri Dec 09, 2022 4:05 pm

» Fiberglass H-bows
by c sitas Sat Nov 12, 2022 8:44 am

» Bad Antler
by drawknife Sat Nov 12, 2022 3:48 am

» Anyone make their own bolts?
by Juniper Mon Oct 17, 2022 8:20 am

» Josef alm in English
by Juniper Sat Oct 15, 2022 4:22 am

» Qin/Han lock drawings
by kenh Fri Sep 23, 2022 8:16 pm

» stirrup dimensions?
by stuckinthemud1 Thu Sep 01, 2022 1:49 pm

» Skane/Lillohus lockbow information needed
by stuckinthemud1 Sun Aug 14, 2022 6:23 am

» need help contacting le musee Dauphinois Grenoble
by stuckinthemud1 Sat Aug 13, 2022 3:22 pm


+4
kenh
c sitas
Geezer
Gnome
8 posters

    CNC Improved Chinese Trigger Xbow- Gnome style

    Gnome
    Gnome
    Crossbow Junkie

    I live here!


    Crossbow JunkieI live here!


    Posts : 451
    Join date : 2011-10-16
    Age : 60
    Location : North Georgia

    CNC Improved Chinese Trigger Xbow- Gnome style Empty CNC Improved Chinese Trigger Xbow- Gnome style

    Post by Gnome Mon Jul 11, 2016 6:00 pm

    Hey all,
    Jaeger22 was good enough to send me a prototype assembly of the trigger mech he designed that is available now on eBay. This is the rig I've built around it so far, using what I had in the shop. I've ordered a couple of the final units that I expect delivery of this week, I will drop one of those in and this thread will be more of a review of that offering than a build-along. It may be a bit of a stress test, as well, as I'm mating it up with a 165# steel prod, the SB BB from Slobows
    CNC Improved Chinese Trigger Xbow- Gnome style WP_20160711_19_06_32_Pro_zpsu4kp0lnm
    Gnome
    Geezer
    Geezer
    Master Crossbowyer
    Master Crossbowyer


    Posts : 1194
    Join date : 2010-01-12
    Age : 76
    Location : Austin, Texas, USA

    CNC Improved Chinese Trigger Xbow- Gnome style Empty Re: CNC Improved Chinese Trigger Xbow- Gnome style

    Post by Geezer Tue Jul 12, 2016 7:30 am

    Well okay: that looks pretty damned keen: very fantasy-elvish.  I'll have to get one of those CNC Chinese variants and build something similar. It will be a big change.  Geezer.
    avatar
    c sitas
    Crossbow Junkie

    I live here!


    Crossbow JunkieI live here!


    Posts : 547
    Join date : 2012-11-24

    CNC Improved Chinese Trigger Xbow- Gnome style Empty Re: CNC Improved Chinese Trigger Xbow- Gnome style

    Post by c sitas Tue Jul 12, 2016 4:28 pm

    Gnome, is there a link to ebay any where around here for the trigger that Jeager is making?  Grat job on the crossbow build . That's gonna look a treat for sure.
    Gnome
    Gnome
    Crossbow Junkie

    I live here!


    Crossbow JunkieI live here!


    Posts : 451
    Join date : 2011-10-16
    Age : 60
    Location : North Georgia

    CNC Improved Chinese Trigger Xbow- Gnome style Empty Re: CNC Improved Chinese Trigger Xbow- Gnome style

    Post by Gnome Tue Jul 12, 2016 4:56 pm

    Thanks Geezer, Sitas. Here's a direct link to the eBay page for the trigger mech: http://www.ebay.com/itm/DIY-Crossbow-Trigger-system-/301988417071?hash=item464fe98e2f:g:gEUAAOSwOVpXZDBm

    Gnome
    kenh
    kenh
    Crossbow Junkie

    I live here!


    Crossbow JunkieI live here!


    Posts : 883
    Join date : 2012-08-03
    Age : 75
    Location : Living Aboard a Sailboat in Fort Myers, FL

    CNC Improved Chinese Trigger Xbow- Gnome style Empty Re: CNC Improved Chinese Trigger Xbow- Gnome style

    Post by kenh Wed Jul 13, 2016 7:14 am

    That tiller reminds me of a 19th century German/American Schuetzen rifle stock designed for offhand shooting at 200 meters.  You don't throw it to your shoulder... you sort of wear it and it fits you like a glove!  Really nice!
    avatar
    edstuff
    Tinkerer

    If there is a will, there is a way.


    TinkererIf there is a will, there  is a way.


    Posts : 74
    Join date : 2014-12-16

    CNC Improved Chinese Trigger Xbow- Gnome style Empty Re: CNC Improved Chinese Trigger Xbow- Gnome style

    Post by edstuff Thu Jul 14, 2016 6:47 am

    That stock is truly gorgeous. My lack of carpentry skills has kept me from finishing my build.
    It's so bad I've debated making one completely out of steel
    Gnome
    Gnome
    Crossbow Junkie

    I live here!


    Crossbow JunkieI live here!


    Posts : 451
    Join date : 2011-10-16
    Age : 60
    Location : North Georgia

    CNC Improved Chinese Trigger Xbow- Gnome style Empty Re: CNC Improved Chinese Trigger Xbow- Gnome style

    Post by Gnome Thu Jul 14, 2016 3:12 pm

    Perhaps a bit of explanation is in order.
    This build has been my most successful so far:
    CNC Improved Chinese Trigger Xbow- Gnome style WP_20151029_17_18_51_Pro_zpsvkcknm67

    I wanted to make a new design inspired by the qualities I liked so much about this one, but easier to build. That's why I was excited about John's CNC trigger mech, if it proves reliable and robust enough it would definitely be worth the money versus the time it takes me to build a decent release mechanism.
    So my first idea, and one I will likely return to, is to do the tiller from two pieces of 3/4" walnut wood laminated together.
    But I didn't have any walnut, I had some 1" thick boards of Brazilian Cherry, so I cut blanks out of that instead:
    CNC Improved Chinese Trigger Xbow- Gnome style WP_20160601_19_08_21_Pro_zpsrzgblsxu

    After cutting these profiles out and handling them, my error quickly became apparent. They were far too dense and heavy! I thought of carving them out intricately to reduce the weight, but the bits, blades and discs I burned up just getting this far with these chunks of rock-like wood reminded me that wouldn't work too well.
    So when I received the prototype trigger mech from John, I wanted to build something as quick and easy as I could, and since I already had these blanks cut I decided to use just one of them as a backbone and beef it up with appliques of other timber at the grip/lock and prod socket. I used oak because that is what I had of an appropriate thickness, 1/2".

    CNC Improved Chinese Trigger Xbow- Gnome style WP_20160605_17_27_27_Pro_zpszdlzcc2k

    CNC Improved Chinese Trigger Xbow- Gnome style WP_20160605_17_14_13_Pro_zpseuwbjzar


    CNC Improved Chinese Trigger Xbow- Gnome style WP_20160612_11_39_39_Pro_zpsz8eb7rme

    CNC Improved Chinese Trigger Xbow- Gnome style WP_20160710_14_38_51_Pro_zpsavqxj3uf

    CNC Improved Chinese Trigger Xbow- Gnome style WP_20160626_12_45_50_Pro_zpsqkzp3fuj

    A lot left to do, but it's 100 degrees outside and my shed fan isn't cutting it! Maybe I'll make my string, at least that part I can do inside in the air conditioning.
    Gnome
    avatar
    jaeger22
    Workshop Savvy

    Did you see my tool collection?


    Workshop SavvyDid you see my tool collection?


    Posts : 153
    Join date : 2013-03-15
    Age : 75
    Location : Orlando, FL

    CNC Improved Chinese Trigger Xbow- Gnome style Empty Re: CNC Improved Chinese Trigger Xbow- Gnome style

    Post by jaeger22 Mon Jul 18, 2016 10:16 am

    Outstanding! cheers I am excited to see this build by one of you masters with one of the triggers I designed. I really like this cool looking stock design. I may have to shamelessly copy it on my next build. Rolling Eyes 
    Also to all, Gnome has already come up with a great improvement for the next run. A drop in version with hollow axles. More to come on that.
    John
    Gnome
    Gnome
    Crossbow Junkie

    I live here!


    Crossbow JunkieI live here!


    Posts : 451
    Join date : 2011-10-16
    Age : 60
    Location : North Georgia

    CNC Improved Chinese Trigger Xbow- Gnome style Empty Re: CNC Improved Chinese Trigger Xbow- Gnome style

    Post by Gnome Mon Jul 18, 2016 6:22 pm

    Thanks, John! I don't know about that "master" bit, though. More like "Journeyman too stubborn to quit."
    Good news: I received two trigger sets and they are awesome, can't wait to start shooting! Here they are, one assembled and one completely broken down except for the back plate that maintains the spring. Pretty awesome stuff.
    CNC Improved Chinese Trigger Xbow- Gnome style WP_20160718_18_05_29_Pro2_zpsbpatc0wx

    The bad news:
    Mark Twain: "It ain't what you don't know that gets you in trouble. It's what you know for sure that just ain't so."
    Gnome: "Measure twice, cut once. Swear in three languages, repeat."

    I made the total draw on my tiller 1.5" too long for the prod! Still scratching my head on how I screwed that up, I went over the conversion half a dozen times. I resisted my first impulse, to chop the whole thing into kindling, which was good because I figured out the surgery to fix it wouldn't be that big a deal. It's going to set me back a couple days, though.
    Gnome
    avatar
    edstuff
    Tinkerer

    If there is a will, there is a way.


    TinkererIf there is a will, there  is a way.


    Posts : 74
    Join date : 2014-12-16

    CNC Improved Chinese Trigger Xbow- Gnome style Empty Re: CNC Improved Chinese Trigger Xbow- Gnome style

    Post by edstuff Tue Jul 19, 2016 6:37 am

    could you possibly purchase a veloci speed Barnett prod instead of performing surgery?

    Edit: I can't think of the proper word for it but the distance from the string to the front of the prod is greater on Barnett prods than on the typical chinese ones. Maybe it would work for your design now?
    Gnome
    Gnome
    Crossbow Junkie

    I live here!


    Crossbow JunkieI live here!


    Posts : 451
    Join date : 2011-10-16
    Age : 60
    Location : North Georgia

    CNC Improved Chinese Trigger Xbow- Gnome style Empty Re: CNC Improved Chinese Trigger Xbow- Gnome style

    Post by Gnome Tue Jul 19, 2016 7:59 am

    Edstuff,
    I'm well on the way with the surgery! Yes, I could get the Barnett prod, but I wanted to use a prod I already had on hand. Also, Jaeger22 has already tested this trigger mech pretty extensively with the Velocispeed, and I wanted to try it with a slightly harder pull steel prod. I will definitely be trying the velocispeed prod in the future, when I have some spare money lying around.
    Gnome


    Last edited by Gnome on Tue Jul 19, 2016 6:09 pm; edited 1 time in total (Reason for editing : clarification)
    avatar
    edstuff
    Tinkerer

    If there is a will, there is a way.


    TinkererIf there is a will, there  is a way.


    Posts : 74
    Join date : 2014-12-16

    CNC Improved Chinese Trigger Xbow- Gnome style Empty Re: CNC Improved Chinese Trigger Xbow- Gnome style

    Post by edstuff Tue Jul 19, 2016 8:22 am

    Spare money?! Man you could sell your stocks on eBay and make that! Ha ha pretty much all you guys could. I do love your work so please keep the pics coming.
    Gnome
    Gnome
    Crossbow Junkie

    I live here!


    Crossbow JunkieI live here!


    Posts : 451
    Join date : 2011-10-16
    Age : 60
    Location : North Georgia

    CNC Improved Chinese Trigger Xbow- Gnome style Empty Re: CNC Improved Chinese Trigger Xbow- Gnome style

    Post by Gnome Tue Jul 19, 2016 11:57 am

    OK, you asked for it!
    This shows how much the tiller needed to be shortened.
    CNC Improved Chinese Trigger Xbow- Gnome style WP_20160716_14_44_56_Pro_zpsjqj4id5s

    And here it is after cutting off the side pieces of oak and the "chin" under the prod mortice area.
    CNC Improved Chinese Trigger Xbow- Gnome style 83702400-af4e-45ee-b3fd-a173c258a87f_zpsri3z3aam
    I love my new table saw! Well, not that new, I've had it for almost a year now, got it as a free gift for 20 years tenure with my company. Just got it out of the box and set up recently, primarily to cut the fletch groove on this tiller. Sure makes a job like this easy, though. I cut the "chin" off so I could glue on enough matching timber to fit with the outline of the side pieces. I'll have to remake those completely, but that should just be an hour or two of work. Might get it done tonight.
    This is the only other woodworking I've made any progress with, the binding block that goes on top of the prod:
    CNC Improved Chinese Trigger Xbow- Gnome style 4eb54367-b709-4444-bb6e-799be2332e11_zpsykajdtzx
    Gnome
    Gnome
    Gnome
    Crossbow Junkie

    I live here!


    Crossbow JunkieI live here!


    Posts : 451
    Join date : 2011-10-16
    Age : 60
    Location : North Georgia

    CNC Improved Chinese Trigger Xbow- Gnome style Empty Re: CNC Improved Chinese Trigger Xbow- Gnome style

    Post by Gnome Tue Jul 19, 2016 7:42 pm

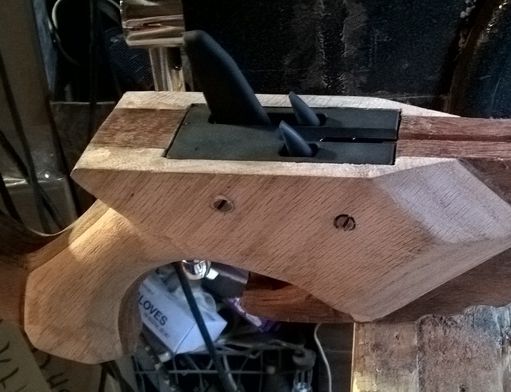
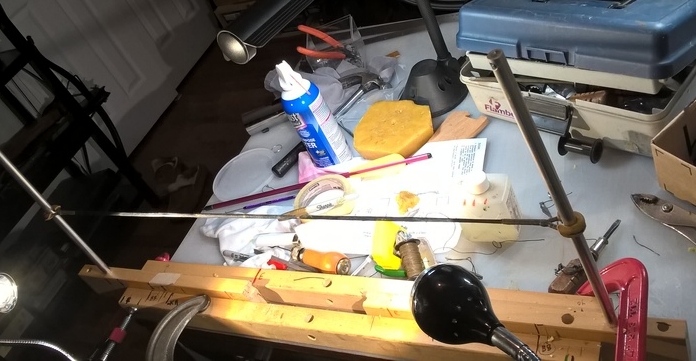
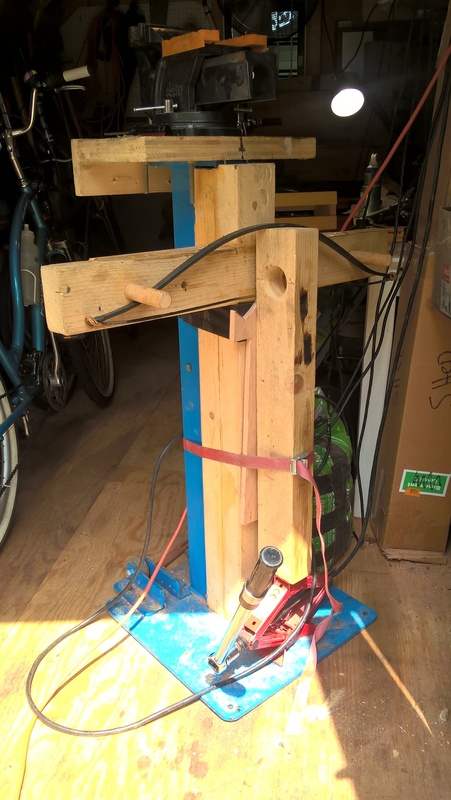
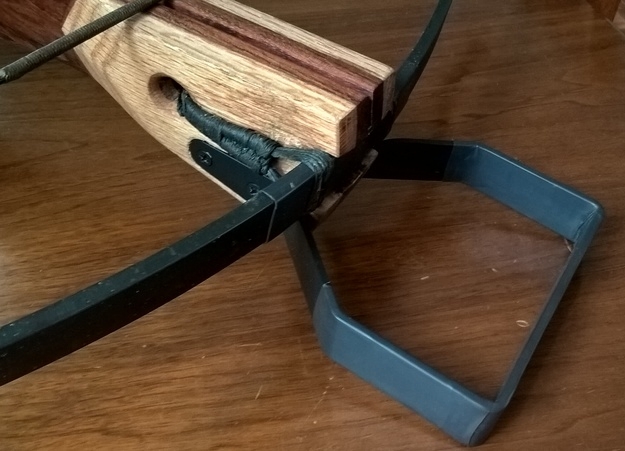
    Made pretty good progress with the tiller this afternoon, but what I really want to get to is the lock mechanism. One came fully assembled and the other in pieces, so first thing I put that one together, starting with the claw assembly. There are four parts, the two aluminum plates, a steel tube spacer, and a screw. I used the 5/16" axle pin to align the parts and tighten up the screw snug, but not so snug I'd risk stripping the threaded aluminum.
    CNC Improved Chinese Trigger Xbow- Gnome style 82dbd25a-bbae-4a58-b72a-255e1fe37180_zpsotv0re3e
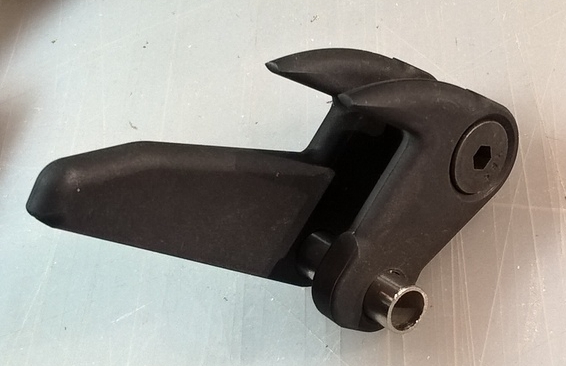
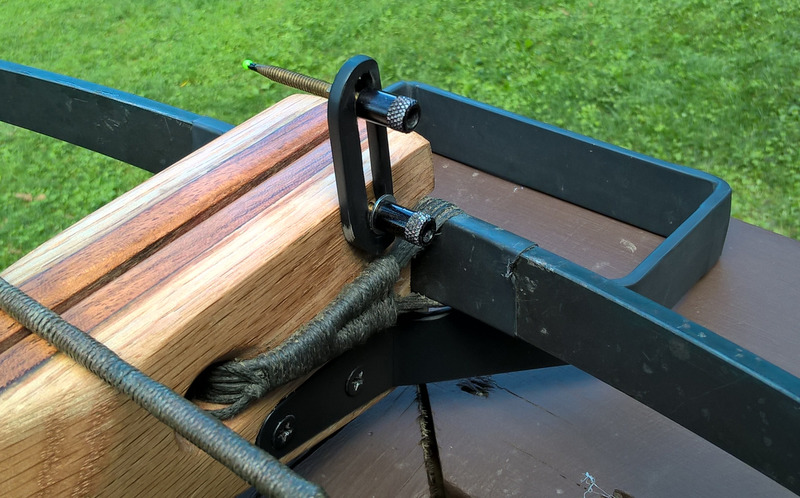
    There were no actual mounting bolts or pins provided, only pins that are just the width of the box, 1.25". That is not a problem, as deciding whether to use bolts or pins and how long they need to be is pretty dependent on how the tiller is built, and bolts are cheap. As currently designed, the front axle for the toggle is 1/4" diameter, and the rear axle for the trigger and claw is 5"16". In the photo above a 5/16" stainless steel tube is inserted, more on that later.

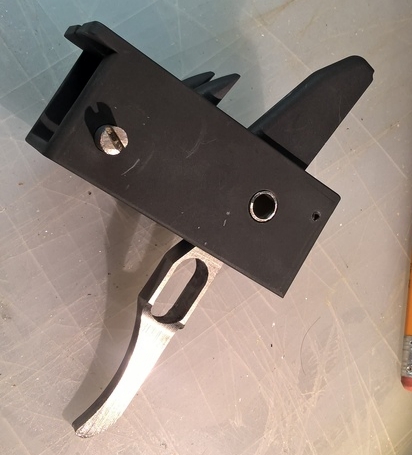
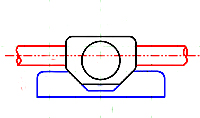
    On to the trigger and compression spring:
    CNC Improved Chinese Trigger Xbow- Gnome style WP_20160718_18_17_33_Pro_zpssmd1efvo
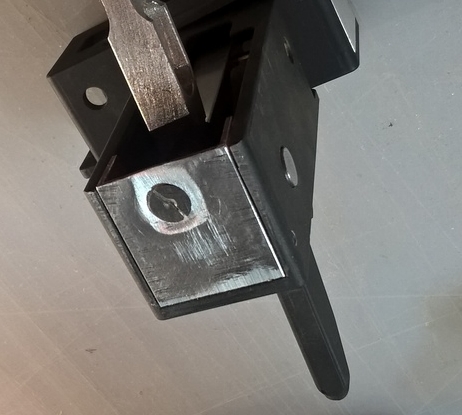
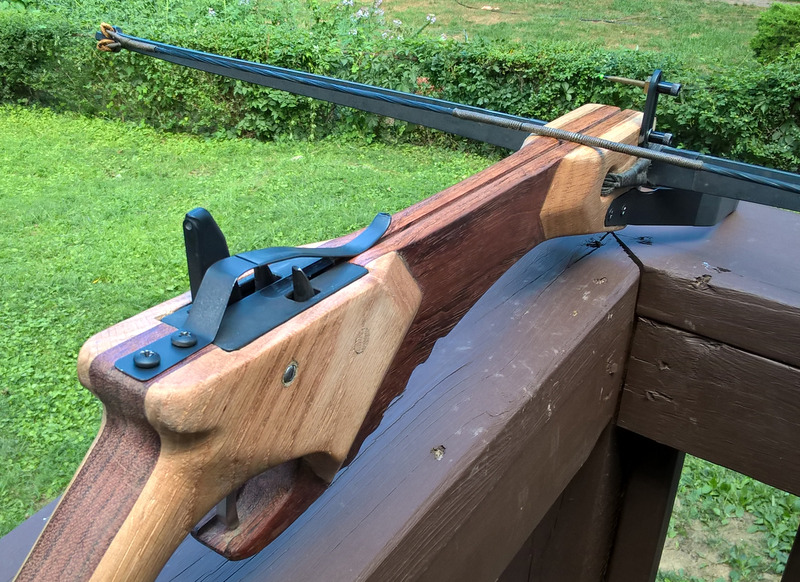
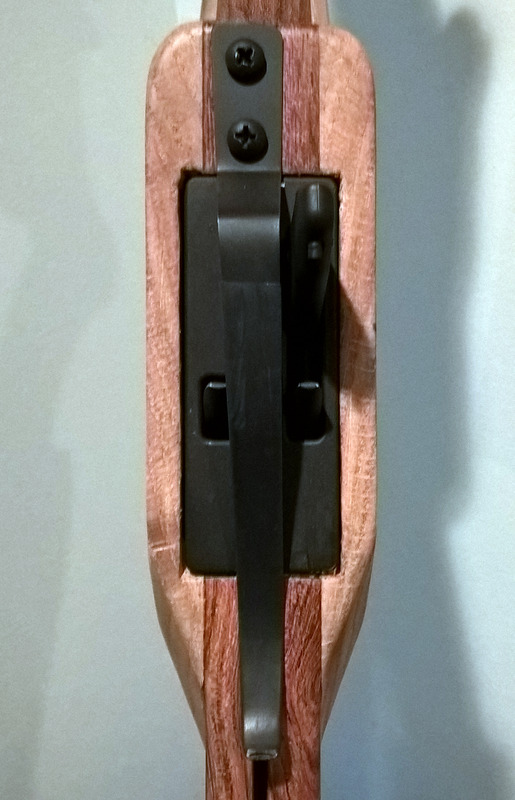
    The box looks to be milled from square aluminum tubing with 1/8" walls, with a lighter weight back plate pinned on. The sole function of the back plate is to secure the spring. Of course the ancients didn't need no stinkin' spring and let gravity do it's thing, but I sure like the lightened trigger and the solid click of the lock engaging. Putting the spring on the screw was a bit of a challenge, eventually I figured out to use the trigger as a lever to force the spring down over the screw. The front of the spring fits into a cavity on the trigger, I don't think it's going anywhere.

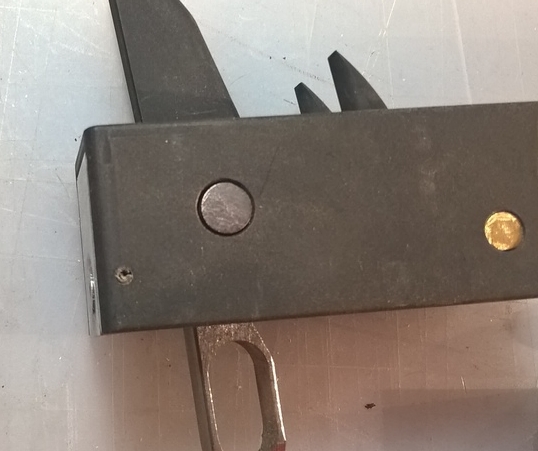
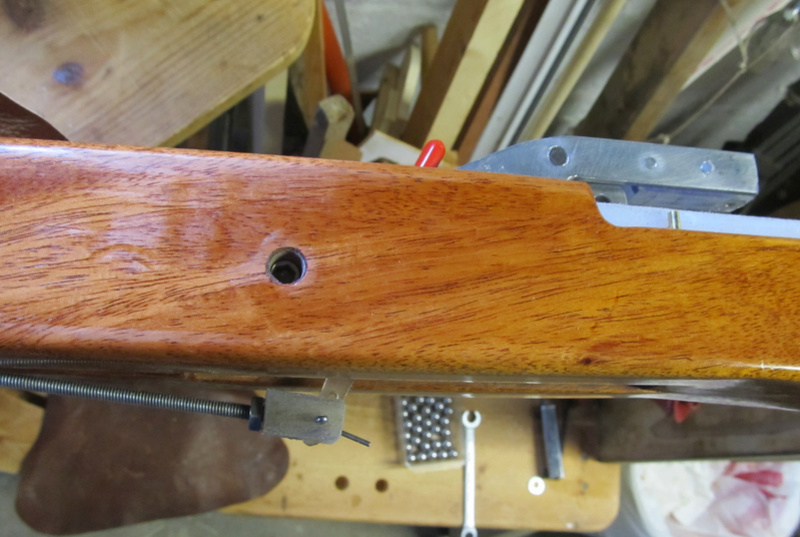
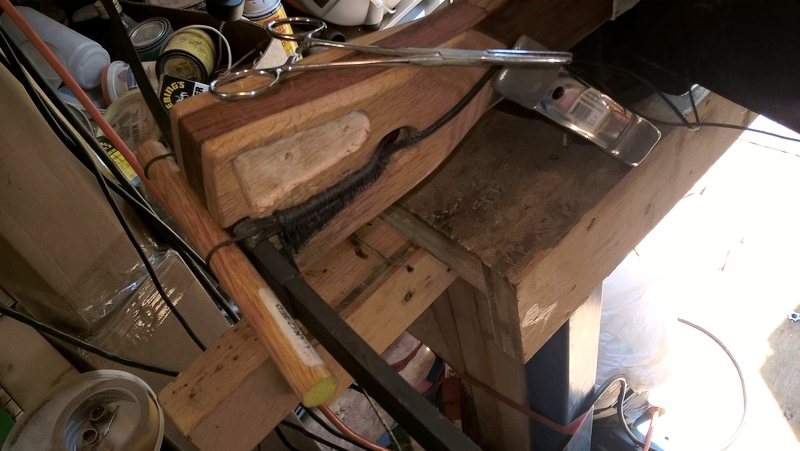
    I planned to install the unit completely stock for the purposes of testing, but I found myself making one alteration right away. The screw provided to secure the spring sits very proud of the back plate.
    CNC Improved Chinese Trigger Xbow- Gnome style C6f9860e-864a-49cd-8219-2efa827652d1_zpsbelhejkn

    I'd cut my cavity for the lock mechanism to fairly tight tolerance, and I did not want to carve a channel to clear the head of the rounded screw. So I filed the screw head as flat as I could, cut a slot for a screwdriver with a thin cut-off wheel in my Dremel, filed a bit of a recess around the screw hole in the back plate, and lovingly suggested the final position with a couple of taps from a ball peen hammer:
    CNC Improved Chinese Trigger Xbow- Gnome style E5ba0463-6cc8-4598-b9dd-cf63d68d7aef_zps4miagkrf
    CNC Improved Chinese Trigger Xbow- Gnome style 3c41dfc1-1d4d-4245-8b79-d5c1f75744b4_zpsjheueoqv
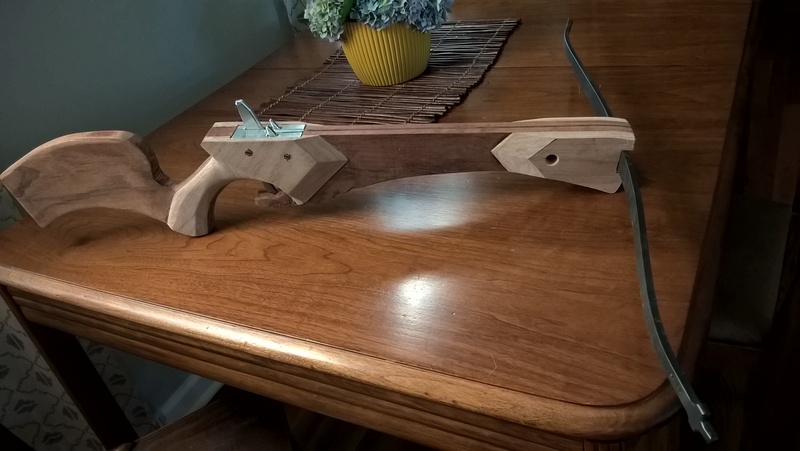
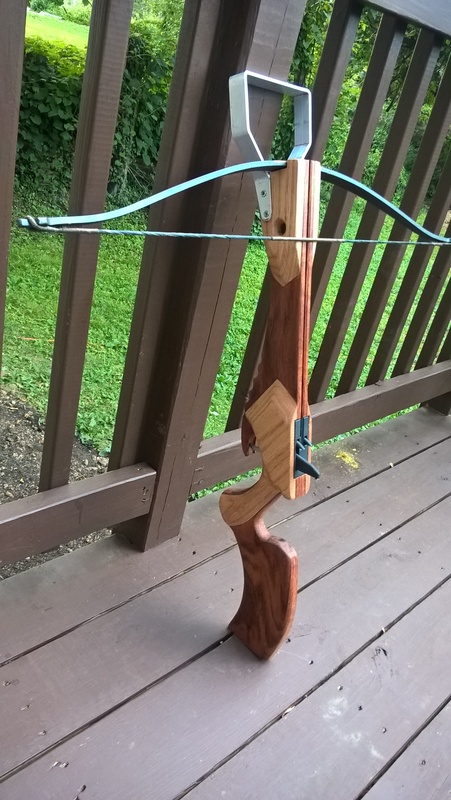
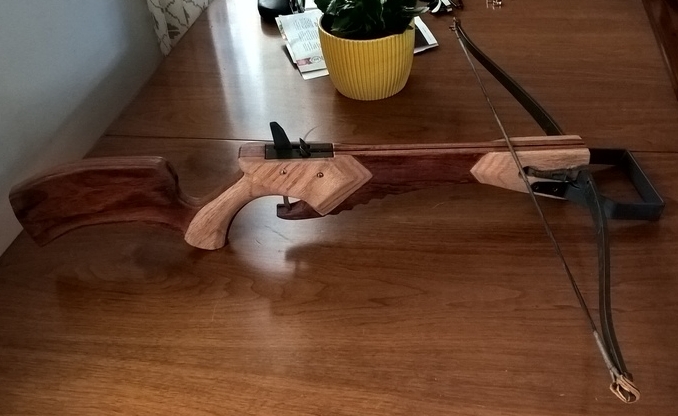
    Above you can see the provided place-holder axle pins in place, the 5/16" pin is steel and the 1/4" pin is brass. I know that through the development of this design John was concerned with clearance of the cock-feather of commercial three fletched bolts, which is why he went with a smaller axle hole for the toggle in front, just for that sliver of extra tolerance. Keep in mind I haven't locked or fired this design yet, but my initial observation is that it is quite robust, and in fact the cock feather clearance may not even be much of an issue. The front of the toggle is one inch in front of the teeth, and I don't have any commercial bolts with fletches closer than 1.25" to the butt of the bolt. The 16.5" aluminum shafts I most often use have the fletches over 1.5" from the end.

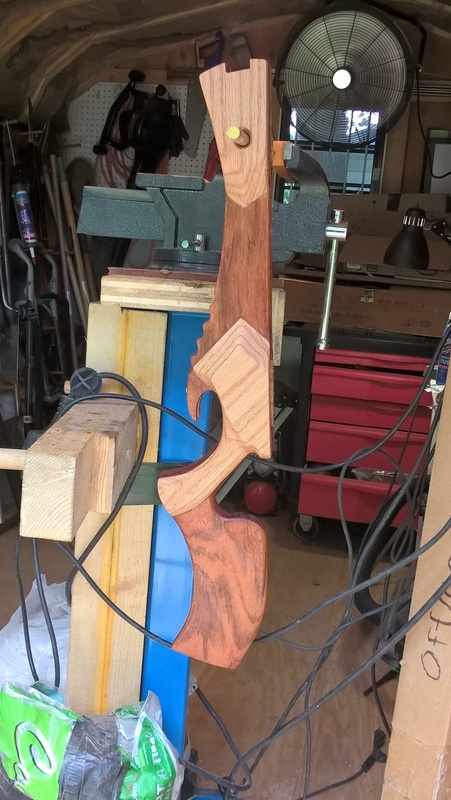
    So that brings me to my only other complaint regarding this otherwise totally sexy lock mechanism: it isn't a drop-in solution. Sure you can assemble it outside the stock and play with the action, and with the short pins provided you can drop the whole unit in to test fit in the cavity in the stock, but since the axles are also needed to secure the whole assembly into the tiller, you still have the fiddly task of lining up the components inside the tiller to get the axles through. This is actually more of a challenge inside an aluminum box inside the tiller than what I'm used to, and there are three parts to line up, fighting a pretty stiff compression spring. This is a bit of a pain in the shop, doing it in the field, for whatever reason, would be a real challenge.

    So, remember that 5/16" stainless steel tube I was talking about earlier?
    CNC Improved Chinese Trigger Xbow- Gnome style 919c6ed7-3095-4e7b-9ced-2509700c3400_zpsofhzkiq4
    The inner diameter of the tube is just over 1/4". So, without further modification to the mechanism, I now can have both axles the same diameter, and at least the most troublesome bits, the trigger and claw assembly that share the rear axle, can be secured outside the tiller and I just have to mess with lining up the toggle. This is how I will install it for testing, to keep it as stock as possible, but In tandem I'll be developing a full drop-in unit, with toggle and front axle drilled out to 5/16" to accept the same tubing. I think there will still be plenty of steel around that part for a margin of safety.

    Gnome
    avatar
    jaeger22
    Workshop Savvy

    Did you see my tool collection?


    Workshop SavvyDid you see my tool collection?


    Posts : 153
    Join date : 2013-03-15
    Age : 75
    Location : Orlando, FL

    CNC Improved Chinese Trigger Xbow- Gnome style Empty Re: CNC Improved Chinese Trigger Xbow- Gnome style

    Post by jaeger22 Wed Jul 20, 2016 3:14 am

    I think that is a brilliant idea on the drop in! cheers Wish I had thought of it. Embarassed 
    And no problem on the larger hole in the front. It is more than strong enough. In fact I think it would work fine with just the rear pin going through the stock and the front pin left short and inside as long as the case fit to the stock is reasonably tight. The string force is trying to lift the lock in the back and push down in the front and the front has that lip that prevents it from going down so the rear is what holds it in. But clearly 2 pins is even better. I told them we will make the next batch that way but they have about 50 made the original way. So it will be awhile.
    With the pins or bolts as I have used them so far, it is a bit of a pain to asymbol in the stock. I normally put the stock in the vice sideways and then with the lock on it's side, asymbol the parts and slide it into place. Then push the pins in while trying to get it all aligned. One of those things where three hands would be helpful.
    The pins have to be cut to match the users stock but should have been longer so you could cut them down to fit. I talked to the guys at the shop about that.
    Gnome
    Gnome
    Crossbow Junkie

    I live here!


    Crossbow JunkieI live here!


    Posts : 451
    Join date : 2011-10-16
    Age : 60
    Location : North Georgia

    CNC Improved Chinese Trigger Xbow- Gnome style Empty Re: CNC Improved Chinese Trigger Xbow- Gnome style

    Post by Gnome Thu Jul 21, 2016 7:02 pm

    A scrap of Brazillian cherry wood to add back to the center, the cord hole has already been filled with a half inch oak dowel.
    CNC Improved Chinese Trigger Xbow- Gnome style WP_20160719_19_06_18_Pro1_zpsejkpzu0n

    Cleaned up and leveled in preparation for the side plates:
    CNC Improved Chinese Trigger Xbow- Gnome style WP_20160720_19_21_14_Pro1_zpscmrmdqvx

    The new side plates sketched out on half inch oak:
    CNC Improved Chinese Trigger Xbow- Gnome style WP_20160719_19_24_26_Pro1_zpsyeq9tz77

    Here the side plates aren't glued on yet, but I wanted to rough out with the prod mortice with a Dremel Multi Max first:
    CNC Improved Chinese Trigger Xbow- Gnome style WP_20160721_17_39_09_Pro1_zpshvmqsg9c

    That was so I could fine tune the fit with glue rather than my precision chiseling skills, because I don't have precision chiseling skills:
    CNC Improved Chinese Trigger Xbow- Gnome style WP_20160721_19_14_43_Pro1_zpskcqi7ptz

    The patient is resting comfortably:
    CNC Improved Chinese Trigger Xbow- Gnome style WP_20160721_20_12_32_Pro1_zpsne14ksep

    And the lock mechanism is fully installed for the first time. Now I'm getting excited!
    CNC Improved Chinese Trigger Xbow- Gnome style 356e24e5-a717-4c62-9e69-8d87b4458f4e_zpspv97wwrd

    Gnome
    avatar
    c sitas
    Crossbow Junkie

    I live here!


    Crossbow JunkieI live here!


    Posts : 547
    Join date : 2012-11-24

    CNC Improved Chinese Trigger Xbow- Gnome style Empty Re: CNC Improved Chinese Trigger Xbow- Gnome style

    Post by c sitas Fri Jul 22, 2016 7:56 am

    Gnome, you have the patience of a saint. Great work , looks fantastic.Like your trigger idea also.
    septua
    septua
    Tinkerer

    If there is a will, there is a way.


    TinkererIf there is a will, there  is a way.


    Posts : 76
    Join date : 2012-12-02
    Location : Ohio

    CNC Improved Chinese Trigger Xbow- Gnome style Empty Re: CNC Improved Chinese Trigger Xbow- Gnome style

    Post by septua Fri Jul 22, 2016 9:02 am

    An alternate method of securing the trigger box is with 2 opposed coarse threaded socket set screws in the tiller. Both of my bows have this feature at the lower rear of box. The front of box protrudes into the tiller but still allows for fast removal.
    CNC Improved Chinese Trigger Xbow- Gnome style Set_sc12
    avatar
    jaeger22
    Workshop Savvy

    Did you see my tool collection?


    Workshop SavvyDid you see my tool collection?


    Posts : 153
    Join date : 2013-03-15
    Age : 75
    Location : Orlando, FL

    CNC Improved Chinese Trigger Xbow- Gnome style Empty Re: CNC Improved Chinese Trigger Xbow- Gnome style

    Post by jaeger22 Fri Jul 22, 2016 10:06 am

    Looking good Gnome!
    Just an FYI, I tested my theory about only using the back pin to hold it in yesterday and it worked just fine. Soooo much easier to install and remove. I just installed a 1/4" pin flush with the case in front and a 5/6"  tube in the back, also flush with the case. I plugged up the holes in an old stock and then drilled a new 1/4" hole in the back through the plug. Slide the lock in and insert a 1/4" pin through the stock and lock and your done. I've only shot it a few times so far but it seems rock solid. No movement at all.
    Gnome
    Gnome
    Crossbow Junkie

    I live here!


    Crossbow JunkieI live here!


    Posts : 451
    Join date : 2011-10-16
    Age : 60
    Location : North Georgia

    CNC Improved Chinese Trigger Xbow- Gnome style Empty Re: CNC Improved Chinese Trigger Xbow- Gnome style

    Post by Gnome Sat Jul 23, 2016 2:04 pm

    Still not done with fit and finish, but got it close enough to sand down and put on a coat of oil to see what it's going to look like:
    CNC Improved Chinese Trigger Xbow- Gnome style B5c1a281-cad8-4a5e-8514-044c095401b2_zpsuxmy6a41

    Next up is the foot stirrup, then the string so I can mount it to the prod and fine tune the mortice.
    Gnome
    avatar
    jaeger22
    Workshop Savvy

    Did you see my tool collection?


    Workshop SavvyDid you see my tool collection?


    Posts : 153
    Join date : 2013-03-15
    Age : 75
    Location : Orlando, FL

    CNC Improved Chinese Trigger Xbow- Gnome style Empty Re: CNC Improved Chinese Trigger Xbow- Gnome style

    Post by jaeger22 Sat Jul 23, 2016 2:29 pm

    Nice! Looking forward to seeing what it looks like after you put the oil on. . . .
    Gnome
    Gnome
    Crossbow Junkie

    I live here!


    Crossbow JunkieI live here!


    Posts : 451
    Join date : 2011-10-16
    Age : 60
    Location : North Georgia

    CNC Improved Chinese Trigger Xbow- Gnome style Empty Re: CNC Improved Chinese Trigger Xbow- Gnome style

    Post by Gnome Mon Aug 01, 2016 7:47 am

    Finally, final stages of assembly. Did not have very good luck making the string, mainly because I was relying on luck rather than accurate measurements and record keeping. Third time's the charm:
    CNC Improved Chinese Trigger Xbow- Gnome style 7a2ed8a2-8176-461a-afb1-25787add81a8_zpsyitwczv5

    Next I strung the prod so I could fine-tune the mortice:
    CNC Improved Chinese Trigger Xbow- Gnome style WP_20160730_12_15_44_Pro_zpsgmm46s9f

    Then it was time to test fit all the components. THe stirrup is formed from 1" by .125" aluminum bar, with the mounting tabs inlet flush to the tiller. Good enough, but it came out a bit bigger than I had in mind.
    CNC Improved Chinese Trigger Xbow- Gnome style WP_20160727_19_12_48_Pro_zpsf5whgure

    Finally time to bind the prod. I decided early on a cord binding early on, to keep weight down. I also like using modern materials. I've used paracord before with no problems, even though there was a chorus of "It's too stretchy, kid! You'll put your eye out!" This time I opted for something different that I discovered on Amazon while looking for something else: Kevlar fiber cord.
    CNC Improved Chinese Trigger Xbow- Gnome style WP_20160731_13_20_03_Pro_zpspwlvsskz

    The stuff is a bit hard to cut, not stretchy at all, and has a tendency to stay tied. I used a pattern similar to how I serve nock ends. It looks a bit dainty, but I hope that looks are deceiving. So far it seems pretty solid. I spray painted the tips of the stirrup that are exposed and covered the rest with shrink tubing.
    CNC Improved Chinese Trigger Xbow- Gnome style 40211122-8110-4f27-b9d3-97b4bff6745c_zpsdnz3yg8x

    Almost ready to shoot!
    CNC Improved Chinese Trigger Xbow- Gnome style 73d425ac-336d-4b33-b485-04b113967af8_zps1pm2ivp7

    First I need to make a bolt clip, and rectify an issue I have with the trigger mech. I routed out the cavity too precisely and that could be a problem. The lock components have some play left to right on their axles, if I don't have everything lined up just right there is a chance of misfire if the toggle gets hung up and can't drop completely. Haven't decided yet if I want to grind out the cavity some more or add spacers on the axles to keep the mech components perfectly aligned.
    Gnome
    avatar
    edstuff
    Tinkerer

    If there is a will, there is a way.


    TinkererIf there is a will, there  is a way.


    Posts : 74
    Join date : 2014-12-16

    CNC Improved Chinese Trigger Xbow- Gnome style Empty Re: CNC Improved Chinese Trigger Xbow- Gnome style

    Post by edstuff Mon Aug 01, 2016 12:30 pm

    that looks gorgeous! And I like your jig for stringing the prod too
    Gnome
    Gnome
    Crossbow Junkie

    I live here!


    Crossbow JunkieI live here!


    Posts : 451
    Join date : 2011-10-16
    Age : 60
    Location : North Georgia

    CNC Improved Chinese Trigger Xbow- Gnome style Empty Re: CNC Improved Chinese Trigger Xbow- Gnome style

    Post by Gnome Sun Aug 07, 2016 1:55 pm

    Finally got it into shooting shape this week and a chance to go to the range today. The trigger worked flawlessly for 50+ shots. Would have kept shooting except for a different issue: going with a light tiller made of dense, hard wood, and no cushion in the prod socket, this weapon is currently very loud and a bit painful on the cheek when fired due to the shock. I also still have a bit too much down force on the string, so it looks like I'll be undoing the binding, increasing the angle of the mortice, putting a thick leather pad in, and rebinding. Also might pad the cheek rest.
    Took a few photos before I tear it down again:
    CNC Improved Chinese Trigger Xbow- Gnome style 20160807_01_zpsnrgpqrau

    Made the bolt clip from a bit of a worn out miter saw and drilled out the lock post to use as a rear peep sight. Up front I put together a pin sight with some scavenged pins and a rail cut from 1/8" aluminum:
    CNC Improved Chinese Trigger Xbow- Gnome style 20160807_142_zpswtntsudv

    I filled in the hole for the front axle and switched to a short pin for the toggle axle. John is right: a single quarter inch pin at the primary axle is sufficient to keep the lock securely in place. I think the pressure on that axle is pretty well distributed on the wood and the aluminum chassis of the lock, and from the chassis to the front face of the socket in the tiller. It's a true drop-in solution, all I need is a standard screwdriver or reasonable substitute, the ease and simplicity is a real treat. over 50 shots and no issues and no signs of distress.
    CNC Improved Chinese Trigger Xbow- Gnome style 20160807_14_zpsrv2xlf6o

    The bolt clip is set asymmetrically so it doesn't interfere with the locking post. It's painted with black lacquer and the business end is covered with shrink tubing.
    CNC Improved Chinese Trigger Xbow- Gnome style 20160806_17_zpsap6o4cik

    I like being able to fold the sight down so it doesn't snag on anything, but I need to make it more secure because it won't stay still when shooting, again due in part to the excessive shock. The kevlar fiber is pretty fantastic, I don't think the prod could be more solidly secured. I'll try to untie it, but I'm pretty sure I'll have to cut it off. I have more, but it wasn't cheap!
    CNC Improved Chinese Trigger Xbow- Gnome style 20160807_141_zpsqgdllqyi

    Gnome
    avatar
    edstuff
    Tinkerer

    If there is a will, there is a way.


    TinkererIf there is a will, there  is a way.


    Posts : 74
    Join date : 2014-12-16

    CNC Improved Chinese Trigger Xbow- Gnome style Empty Re: CNC Improved Chinese Trigger Xbow- Gnome style

    Post by edstuff Mon Aug 08, 2016 10:10 am

    She's a beauty

    Sponsored content


    CNC Improved Chinese Trigger Xbow- Gnome style Empty Re: CNC Improved Chinese Trigger Xbow- Gnome style

    Post by Sponsored content


      Current date/time is Fri Apr 26, 2024 3:11 pm