The Arbalist Guild

Would you like to react to this message? Create an account in a few clicks or log in to continue.

Crossbows - Everything about Building, Modding, and Using your Crossbow Gear

Latest topics

» 12th Century Chinese Crossbow Chronographed
by stuckinthemud1 Fri Nov 24, 2023 3:50 pm

» Crossbow Stock
by kenh Tue Oct 31, 2023 6:19 am

» Colletiere a Charavines continuing experiment
by stuckinthemud1 Sat Oct 07, 2023 5:36 am

» Cocking - how
by stuckinthemud1 Thu Aug 03, 2023 4:24 am

» Questions around heavy crossbow lath buildin
by stuckinthemud1 Wed Apr 26, 2023 1:10 am

» Arab Crossbow
by stuckinthemud1 Tue Apr 25, 2023 7:57 am

» prod angle, and lever trigger for sale anyone?
by stuckinthemud1 Mon Mar 20, 2023 5:54 am

» flexible string
by jasper1978 Mon Mar 20, 2023 1:25 am

» [solved]Skane/Lillohus crossbow thread
by stuckinthemud1 Sun Mar 19, 2023 7:44 am

» jens sensfelder
by jasper1978 Wed Mar 08, 2023 11:58 pm

» 400lb Windlass crossbow bolts weight and accuracy shooting high.
by stuckinthemud1 Sun Mar 05, 2023 2:53 pm

» Codex Löffelholz crossbow
by stuckinthemud1 Tue Jan 24, 2023 4:14 pm

» Digitar prodsc
by stuckinthemud1 Sun Jan 15, 2023 2:42 pm

» Troubleshooting
by Andy. Fri Jan 06, 2023 12:29 pm

» Wood Prods
by stuckinthemud1 Fri Dec 30, 2022 12:47 pm

» Colletiere a Charavines crossbow
by stuckinthemud1 Fri Dec 30, 2022 8:54 am

» Simplified Löffelhotz speedloader
by stuckinthemud1 Fri Dec 09, 2022 4:05 pm

» Fiberglass H-bows
by c sitas Sat Nov 12, 2022 8:44 am

» Bad Antler
by drawknife Sat Nov 12, 2022 3:48 am

» Anyone make their own bolts?
by Juniper Mon Oct 17, 2022 8:20 am

» Josef alm in English
by Juniper Sat Oct 15, 2022 4:22 am

» Qin/Han lock drawings
by kenh Fri Sep 23, 2022 8:16 pm

» stirrup dimensions?
by stuckinthemud1 Thu Sep 01, 2022 1:49 pm

» Skane/Lillohus lockbow information needed
by stuckinthemud1 Sun Aug 14, 2022 6:23 am

» need help contacting le musee Dauphinois Grenoble
by stuckinthemud1 Sat Aug 13, 2022 3:22 pm


+4
Geezer
chaz
Andy.
chilihook
8 posters

    Finished Crossbow - Thanks to all - here some pic and if anyone wants info let me know happy to help .

    avatar
    globalmark
    Fresh Blood

    Doesn't mean
    I'm new to crossbows


    Fresh Blood Doesn't meanI'm new to crossbows


    Posts : 25
    Join date : 2018-06-08

    Finished Crossbow - Thanks to all - here some pic and if anyone wants info let me know happy to help . Empty Finished Crossbow - Thanks to all - here some pic and if anyone wants info let me know happy to help .

    Post by globalmark Sun Aug 26, 2018 12:48 pm

    Hi Guys 

    Thanks to anyone gave info and i read a lot here - 
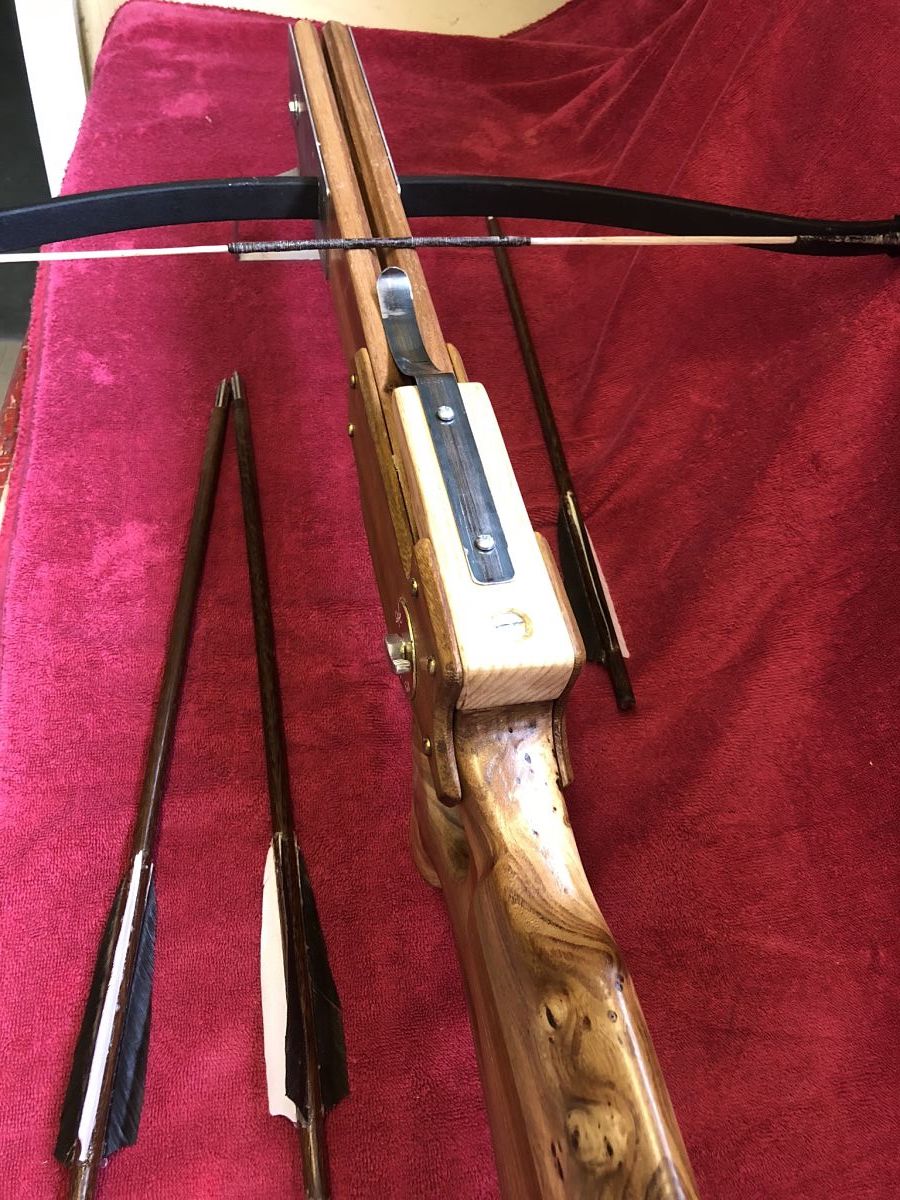
    this was supposed to be 100% home made crossbow but snapped my bamboo and timber prod , made PVC one didn't like the look so Bought a £20 taiwanese one from ebay - here some details if anyone want more info Just ask 

    Stock - Glued up ELM 
    plates around prod and stock end  - Stainless steel 1.2mm
    Prod - 160lbs Taiwanese from ebay 
    String - Homemade Dacron B50 28 strands , long bow serving material and Doubled Served in centre with strong Linen thread covered in bees wax
    Trigger- took Pic of Chinese one - used photoshop slightly enlarge - cut out and made in timber for trial then Aluminium 4mm side plates and 9-10mm for trigger and other parts (roll nut part made from 3 pieces of 4mm glued and screwed together (used tap and die set make thread) - then oak spacer plates and springs found in a draw ..
    (did have trouble this trigger not holding string weight but slight file a better angle on parts now rock solid) 
    Safety made from bolt with part ground away, home made aluminium thumb push screw and glued on , brass cover washer  
    Side cover plates- unknown timber 8-9mm thick held on with M4 brass machine screws into Glued in threaded inserts 
    foot stripup - strip Aluminium i had 
    ash timber to cover roller nut 
    Bolt/arrow holder - bit old bandsaw blade 
    Bolts made from leftover timber IPE , OAK , Maple - ones 9.5mm home made dowel - turkey feathers and arrow points ..
    Finished sanding to 240grit then sanding sealer then several coats Danish oil - then beeswax on arrow bed and edges where string will touch 

    Think thats all for now ask if any questions ..
    mark 

    Finished Crossbow - Thanks to all - here some pic and if anyone wants info let me know happy to help . Img_0410
    Finished Crossbow - Thanks to all - here some pic and if anyone wants info let me know happy to help . Img_0411
    Finished Crossbow - Thanks to all - here some pic and if anyone wants info let me know happy to help . Img_0412


    Last edited by globalmark on Sun Aug 26, 2018 12:56 pm; edited 1 time in total
    avatar
    globalmark
    Fresh Blood

    Doesn't mean
    I'm new to crossbows


    Fresh Blood Doesn't meanI'm new to crossbows


    Posts : 25
    Join date : 2018-06-08

    Finished Crossbow - Thanks to all - here some pic and if anyone wants info let me know happy to help . Empty Re: Finished Crossbow - Thanks to all - here some pic and if anyone wants info let me know happy to help .

    Post by globalmark Sun Aug 26, 2018 12:50 pm

    Couple more pics have plenty during build - if anyone want let me know as have to shrink the size first ..
    Cheers Mark 
    Finished Crossbow - Thanks to all - here some pic and if anyone wants info let me know happy to help . Img_0413
    Finished Crossbow - Thanks to all - here some pic and if anyone wants info let me know happy to help . Img_0414
    Finished Crossbow - Thanks to all - here some pic and if anyone wants info let me know happy to help . Img_0415
    avatar
    globalmark
    Fresh Blood

    Doesn't mean
    I'm new to crossbows


    Fresh Blood Doesn't meanI'm new to crossbows


    Posts : 25
    Join date : 2018-06-08

    Finished Crossbow - Thanks to all - here some pic and if anyone wants info let me know happy to help . Empty Re: Finished Crossbow - Thanks to all - here some pic and if anyone wants info let me know happy to help .

    Post by globalmark Sun Aug 26, 2018 12:52 pm

    couple more Finished Crossbow - Thanks to all - here some pic and if anyone wants info let me know happy to help . Img_0416
    Finished Crossbow - Thanks to all - here some pic and if anyone wants info let me know happy to help . Img_0417
    chilihook
    chilihook
    Fresh Blood

    Doesn't mean
    I'm new to crossbows


    Fresh Blood Doesn't meanI'm new to crossbows


    Posts : 38
    Join date : 2018-08-07
    Age : 54
    Location : Central Connecticut

    Finished Crossbow - Thanks to all - here some pic and if anyone wants info let me know happy to help . Empty Re: Finished Crossbow - Thanks to all - here some pic and if anyone wants info let me know happy to help .

    Post by chilihook Wed Aug 29, 2018 1:16 pm

    Hi Mark - thanks for the info on my post. There are great pics here too. Can you post a larger pic of your trigger mechanism? Beautiful crossbow!
    avatar
    globalmark
    Fresh Blood

    Doesn't mean
    I'm new to crossbows


    Fresh Blood Doesn't meanI'm new to crossbows


    Posts : 25
    Join date : 2018-06-08

    Finished Crossbow - Thanks to all - here some pic and if anyone wants info let me know happy to help . Empty Re: Finished Crossbow - Thanks to all - here some pic and if anyone wants info let me know happy to help .

    Post by globalmark Wed Aug 29, 2018 1:39 pm

    here you go - 1st pic was chinese one from internet pic then i edited it in Black and white ,I printed it out on paper couple times till was happy for size for my stock as chinese one was quite small .
    Then cut out in wood by hand for proof it worked - 
    after cut out bit oversized In Aluminium .
    only part hard to see is roller nut made of three pieces aluminium sandwiched together then glued and screwed - i felt this was easier then grinding middle of roller nut and more accurate .. 
    any thing else mate happy to help Finished Crossbow - Thanks to all - here some pic and if anyone wants info let me know happy to help . Screen12
    Finished Crossbow - Thanks to all - here some pic and if anyone wants info let me know happy to help . Screen13
    Finished Crossbow - Thanks to all - here some pic and if anyone wants info let me know happy to help . Img_2413
    avatar
    globalmark
    Fresh Blood

    Doesn't mean
    I'm new to crossbows


    Fresh Blood Doesn't meanI'm new to crossbows


    Posts : 25
    Join date : 2018-06-08

    Finished Crossbow - Thanks to all - here some pic and if anyone wants info let me know happy to help . Empty Re: Finished Crossbow - Thanks to all - here some pic and if anyone wants info let me know happy to help .

    Post by globalmark Wed Aug 29, 2018 1:42 pm

    more Finished Crossbow - Thanks to all - here some pic and if anyone wants info let me know happy to help . Img_0311
    Finished Crossbow - Thanks to all - here some pic and if anyone wants info let me know happy to help . Img_2510
    Finished Crossbow - Thanks to all - here some pic and if anyone wants info let me know happy to help . Img_0312
    avatar
    globalmark
    Fresh Blood

    Doesn't mean
    I'm new to crossbows


    Fresh Blood Doesn't meanI'm new to crossbows


    Posts : 25
    Join date : 2018-06-08

    Finished Crossbow - Thanks to all - here some pic and if anyone wants info let me know happy to help . Empty Re: Finished Crossbow - Thanks to all - here some pic and if anyone wants info let me know happy to help .

    Post by globalmark Wed Aug 29, 2018 1:45 pm

    few more - Last pic is my safety sticking out the side - sorry no picture of that myself but will try and explainFinished Crossbow - Thanks to all - here some pic and if anyone wants info let me know happy to help . Img_0313
    Finished Crossbow - Thanks to all - here some pic and if anyone wants info let me know happy to help . Img_0314
    Finished Crossbow - Thanks to all - here some pic and if anyone wants info let me know happy to help . Img_2511
    avatar
    globalmark
    Fresh Blood

    Doesn't mean
    I'm new to crossbows


    Fresh Blood Doesn't meanI'm new to crossbows


    Posts : 25
    Join date : 2018-06-08

    Finished Crossbow - Thanks to all - here some pic and if anyone wants info let me know happy to help . Empty Re: Finished Crossbow - Thanks to all - here some pic and if anyone wants info let me know happy to help .

    Post by globalmark Wed Aug 29, 2018 2:01 pm

    Ok 
    here is one picture NOT MINE found online after i made mine but a similar idea to help explain .
    I think this picture is better then mine and far easier to make and do - and next time i take apart my trigger i might make similar and make like this - same as mine just a better fixing idea - + couple washers 

    What I did was i took a dome head carriage Bolt (filed off the square part under the head) then worked out where i needed to file it and then I filed half the shaft away (like in picture) - 
    This then goes through the stock - through the trigger drop in Mechanism and the other end it has a shaped NUT "i used aluminium cut a finger push taped it with tap and die set .
    cut the thread exact length so i could put on tight and thread hit end of nut - i glued on with epoxy also for security - 
    but many ways to do this same system and lots other safety systems far better out there .

    you can see on my close up of trigger mech on central far right a hole through - this is where the safety goes - turn 180˚ its on turn 180˚ other way its able to fire .. - all it does is stop the trigger being pulled - 100% manual no self return so i have to cock the cross bow (put string behind roller nut) then put safety on , load a bolt , aim turn safety to fire the can fire ..
    hoe that Makes sense - let me know if anything more you need Finished Crossbow - Thanks to all - here some pic and if anyone wants info let me know happy to help . Screen14
    avatar
    Andy.
    Workshop Savvy

    Did you see my tool collection?


    Workshop SavvyDid you see my tool collection?


    Posts : 133
    Join date : 2014-09-05

    Finished Crossbow - Thanks to all - here some pic and if anyone wants info let me know happy to help . Empty Re: Finished Crossbow - Thanks to all - here some pic and if anyone wants info let me know happy to help .

    Post by Andy. Wed Aug 29, 2018 5:35 pm

    Well done, like the trigger!... though look out for wear and galling on the sear faces if aluminium.
    avatar
    chaz
    Crossbow Junkie

    I live here!


    Crossbow JunkieI live here!


    Posts : 313
    Join date : 2012-04-13
    Age : 75
    Location : Texas

    Finished Crossbow - Thanks to all - here some pic and if anyone wants info let me know happy to help . Empty Re: Finished Crossbow - Thanks to all - here some pic and if anyone wants info let me know happy to help .

    Post by chaz Thu Aug 30, 2018 1:58 am

    globalmark
     
       Your info is very appreciated and very interesting ,,,,,,,,,,,Great Job

    Chaz
    avatar
    globalmark
    Fresh Blood

    Doesn't mean
    I'm new to crossbows


    Fresh Blood Doesn't meanI'm new to crossbows


    Posts : 25
    Join date : 2018-06-08

    Finished Crossbow - Thanks to all - here some pic and if anyone wants info let me know happy to help . Empty Re: Finished Crossbow - Thanks to all - here some pic and if anyone wants info let me know happy to help .

    Post by globalmark Thu Aug 30, 2018 2:39 am

    Hi Guys 
    Thanks for that - 

    Andy , cheers i will keep a look out for wear ,i also have plenty meat left on the parts so can refile probably at least once and maybe replace main trigger parts in steel easy enough .. as made as lift out unit .
    Mark
    chilihook
    chilihook
    Fresh Blood

    Doesn't mean
    I'm new to crossbows


    Fresh Blood Doesn't meanI'm new to crossbows


    Posts : 38
    Join date : 2018-08-07
    Age : 54
    Location : Central Connecticut

    Finished Crossbow - Thanks to all - here some pic and if anyone wants info let me know happy to help . Empty Re: Finished Crossbow - Thanks to all - here some pic and if anyone wants info let me know happy to help .

    Post by chilihook Thu Sep 06, 2018 3:24 pm

    Hi Mark - can you tell me the draw length of that prod? I have the same one and just want to make sure that my measurements are in the ballpark. Thanks!
    avatar
    globalmark
    Fresh Blood

    Doesn't mean
    I'm new to crossbows


    Fresh Blood Doesn't meanI'm new to crossbows


    Posts : 25
    Join date : 2018-06-08

    Finished Crossbow - Thanks to all - here some pic and if anyone wants info let me know happy to help . Empty Re: Finished Crossbow - Thanks to all - here some pic and if anyone wants info let me know happy to help .

    Post by globalmark Thu Sep 06, 2018 3:32 pm

    Hi Mate 

    I contacted the seller and the European importers in Holland neither could tell me - 
    but a i did heaps of googling and found some people say 11" some say 12" and some even said 13" - so i put on my tillering tree and could comfortable get max 12-12.5" and would get 13" but i was not comfortable - 

    so i ended up setting it at close 11 3/4" - but think you can set 12" and also ok ..
    with my set up i can comfortable cock this by 2 hands on the string and foot in stirup so dont need any cocking string or anything .

    I have just added a very basic dry fire Mech (basically a bit aluminium on a string just infront of rollernut - will add pics when all finished and pretty.

    hope that helps 
    Mark
    chilihook
    chilihook
    Fresh Blood

    Doesn't mean
    I'm new to crossbows


    Fresh Blood Doesn't meanI'm new to crossbows


    Posts : 38
    Join date : 2018-08-07
    Age : 54
    Location : Central Connecticut

    Finished Crossbow - Thanks to all - here some pic and if anyone wants info let me know happy to help . Empty Re: Finished Crossbow - Thanks to all - here some pic and if anyone wants info let me know happy to help .

    Post by chilihook Thu Sep 06, 2018 6:04 pm

    Perfect, that info will definitely be handy. I appreciate the help!
    Geezer
    Geezer
    Master Crossbowyer
    Master Crossbowyer


    Posts : 1194
    Join date : 2010-01-12
    Age : 76
    Location : Austin, Texas, USA

    Finished Crossbow - Thanks to all - here some pic and if anyone wants info let me know happy to help . Empty Re: Finished Crossbow - Thanks to all - here some pic and if anyone wants info let me know happy to help .

    Post by Geezer Tue Sep 11, 2018 3:16 pm

    The Chinese fiberglass prods, approx 27 inches long are copies of the old Barnett fiberglass prods... also seen on Italian San Marino crossbows..  I would say go for about 12 inches from belly of prod to the lock, give or take half an inch.  Geezer.
    avatar
    globalmark
    Fresh Blood

    Doesn't mean
    I'm new to crossbows


    Fresh Blood Doesn't meanI'm new to crossbows


    Posts : 25
    Join date : 2018-06-08

    Finished Crossbow - Thanks to all - here some pic and if anyone wants info let me know happy to help . Empty Re: Finished Crossbow - Thanks to all - here some pic and if anyone wants info let me know happy to help .

    Post by globalmark Tue Oct 09, 2018 5:12 am

    Few adaptions made - added a red dot sight , then could not raise the adjustment enough so had to add a shim (aluminium wedge under sight mount) 
    see Pics ..
    Also added a simple Dry fire hook (or whatever you call it) - this is a simple slightly hooked shape piece aluminium held down with a spring with a bolt as a pivot . 
    Mark 
    Finished Crossbow - Thanks to all - here some pic and if anyone wants info let me know happy to help . D166b110
    Finished Crossbow - Thanks to all - here some pic and if anyone wants info let me know happy to help . Img_0610
    Finished Crossbow - Thanks to all - here some pic and if anyone wants info let me know happy to help . Img_0910
    avatar
    msalazar2310
    Fresh Blood

    Doesn't mean
    I'm new to crossbows


    Fresh Blood Doesn't meanI'm new to crossbows


    Posts : 14
    Join date : 2015-04-19
    Age : 78
    Location : Mexico

    Finished Crossbow - Thanks to all - here some pic and if anyone wants info let me know happy to help . Empty Re: Finished Crossbow - Thanks to all - here some pic and if anyone wants info let me know happy to help .

    Post by msalazar2310 Sun Oct 21, 2018 4:38 pm

    Great job, congratulations!!!. I would like to know how do you cock the string.
    Manuel Salazar
    Guadalajara
    avatar
    globalmark
    Fresh Blood

    Doesn't mean
    I'm new to crossbows


    Fresh Blood Doesn't meanI'm new to crossbows


    Posts : 25
    Join date : 2018-06-08

    Finished Crossbow - Thanks to all - here some pic and if anyone wants info let me know happy to help . Empty Re: Finished Crossbow - Thanks to all - here some pic and if anyone wants info let me know happy to help .

    Post by globalmark Mon Oct 22, 2018 2:02 am

    Hi 
    1st step I do make sure my safe on fire 
    2nd pull trigger while crossbow facing ground just to make sure roll nut part is down and correct placement
    3rd Cocking this quite easy - just foot in stirrup and one hand each side of stock pull gently with slight harder pull at end - only 160lbs - (think 175lbs would be my max manual cocking)
    can easy do 100 times in a day before get to tired - it seems more technic then strength ..

    only one thing i notice is since made dry fire mechnism if dont cock perfectly 1st time the string holds with the dry fire bit and you have to just pull that extra 1" after which is a bit trickier but still not to hard .

    Mark
    avatar
    c sitas
    Crossbow Junkie

    I live here!


    Crossbow JunkieI live here!


    Posts : 547
    Join date : 2012-11-24

    Finished Crossbow - Thanks to all - here some pic and if anyone wants info let me know happy to help . Empty Re: Finished Crossbow - Thanks to all - here some pic and if anyone wants info let me know happy to help .

    Post by c sitas Sun Oct 28, 2018 1:59 pm

    Hi Mark, One thing I really like about your roller knut is that it's made in three pieces. To convert it to steel I would just make a new center piece for the knut. That would be any easy way to start to convert to a steel trigger.I use a steel insert similar to that when I use delrin for material.The  two other flat pieces are a piece of cake compared to hacking out a new complete knut. Very good looking little bow you made. I really like the back end grain of the stock , it's beautiful. Also , you were very smart to incorporate the anti dry fire. In the long run , it's not a matter of how you dry fired , It's actually a matter of when . If you shoot long enough ,I'll guarantee you it'll happen. Don't ask how I know this.
    Gnome
    Gnome
    Crossbow Junkie

    I live here!


    Crossbow JunkieI live here!


    Posts : 451
    Join date : 2011-10-16
    Age : 60
    Location : North Georgia

    Finished Crossbow - Thanks to all - here some pic and if anyone wants info let me know happy to help . Empty Re: Finished Crossbow - Thanks to all - here some pic and if anyone wants info let me know happy to help .

    Post by Gnome Mon Oct 29, 2018 6:08 pm

    Hi Mark,
    Great looking crossbow! I really like how you inlet the stock under the plates in front for the foot stirrup to pivot, and the lock mechanism looks like a sweet design. I thought the draw length looked a little short, and compared to the builds I've done with the same prod, it is. I like 14 total inches from belly to lock, 3 inch brace height and 11 inch power stroke. The prod holds up fine, but the generic factory strings don't like it and start to come apart pretty quick so I always make my own anyway. I think you're well within the safety zone, and stressing parts to failure isn't all it's cracked up to be LOL.
    Keep up the good work!
    Gnome
    avatar
    c sitas
    Crossbow Junkie

    I live here!


    Crossbow JunkieI live here!


    Posts : 547
    Join date : 2012-11-24

    Finished Crossbow - Thanks to all - here some pic and if anyone wants info let me know happy to help . Empty Re: Finished Crossbow - Thanks to all - here some pic and if anyone wants info let me know happy to help .

    Post by c sitas Sun Dec 23, 2018 8:36 am

    reading back through posts,as I do when I've nothing to do, I come onto a mention about adding a safety. While the way used was effective, a better approach would be to block the sear instead of the trigger. A more "safe" way, so to speak.Reason being , triggers are often set very light and a good strong jar would fire it.

    Sponsored content


    Finished Crossbow - Thanks to all - here some pic and if anyone wants info let me know happy to help . Empty Re: Finished Crossbow - Thanks to all - here some pic and if anyone wants info let me know happy to help .

    Post by Sponsored content


      Current date/time is Sat Apr 27, 2024 10:59 pm