The Arbalist Guild

Would you like to react to this message? Create an account in a few clicks or log in to continue.

Crossbows - Everything about Building, Modding, and Using your Crossbow Gear

Latest topics

» 12th Century Chinese Crossbow Chronographed
by stuckinthemud1 Fri Nov 24, 2023 3:50 pm

» Crossbow Stock
by kenh Tue Oct 31, 2023 6:19 am

» Colletiere a Charavines continuing experiment
by stuckinthemud1 Sat Oct 07, 2023 5:36 am

» Cocking - how
by stuckinthemud1 Thu Aug 03, 2023 4:24 am

» Questions around heavy crossbow lath buildin
by stuckinthemud1 Wed Apr 26, 2023 1:10 am

» Arab Crossbow
by stuckinthemud1 Tue Apr 25, 2023 7:57 am

» prod angle, and lever trigger for sale anyone?
by stuckinthemud1 Mon Mar 20, 2023 5:54 am

» flexible string
by jasper1978 Mon Mar 20, 2023 1:25 am

» [solved]Skane/Lillohus crossbow thread
by stuckinthemud1 Sun Mar 19, 2023 7:44 am

» jens sensfelder
by jasper1978 Wed Mar 08, 2023 11:58 pm

» 400lb Windlass crossbow bolts weight and accuracy shooting high.
by stuckinthemud1 Sun Mar 05, 2023 2:53 pm

» Codex Löffelholz crossbow
by stuckinthemud1 Tue Jan 24, 2023 4:14 pm

» Digitar prodsc
by stuckinthemud1 Sun Jan 15, 2023 2:42 pm

» Troubleshooting
by Andy. Fri Jan 06, 2023 12:29 pm

» Wood Prods
by stuckinthemud1 Fri Dec 30, 2022 12:47 pm

» Colletiere a Charavines crossbow
by stuckinthemud1 Fri Dec 30, 2022 8:54 am

» Simplified Löffelhotz speedloader
by stuckinthemud1 Fri Dec 09, 2022 4:05 pm

» Fiberglass H-bows
by c sitas Sat Nov 12, 2022 8:44 am

» Bad Antler
by drawknife Sat Nov 12, 2022 3:48 am

» Anyone make their own bolts?
by Juniper Mon Oct 17, 2022 8:20 am

» Josef alm in English
by Juniper Sat Oct 15, 2022 4:22 am

» Qin/Han lock drawings
by kenh Fri Sep 23, 2022 8:16 pm

» stirrup dimensions?
by stuckinthemud1 Thu Sep 01, 2022 1:49 pm

» Skane/Lillohus lockbow information needed
by stuckinthemud1 Sun Aug 14, 2022 6:23 am

» need help contacting le musee Dauphinois Grenoble
by stuckinthemud1 Sat Aug 13, 2022 3:22 pm


+8
mac
Geezer
Ivo
Michael
Väinämöinen
Wilhelm
Todd the archer
stoneagebowyer
12 posters

    Central European Crossbow, just starting

    stoneagebowyer
    stoneagebowyer
    Crossbow Junkie

    I live here!


    Crossbow JunkieI live here!


    Posts : 490
    Join date : 2011-01-12

    Central European Crossbow, just starting - Page 2 Empty Central European Crossbow, just starting

    Post by stoneagebowyer Tue Dec 27, 2011 6:31 pm

    First topic message reminder :

    Central European Crossbow, just starting - Page 2 Socketdrill4Central European Crossbow, just starting - Page 2 Nutbindinghole-1Central European Crossbow, just starting - Page 2 Tickler10Central European Crossbow, just starting - Page 2 Tickler5Central European Crossbow, just starting - Page 2 Tickler4


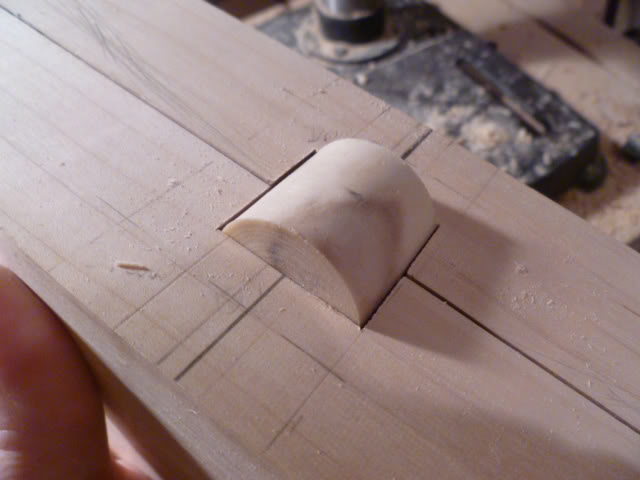
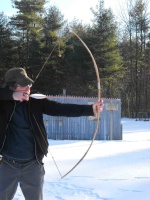
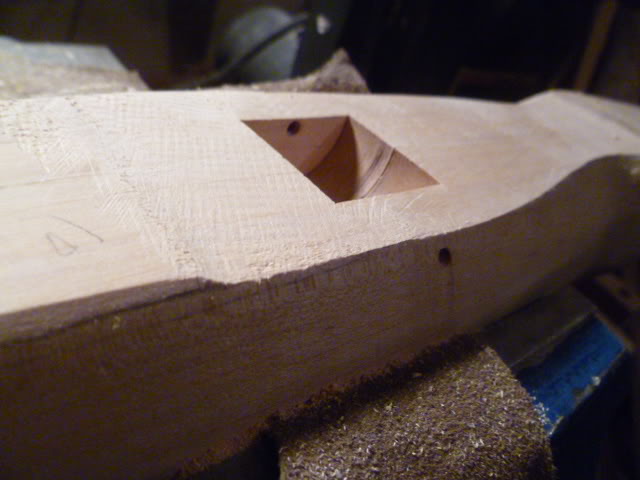
    Hi, gang. Here are a few pictures of my latest project. The tiller is being constructed by laminating two 1.5" maple planks together. So far, I have the tiller profile roughly cut out, the nut socket is drilled into each side, the tickler channel is chiseled out, and the nut binding holes and tickler pivot pin hole is drilled. Next step is to laminate the tiller and begin shaping.

    I don't expect this project to take nearly as long as the first crossbow I built. I am expecting this to be in shooting form by early, early spring, if not sooner. Maple is one of my favorite hardwoods, and I expect this tiller with all the nice curves of a Central European bow to be easy on the eye. I have a 190# prod set aside for this weapon.

    More photos soon enough. Comments are welcome.
    stoneagebowyer
    stoneagebowyer
    Crossbow Junkie

    I live here!


    Crossbow JunkieI live here!


    Posts : 490
    Join date : 2011-01-12

    Central European Crossbow, just starting - Page 2 Empty Re: Central European Crossbow, just starting

    Post by stoneagebowyer Fri Jan 06, 2012 6:42 am

    Last bit that is on my mind. This clears the way to start gluing on the bone table surface. I was going to pre-drill holes for #18 brass escutcheon pins, a look I like, although I am not sure how or if these are evident in historic bows. Instead, I'll glue down the surface bone, then drill and tap in the pins, as I will want to spend some time filing and sanding the bone surface and not worry about the pin heads getting in the way. Hopefully, I can start this step today, as well as work on the tickler. The sturrip blank is waiting for me, and I will want both of those ready to blue at the same time. I like hot browning finished such as you see on plains rifles, but the bluing looks nice and contrasty against the various wood and bone tones. Dane
    Geezer
    Geezer
    Master Crossbowyer
    Master Crossbowyer


    Posts : 1194
    Join date : 2010-01-12
    Age : 76
    Location : Austin, Texas, USA

    Central European Crossbow, just starting - Page 2 Empty Re: Central European Crossbow, just starting

    Post by Geezer Fri Jan 06, 2012 8:57 am

    "I was going to pre-drill holes for #18 brass escutcheon pins, a look I
    like, although I am not sure how or if these are evident in historic
    bows."
    I have seen a fair number of Germanic bows with pins holding bone-top bits in place. They tend to be rather larger than no. 18 pins, but in principle, you're on solid ground... and yeah, they look real nice.
    Geezer.
    stoneagebowyer
    stoneagebowyer
    Crossbow Junkie

    I live here!


    Crossbow JunkieI live here!


    Posts : 490
    Join date : 2011-01-12

    Central European Crossbow, just starting - Page 2 Empty Re: Central European Crossbow, just starting

    Post by stoneagebowyer Fri Jan 06, 2012 9:14 am

    Thanks for the message. I appreciate it.

    Dane
    stoneagebowyer
    stoneagebowyer
    Crossbow Junkie

    I live here!


    Crossbow JunkieI live here!


    Posts : 490
    Join date : 2011-01-12

    Central European Crossbow, just starting - Page 2 Empty Re: Central European Crossbow, just starting

    Post by stoneagebowyer Fri Jan 06, 2012 6:42 pm

    Central European Crossbow, just starting - Page 2 Tablrrasp0022Central European Crossbow, just starting - Page 2 Tablrrasp0032Central European Crossbow, just starting - Page 2 Tablrrasp0042Central European Crossbow, just starting - Page 2 Tablrrasp0062Central European Crossbow, just starting - Page 2 Tablrrasp0092Central European Crossbow, just starting - Page 2 Tablrrasp0132


    I am going to knock off for the night, but I completed a few very important steps.

    My big concern was that with the bone plating, the top surface of the crossbow would be too high, and thus interfere with the operation of the nut. In other words, the bolt would be riding too high and the notch in the nut would have to be so high, the little horns (or whatever you call them) would be insufficient. I am not sure I am putting that correctly, but in any case, I had two options; 1, sand down the bone to half their thickness, or work down the top of the tiller.

    That seemed the most logical approach, and easiest, so in to the vice went Mr. Tiller, and out came Mr. Farrier's Rasp, with cabinet scraper as Wing Man. If you havent used a good, sharp cabinet scraper, you have no idea what an amazing tool it is.

    I was pleased with how quickly and easily this went overall. I tested the flatness of the table top by placing bone pieces on top and eyed the edges, and my worklamp helped in seeing light peeking between the bone scales and the wood. I still have bits of touching up to do, but now I am trimming each bone piece, and making sure the joints between the various pieces are completely straight.

    Whew.

    Dane
    stoneagebowyer
    stoneagebowyer
    Crossbow Junkie

    I live here!


    Crossbow JunkieI live here!


    Posts : 490
    Join date : 2011-01-12

    Central European Crossbow, just starting - Page 2 Empty Re: Central European Crossbow, just starting

    Post by stoneagebowyer Tue Jan 10, 2012 3:27 am

    Central European Crossbow, just starting - Page 2 Bonelaminate0012Central European Crossbow, just starting - Page 2 Bonelaminate0022Central European Crossbow, just starting - Page 2 Bonelaminate0062Central European Crossbow, just starting - Page 2 Bonelaminate0072


    Well, the bone glueup has begun. I picked up a couple of cheap bicycle inner tubes and cut them into strips, and also used wooden handscrew clamps. I am not sure if this is the best way to do this job, but it seems to work with minimum stress or hassles. My biggest concern is making sure that they wooden surface is truly flat, so I don't end up having gaps between the tiller and the bone scales. Now that I have this started, the rest should go relatively quickly. The glue I am using is two-part epoxy. Dane
    stoneagebowyer
    stoneagebowyer
    Crossbow Junkie

    I live here!


    Crossbow JunkieI live here!


    Posts : 490
    Join date : 2011-01-12

    Central European Crossbow, just starting - Page 2 Empty Re: Central European Crossbow, just starting

    Post by stoneagebowyer Tue Jan 10, 2012 5:01 pm

    Central European Crossbow, just starting - Page 2 Nextglueing0022-1Central European Crossbow, just starting - Page 2 Nextglueing0032Central European Crossbow, just starting - Page 2 Nextglueing0052


    More gluing. After ensuring a good fit on the surface of the wood and between adjacent bone pieces, I used two-part epoxy and the inner tubes to glue on the next three pieces. The inner tubes are way more hassle-free than regular rubber bands, and their width makes it easier and faster. I just tie them on using a half knot, then wrap, then tuck under the nearest other inner tube.

    Dane
    Ivo
    Ivo
    Admin
    Admin


    Posts : 1041
    Join date : 2009-11-25
    Age : 36
    Location : NJ, USA

    Central European Crossbow, just starting - Page 2 Empty Re: Central European Crossbow, just starting

    Post by Ivo Tue Jan 10, 2012 5:40 pm

    Wicked! drunken

    I can easily see you doing something like this eventually...

    Central European Crossbow, just starting - Page 2 Th_f36de65e657e

    Honestly I thought I'd be the first one to do a buildalong so nice...haha! You got balls man (...pardon my French) Laughing

    Think it's time to have a talk about making a sight for this beast? *went to look for the topic* study

    Also...Hope you gots a few metal files handy, this thing will definitely need a curvy bolt clip. Cool

    Ivo
    stoneagebowyer
    stoneagebowyer
    Crossbow Junkie

    I live here!


    Crossbow JunkieI live here!


    Posts : 490
    Join date : 2011-01-12

    Central European Crossbow, just starting - Page 2 Empty Re: Central European Crossbow, just starting

    Post by stoneagebowyer Wed Jan 11, 2012 3:01 am

    Central European Crossbow, just starting - Page 2 Nextglueing0062

    Thank you, man. I appreciate that.

    Sights....bring 'em on. I am very open to the idea of a rear sight. Very Happy

    Here is a shot of the rawhide strapping I got from Black Bear Haversack Trading Post, a vendor Mac suggested. Great price and fast delivery.

    And, here is a bit of oddness. Last night I had a dream where I met the two main characters from the film Natural Born Killers. I showed the Woody Harrilson character the crossbow tiller in the same state it is in now, and he approved with an evil smile. I wonder what my shrink would say, provided I had a shrink? Smile

    Dane
    stoneagebowyer
    stoneagebowyer
    Crossbow Junkie

    I live here!


    Crossbow JunkieI live here!


    Posts : 490
    Join date : 2011-01-12

    Central European Crossbow, just starting - Page 2 Empty Re: Central European Crossbow, just starting

    Post by stoneagebowyer Thu Jan 12, 2012 10:26 am

    Central European Crossbow, just starting - Page 2 Finalgluing0052The rest of the bone pieces are now glued on, and waiting to cure.
    mac
    mac
    Master Weaponsmith
    Master Weaponsmith


    Posts : 561
    Join date : 2010-12-23
    Location : Near Philly USA

    Central European Crossbow, just starting - Page 2 Empty Re: Central European Crossbow, just starting

    Post by mac Thu Jan 12, 2012 10:50 am

    That raw hide looks pretty nice. It's a bit thicker than what I have been using, and that's all to the good.

    Mac
    stoneagebowyer
    stoneagebowyer
    Crossbow Junkie

    I live here!


    Crossbow JunkieI live here!


    Posts : 490
    Join date : 2011-01-12

    Central European Crossbow, just starting - Page 2 Empty Re: Central European Crossbow, just starting

    Post by stoneagebowyer Thu Jan 12, 2012 5:42 pm

    Central European Crossbow, just starting - Page 2 Surfaceworking0022Central European Crossbow, just starting - Page 2 Surfaceworking0032Central European Crossbow, just starting - Page 2 Surfaceworking0042Central European Crossbow, just starting - Page 2 Surfaceworking0052Central European Crossbow, just starting - Page 2 Surfaceworking0062Central European Crossbow, just starting - Page 2 Surfaceworking0072Central European Crossbow, just starting - Page 2 Surfaceworking0082


    Thanks about the rawhide, Mac. It was your source suggestions, after all, and a good call.

    Here are some shots of the table surface as I work down the bone with rasps and files. I use a farrier's rasp a lot, and that really helps me hog off the extra bone. Cutting the scales closely to size before hand would save a bunch of work, of course.
    stoneagebowyer
    stoneagebowyer
    Crossbow Junkie

    I live here!


    Crossbow JunkieI live here!


    Posts : 490
    Join date : 2011-01-12

    Central European Crossbow, just starting - Page 2 Empty Re: Central European Crossbow, just starting

    Post by stoneagebowyer Fri Jan 13, 2012 5:37 am

    Central European Crossbow, just starting - Page 2 Definingedges0032Central European Crossbow, just starting - Page 2 Definingedges0062


    I think these next two photos really put into focus how subtle and not so subtle errors can creep into your work. I actually didn't catch this at first, but after laying on the bone at the nose area, I could clearly see that one side of the tiller was not the same as the other. Lopsided, so to speak.

    The first photo shows the pencil lines I drew to redefine the edges as seen from above, and the second one shows the new edges. Other issues are being corrected as I continue the work. I am leaving the area fore of the dovetail for now, and perhaps some sort of stylistic treatment can be done to give it a bit more panauche.

    Dane
    Flippy
    Flippy
    Fresh Blood

    Doesn't mean
    I'm new to crossbows


    Fresh Blood Doesn't meanI'm new to crossbows


    Posts : 12
    Join date : 2012-01-13

    Central European Crossbow, just starting - Page 2 Empty Re: Central European Crossbow, just starting

    Post by Flippy Fri Jan 13, 2012 12:04 pm

    Nice... really nice!!!

    I had a similar-and different project posted in the neighbor topic... That 'two half building' would be great for my 16-17 century crossbow(I used than many times making airsoft woodstocks).
    stoneagebowyer
    stoneagebowyer
    Crossbow Junkie

    I live here!


    Crossbow JunkieI live here!


    Posts : 490
    Join date : 2011-01-12

    Central European Crossbow, just starting - Page 2 Empty Re: Central European Crossbow, just starting

    Post by stoneagebowyer Sat Jan 14, 2012 2:01 am

    Thanks, Flippy.
    stoneagebowyer
    stoneagebowyer
    Crossbow Junkie

    I live here!


    Crossbow JunkieI live here!


    Posts : 490
    Join date : 2011-01-12

    Central European Crossbow, just starting - Page 2 Empty Re: Central European Crossbow, just starting

    Post by stoneagebowyer Sat Jan 14, 2012 3:22 am

    Central European Crossbow, just starting - Page 2 Boneedging0022Central European Crossbow, just starting - Page 2 Boneedging0032Central European Crossbow, just starting - Page 2 Boneedging0042Central European Crossbow, just starting - Page 2 Boneedging0052Central European Crossbow, just starting - Page 2 Boneedging0062

    Central European Crossbow, just starting - Page 2 Boneedging0072


    Okay, guys, here it is so far. Overall, I am pleased with the hours of rasping and filing and sanding. There are still a few areas that need to be addressed, but now comes my plea for help. In the areas where the glue line wasn't perfect, I had some crumbling of the bone, leaving some rough gaps. I am wondering how to address and repair this. I saved a bunch of bone dust, and can always make more if necessary. Would a mixture of dust and glue to fill in these gaps work? As in life, the mistakes and errors challenge us to learn.

    Dane
    Gnome
    Gnome
    Crossbow Junkie

    I live here!


    Crossbow JunkieI live here!


    Posts : 451
    Join date : 2011-10-16
    Age : 60
    Location : North Georgia

    Central European Crossbow, just starting - Page 2 Empty Re: Central European Crossbow, just starting

    Post by Gnome Sat Jan 14, 2012 5:35 am

    I've used wood dust and glue as a filler with mixed results, and I think you may run into the same challenges with the bone- the hard part is getting the correct ratio of dust to adhesive. You have to have as much dust as you can so that when you file and sand the seam you are cutting into that solid matter and not just polishing the binder.Too little glue, however, and of course it's just going to crumble. More often than not I end up cheating and painting the repair to match, or hiding it with a decorative feature!

    Hm, I bet you wanted advice from someone who's successfully done what you're trying to do. I bet Ivo could give you some good ideas, I bet a dental resin pre-shaded to match the color of the bone would look a lot better.

    Very impressed with your work so far!

    Gnome
    avatar
    8fingers
    Workshop Savvy

    Did you see my tool collection?


    Workshop SavvyDid you see my tool collection?


    Posts : 200
    Join date : 2011-04-06
    Location : Chetwynd, BC, Canada

    Central European Crossbow, just starting - Page 2 Empty Re: Central European Crossbow, just starting

    Post by 8fingers Sat Jan 14, 2012 8:49 am

    What about a strip of contrasting wood like binding on a guitar or go for something wider and flashier?
    Flippy
    Flippy
    Fresh Blood

    Doesn't mean
    I'm new to crossbows


    Fresh Blood Doesn't meanI'm new to crossbows


    Posts : 12
    Join date : 2012-01-13

    Central European Crossbow, just starting - Page 2 Empty Re: Central European Crossbow, just starting

    Post by Flippy Sat Jan 14, 2012 8:50 am

    I bought wood putty(water based); when dried it's not hard enough. No problem, because I dried it on steel plate. I milled it, and mixed with polyesther resin, and used that semi-transparent mixture to gule the bone parts. But... Central European Crossbow, just starting - Page 2 2860157027
    Bone is fetty; still after cooked it three times... resin 'don't likes' fet; so I made some recess with dremel...
    After I guled the bone parts in...
    Central European Crossbow, just starting - Page 2 Th_PB060008Central European Crossbow, just starting - Page 2 Th_PA300008
    In case you guled the bone with non-epoxy-polyesther-vinylesther gule I do not advise this method, because it may fall out... Central European Crossbow, just starting - Page 2 3037357242
    Tinker
    Tinker
    Techno Weeny Supreme
    Techno Weeny Supreme


    Posts : 75
    Join date : 2010-07-19
    Location : Idaho, USA

    Central European Crossbow, just starting - Page 2 Empty The best way to hide somethings is to make them glaringly obvious

    Post by Tinker Sat Jan 14, 2012 4:57 pm

    After the fact, this is of little use except for future reference.
    There is a product called Marine Tex that comes in dark grey or white. The dark grey would finish in almost black. This stuff is very strong indeed and is machinable. (To make the point:) I have used it for target rifle bedding and even to bond half-rings into a detent on a rifle bolt to increase clearance diameter. My Dad used to use it in 1955, doing a factory repair of General Motors automatic transmissions that had 'weepy castings' by degreasing and overcoating the area. (oil-tight) Marine-Tex is not liquid but a thin paste that is workable.
    That said;
    If the overlay and stock surface are roughed and free of oils Marine Tex should bond superbly and fill nicely. Black in most applications or white on a very dark piece of wood. Tape a boundary a sixteenth inch or so away from the joint and apply the Marine Tex to both surfaces to prevent air bubbles. Let the Marine Tex 'squish' out and bind it down to set-up. Alcohol or lacquer thinner will clean up what you need to but try to keep it off the wood as much as possible. Do not clean the 'squish out below the surface but leave it proud. Doing so will create a hard-as-nails fill that will support the overlay and file/sand off to a no-joint finish. The black bead will add a pleasing contrast and will not look like you tried to hide anything, but wanted to bring attention to the finished joint. A web search of Dexotex Marine will take you to their site.
    Flippy
    Flippy
    Fresh Blood

    Doesn't mean
    I'm new to crossbows


    Fresh Blood Doesn't meanI'm new to crossbows


    Posts : 12
    Join date : 2012-01-13

    Central European Crossbow, just starting - Page 2 Empty Re: Central European Crossbow, just starting

    Post by Flippy Sun Jan 15, 2012 4:11 am


    That looks like two component epoxy(naturally it's more dens to be better to fill the gaps)... You get the same if you mix talcum with vynilesther/epoxy/polyesther resin... it(marine tex) also 'don't likes' fet, and lindseen oliled wood... and beeswax.
    White is great beside the bone inlay, but both black and even white would look ugly on the other parts(unless wou will stain it 'deep-dark' brown).

    As I see on your photos... you used a 'transparent' gule... What kind is it??? If some resin; use this with mixed fine wood dust, charcoal, talcum(it"s not the same as toilet powder, because it contains antifungal components and became yellow-white when harded; talcum is semi-transparent), or fine milled wood putty, or fine milled cork(fine milled is important; and don't put too much of them into the resin-except talcum, because it may won't dry, and hard!!!).
    Tinker
    Tinker
    Techno Weeny Supreme
    Techno Weeny Supreme


    Posts : 75
    Join date : 2010-07-19
    Location : Idaho, USA

    Central European Crossbow, just starting - Page 2 Empty Re: Central European Crossbow, just starting

    Post by Tinker Sun Jan 15, 2012 11:22 am

    Flippy; I did not make the product suggestion to try to sell it to anyone. Where I come from knowledge is a resource. Using a product as it was intended, without using additives which are unnecessary with Marine Tex, only degrades its strength. Saying "it looks like" indicates that you have never used it.... There are many things 'out there' to amaze us only if we can discover their existence. Paste floor wax, in a very thin layer will 'release' something set into it. But, fresh wood and bone that is 'roughed' slightly should set up harder than the hubs of Hell.
    Marine Tex will make an onyx-like inlay in wood that is easy, permanent and fills the cut out design completely. In a similar manner a groove, say 1/8" can be cut along the top of the wood where the bone will be adhered and in one operation the bone is attached and the 1/8" black line is laid. The support to the bottom of the bone will prevent chipping as the surface is dressed down to the finished wood. "UGLY", you bet if it 'squishes' into an erratic fill line... but that is not what I am talking about.
    Granted, use of epoxy-types of products are not satisfactory for dyed-in-the-wool artists who want to make authentic period pieces. Few actually are or else folks here would not use nothing but fish and animal glues. As for me, if it is strong and durable and looks authentic to most people, that is the way I do it!
    Flippy
    Flippy
    Fresh Blood

    Doesn't mean
    I'm new to crossbows


    Fresh Blood Doesn't meanI'm new to crossbows


    Posts : 12
    Join date : 2012-01-13

    Central European Crossbow, just starting - Page 2 Empty Re: Central European Crossbow, just starting

    Post by Flippy Sun Jan 15, 2012 12:30 pm

    I don't said Marine-Tex is bad... hence it's performance won't show when fillin' gaps(in that realtion more colors would be better than black/white color+extreme strength)...

    The mashines you're usin also didn't available in the middle age... Very Happy
    Ivo
    Ivo
    Admin
    Admin


    Posts : 1041
    Join date : 2009-11-25
    Age : 36
    Location : NJ, USA

    Central European Crossbow, just starting - Page 2 Empty Re: Central European Crossbow, just starting

    Post by Ivo Sun Jan 15, 2012 4:12 pm

    Hey guys, lots of developments on the projects as I see. Smile I don't have internet at home any more, so I had to rush my work to get on the computer in the lab. Central European Crossbow, just starting - Page 2 Runner10

    About those gaps, maaan...sorry to hear about that.

    Lightly did a similar build with a white top and I asked her about this exact issue with the rough glue line showing pale ...which she was really cool about and showed how she handles it. Central European Crossbow, just starting - Page 2 2860157027

    http://www.flickr.com/photos/swifthoundbows/sets/72157623186044585/

    As it seems, nothing special, she just sanded it all down carefully till the glue line was nice again. But again, you have a slightly different issue here, right?

    I bet Ivo could give you some good ideas, I bet a dental resin
    pre-shaded to match the color of the bone would look a lot better.

    I wish I could...in terms of pre-shaded dental resin(well, acrylic actually)...that stuff is kinda expensive and not really necessary. Smile

    There was a guy once who stopped by the forum, who did a pretty cool bow that had what looked like some really intricate inlay in the stock, but in fact it was bone dust/white glue mix. Very Happy What are your thoughts bowyer? Perhaps a little bit more sanding to see what you can get out of the glue line as is and then (if necessary) move up to cutting a tiny groove to mask the problem area a bit?

    Ivo
    stoneagebowyer
    stoneagebowyer
    Crossbow Junkie

    I live here!


    Crossbow JunkieI live here!


    Posts : 490
    Join date : 2011-01-12

    Central European Crossbow, just starting - Page 2 Empty Re: Central European Crossbow, just starting

    Post by stoneagebowyer Sun Jan 15, 2012 5:32 pm

    Guys, thanks for the input and suggestions! There is a lot to think about and explore with you. Right now, I just wanted to acknowlege the comments. I just got home from first shot kuydo training. I had to drive to Cambridge for that (on the campus of MIT), so I put in over 400 miles driving these past two days. What a facinating experience, too.

    I will get back to you all very, very soon, over the next day or so. I had better get some sleep.

    Dane
    stoneagebowyer
    stoneagebowyer
    Crossbow Junkie

    I live here!


    Crossbow JunkieI live here!


    Posts : 490
    Join date : 2011-01-12

    Central European Crossbow, just starting - Page 2 Empty Re: Central European Crossbow, just starting

    Post by stoneagebowyer Tue Jan 17, 2012 1:46 am

    I have been thinking about your suggestions and what do to, and have to rule out Tinker's idea of cutting a groove and filling it with Marine Tex. It sounds like a great product that would best be used by planning deliberetly ahead. To make it would, I would have to cut a groove into either the bone, the wood, or both, and don't think I can do that to the precision it needs. Covering the area with a strip of some sort of material would, I fear, make it look like I am hiding something, which would be entirely true.

    I think I will go with the bone dust and white glue combo, and see where that takes me. Wish me luck.

    Dane

    Sponsored content


    Central European Crossbow, just starting - Page 2 Empty Re: Central European Crossbow, just starting

    Post by Sponsored content


      Current date/time is Fri Apr 26, 2024 4:18 am