The Arbalist Guild

Would you like to react to this message? Create an account in a few clicks or log in to continue.

Crossbows - Everything about Building, Modding, and Using your Crossbow Gear

Latest topics

» [solved]Skane/Lillohus crossbow thread
by stuckinthemud1 Sat Aug 10, 2024 3:16 pm

» Colletiere a Charavines continuing experiment
by stuckinthemud1 Fri Aug 02, 2024 7:13 am

» What you building?
by hullutiedemies Tue Jul 09, 2024 12:39 am

» 12th Century Chinese Crossbow Chronographed
by stuckinthemud1 Fri Nov 24, 2023 3:50 pm

» Crossbow Stock
by kenh Tue Oct 31, 2023 6:19 am

» Cocking - how
by stuckinthemud1 Thu Aug 03, 2023 4:24 am

» Questions around heavy crossbow lath buildin
by stuckinthemud1 Wed Apr 26, 2023 1:10 am

» Arab Crossbow
by stuckinthemud1 Tue Apr 25, 2023 7:57 am

» prod angle, and lever trigger for sale anyone?
by stuckinthemud1 Mon Mar 20, 2023 5:54 am

» flexible string
by jasper1978 Mon Mar 20, 2023 1:25 am

» jens sensfelder
by jasper1978 Wed Mar 08, 2023 11:58 pm

» 400lb Windlass crossbow bolts weight and accuracy shooting high.
by stuckinthemud1 Sun Mar 05, 2023 2:53 pm

» Codex Löffelholz crossbow
by stuckinthemud1 Tue Jan 24, 2023 4:14 pm

» Digitar prodsc
by stuckinthemud1 Sun Jan 15, 2023 2:42 pm

» Troubleshooting
by Andy. Fri Jan 06, 2023 12:29 pm

» Wood Prods
by stuckinthemud1 Fri Dec 30, 2022 12:47 pm

» Colletiere a Charavines crossbow
by stuckinthemud1 Fri Dec 30, 2022 8:54 am

» Simplified Löffelhotz speedloader
by stuckinthemud1 Fri Dec 09, 2022 4:05 pm

» Fiberglass H-bows
by c sitas Sat Nov 12, 2022 8:44 am

» Bad Antler
by drawknife Sat Nov 12, 2022 3:48 am

» Anyone make their own bolts?
by Juniper Mon Oct 17, 2022 8:20 am

» Josef alm in English
by Juniper Sat Oct 15, 2022 4:22 am

» Qin/Han lock drawings
by kenh Fri Sep 23, 2022 8:16 pm

» stirrup dimensions?
by stuckinthemud1 Thu Sep 01, 2022 1:49 pm

» Skane/Lillohus lockbow information needed
by stuckinthemud1 Sun Aug 14, 2022 6:23 am


5 posters

    Reverse limb "Test" crossbow

    Kali
    Kali
    Fresh Blood

    Doesn't mean
    I'm new to crossbows


    Fresh Blood Doesn't meanI'm new to crossbows


    Posts : 31
    Join date : 2010-01-29

    Reverse limb "Test" crossbow Empty Reverse limb "Test" crossbow

    Post by Kali Tue Feb 16, 2010 11:33 pm

    During last weeks I started to build a "test" crossbow (in fact I just plan the design, gathered the materials and prepared some spare parts):
    The design to be tested: Reverse limb configuration + full compound system.
    To speed the process, I've built 2 straight limbs, using 2 layers of clear fiberglass and 2 strips of action bamboo (the laminated limbs are made using 4 laminations totaling 7 cm thickness, 4cm wideness and 45 cm in length). I will say that the limbs are pretty soft (I estimate a max draw weight of just 20kg), but, for testing purpose will be just perfect
    I also designed a trigger system and made calculations regarding limbs alignment : the limbs will have to be oriented 30 grades away from the stock in order to achieve a draw length of 50cm. Aiming a draw length longer than the limbs, I had to place the trigger in the back of the riser - from this perspective, I had to design the riser a little wider, each limb being 10cm away from the stock (to be able to cook the bow by hand and not to get the rope passing over the riser)
    I also built 2 pulleys (round and with the hole in the middle). Here I made a mistake, building the pulleys with 2 x 6mm thick ball bearing inside - this leading to a 15mm overall thickness (I think that it will be too much to cut a 15mm hole in the 40mm limbs tops). This week i will build another pulleys using just 1 ball bearing, leading to just 10mm thickness.
    Unlike Ivo, i choose to build the metal spare parts to a machine shop to get better accuracy (especially for the riser that will have to be perfect aligned and for the pulleys ...). Up to the end of this week I will have to have ready the trigger mechanism components and the new pulleys. Next week I should get the riser and to start assembly the crossbow. I will start to take and display pictures as the works will progress.
    Ivo
    Ivo
    Admin
    Admin


    Posts : 1041
    Join date : 2009-11-25
    Age : 36
    Location : NJ, USA

    Reverse limb "Test" crossbow Empty Re: Reverse limb "Test" crossbow

    Post by Ivo Wed Feb 17, 2010 4:51 am

    Hey we are rooting for you Kali!

    When you said totaling 7cm in thickness did you mean the thickness of "two" limbs added and that the total was 7cm? I got a bit confused there. cyclops

    Also about the hole in the limb for attaching the cams...it isn't really necessary...all you would need is a small bracket that you can cut,drill, and bend into shape very easily. Let me know if you need a better description as I believe I have a few pictures of a crossbow with reversed limbs that has uses the bracket mount instead of just hole in the limb tip.

    Everything else including being able to "order out" Wink and get the parts made professionally is great and should speed you up to the testing phase instead of dropping stuff on your foot like I did. Mad Laughing

    I have a shop near me that makes custom motorcycles and those guys have the most insane equipment and have been inviting me to come in if I want to do something...but I said NO until I finish it on a knee and present it in step by step tutorial form I am not moving a finger in their direction. pirat

    Good Luck and keep us posted on your progress Kali!

    Ivo :frank:


    Last edited by Ivo on Fri Feb 19, 2010 2:49 am; edited 1 time in total
    Kali
    Kali
    Fresh Blood

    Doesn't mean
    I'm new to crossbows


    Fresh Blood Doesn't meanI'm new to crossbows


    Posts : 31
    Join date : 2010-01-29

    Reverse limb "Test" crossbow Empty Re: Reverse limb "Test" crossbow

    Post by Kali Wed Feb 17, 2010 9:50 am

    Hi Ivo,
    Thank you very much for your advices ...
    My mistake about the limbs - they are 7 mm thick : 4 layers / 2x 1.3mm of clear fiberglass + 2x 2.05mm of laminated bamboo.
    Regarding the pulleys - I've seen several simple ways to mount the pulleys on the brackets, but, without considering the easier way to install, i can see 2 disadvantages:
    1. the weight - the pulleys that i have are weighting about 50 grams each (made from aluminium alloy + 2 steel ball bearings inside). Using just one ball bearing i can reduce in half the weight of each pulley; the brackets will also add more weight rather than some steel bushings glued on the limbs tops.
    2. using the brackets i will have to increase the axle to axle distance, reducing the available power stroke
    (i think that this a subject itself to be debated - how much the weight attached to the limbs tops does matter - my personal believe is that it counts a lot)

    In terms of DYI parts - i also own a large array of tools, including a Dremel 400 Digital will all accessories, a vertical drilling/ milling machine, hand drilling/ sanding/ cutting machines, a vertical saw, etc, etc - the problem is that machining metal parts at home (i'm living in an apartment) produce to much noise for my neighbors ears Smile). Anyway, the precision of parts machined on CNC is by far greater than anything i can produce handmaded.
    Ivo
    Ivo
    Admin
    Admin


    Posts : 1041
    Join date : 2009-11-25
    Age : 36
    Location : NJ, USA

    Reverse limb "Test" crossbow Empty Re: Reverse limb "Test" crossbow

    Post by Ivo Fri Feb 19, 2010 2:53 am

    Yeh I can write a book about coming home late and not being able to make noise for weeks at a time. ninja vanish

    Got some inspiration for you...a guy from a Russian crossbow forum is doing a similar one...all wood and nothing serious...just fooling around, but it does look good.

    chopp wrote:
    Reverse limb "Test" crossbow 18041f182566t Reverse limb "Test" crossbow E13d3dd17603t Reverse limb "Test" crossbow 296dc3c349bet

    Oh and the bracket VVV cyclops

    Image: Courtesy of Moonkryket
    Reverse limb "Test" crossbow V_175_10
    Reverse limb "Test" crossbow V175_t10
    Kali
    Kali
    Fresh Blood

    Doesn't mean
    I'm new to crossbows


    Fresh Blood Doesn't meanI'm new to crossbows


    Posts : 31
    Join date : 2010-01-29

    Reverse limb "Test" crossbow Empty Re: Reverse limb "Test" crossbow

    Post by Kali Fri Feb 19, 2010 5:20 am

    It looks very nice your's friend all wood crossbow - it is very good inspiration for a real one Smile
    Now i see what you mean about the small brackets - these are looking like really small and low weight.
    Today I got the steel triggers' parts from the machine shop - hopefully, tomorrow i will have the trigger assembly and I will have some pictures to display
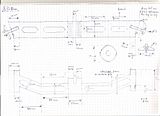
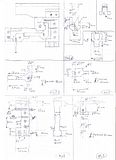
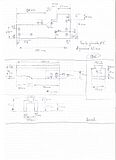
    I also sent to production the riser plans, that will be made from dural :
    Reverse limb "Test" crossbow Th_scan0001
    sorry for the bad drawing ...

    and this is my hand-made Assyrian bow - 46lb (sorry for the off-topic):
    Reverse limb "Test" crossbow Th_asirian001
    the bow was not made by me - is produces by a local bow artisan from Romania, leather covered and painted following some Assyrian "traditional" models Smile


    Last edited by Admin on Sun Feb 21, 2010 5:03 am; edited 1 time in total (Reason for editing : Reposting pictures in a clickable "Thumbnail" format.)
    Ivo
    Ivo
    Admin
    Admin


    Posts : 1041
    Join date : 2009-11-25
    Age : 36
    Location : NJ, USA

    Reverse limb "Test" crossbow Empty Re: Reverse limb "Test" crossbow

    Post by Ivo Sun Feb 21, 2010 3:08 am

    Nice! 46lb is a good hunting weight. I believe I've seen a similar bow somewhere on the net before...Perhaps it was even yours that I saw. Very Happy Do you mind enlightening me a bit on who this bowyer might be? I'd love to see more of his work.

    There is a very nice book on the construction of traditional composite bows by Adam Karpowicz. I recommend it in any bow lovers personal library... link

    Ok...back on topic

    About the plans...I see you have planned lightening of the load a lot by milling the riser practically hollow...did you just eye out the design having a feel for how strong the duraluminum you are using or have you done some calculations? By the way, what mark of dural are you using for the riser and what are the trigger parts and housing is being made from?

    More inspiration Very Happy

    Reverse limb "Test" crossbow 4d677112 Reverse limb "Test" crossbow 16ba7510 Reverse limb "Test" crossbow D89ac910

    This one was made by a Ukrainian guy...don't ask...I was not able to understand what this guy was talking about as he was talking in "shortened" heavy duty street slang...how much do I regret for busting out on that guy for the way he was talking, but I and many others just couldn't understand what in the world this guy was yapping about...thou he did make some wicked "hard" cams on this apocalyptic styled crossbow. >>> More Pics

    PS: click to open
    Spoiler:
    Kali
    Kali
    Fresh Blood

    Doesn't mean
    I'm new to crossbows


    Fresh Blood Doesn't meanI'm new to crossbows


    Posts : 31
    Join date : 2010-01-29

    Reverse limb "Test" crossbow Empty Re: Reverse limb "Test" crossbow

    Post by Kali Mon Feb 22, 2010 11:30 am

    About the riser : there are designed milling holes just from upside-down, the milling on sides is just 3mm deep. There is no precise calculation, but I bet that will easily hold 100lb Smile - the dural is some kind of aircraft aluminum - i don't know the code, but is much harder than ordinary aluminum ... we will see next week how will looks like Smile
    The machined trigger piece is made of carbon steel. The housing is from 2mm thick steel.
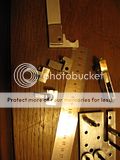
    The trigger assembled/ dismounted/ housing :
    Reverse limb "Test" crossbow Th_IMG_1837;Reverse limb "Test" crossbow Th_IMG_1838;Reverse limb "Test" crossbow Th_IMG_1839;Reverse limb "Test" crossbow Th_IMG_1841
    Still, there is a lot to work on it: first, to find a way to include a safety system, then - to make some mounting rail to be attached on the top of the mechanism, providing support for the scope, and to finish the trigger pull (I will left this after I will finish the stock.
    An idea about how the mounted scope will look like:
    LE: now i'm seeing that i placed the scope reversed Smile)
    Reverse limb "Test" crossbow Th_IMG_1846;Reverse limb "Test" crossbow Th_IMG_1847
    These are the machined trigger parts made from carbon steel:
    Reverse limb "Test" crossbow Th_IMG_1840
    Kali
    Kali
    Fresh Blood

    Doesn't mean
    I'm new to crossbows


    Fresh Blood Doesn't meanI'm new to crossbows


    Posts : 31
    Join date : 2010-01-29

    Reverse limb "Test" crossbow Empty Re: Reverse limb "Test" crossbow

    Post by Kali Mon Feb 22, 2010 11:52 am

    The limbs (7mm thick) and the pulleys that were machined initially (too thick and too heavy) - i already ordered 2 sets of lighter pulleys : 1 in 45mm diameter and another one in 70mm - I will see which fits better
    Reverse limb "Test" crossbow Th_IMG_1843
    the limbs are 2 fiberglass + 2 bamboo strips laminations, glued together with Bizon Epoxy Universal "Slow hardening" (shown in the picture)
    This is my current idea about the fire rail + first part of the stock:
    Reverse limb "Test" crossbow Th_IMG_1844;Reverse limb "Test" crossbow Th_IMG_1845
    As the works progress, i start to realize how difficult actually is to build a reliable/ strong and decent looking crossbow ... in this stage, after some 2 months of gathering pieces, design and try and miss , still, there is a LOT of things to do:
    1. to build the new pulleys
    2. to design/ build a reliable way to attach the pulleys to limbs (here, i'm still debating with myself if to use 2 limbs with holes at tops, or to cut the limbs in 2 and to use 4 narrower limbs)
    3. to build the fire rail
    4. to build the stock (here I think that i will go with a very simple idea - some aluminum tube with a shoulder rest attached
    5. to build the rope (I think that dacron is the most recommended)
    6. some solution to cover the 1000 screws in the trigger mechanism Smile
    7. painting, etc, etc - most probably there are a lot of things that i didn't thought about yet Smile)
    Kali
    Kali
    Fresh Blood

    Doesn't mean
    I'm new to crossbows


    Fresh Blood Doesn't meanI'm new to crossbows


    Posts : 31
    Join date : 2010-01-29

    Reverse limb "Test" crossbow Empty Re: Reverse limb "Test" crossbow

    Post by Kali Mon Feb 22, 2010 12:31 pm

    By the way, what way of clearing the excess epoxy/ smoothing the edges of the limbs do you recommend ?
    I cleared one limb with this (the gross parts with the drilling machine and finishing with the dremel):
    Reverse limb "Test" crossbow Th_IMG_1850;Reverse limb "Test" crossbow Th_IMG_1853
    but is very time consuming and is making a lot of dust around
    Ivo
    Ivo
    Admin
    Admin


    Posts : 1041
    Join date : 2009-11-25
    Age : 36
    Location : NJ, USA

    Reverse limb "Test" crossbow Empty Re: Reverse limb "Test" crossbow

    Post by Ivo Mon Feb 22, 2010 12:35 pm

    Ah thanks for the info on the riser...by the way...did you check out this program? I', sure you will like it a lot...just watch the tutorial videos and you will see that planing your project in CAD is much more fun than on paper. Very Happy >>>Link

    Sorry...I've run out of time at the moment and have to get back to work, so I'll check in a little later...so far I can only say - great job!...and the comment on decent looking crossbow Smile >>> if it's done more or less correctly it will "shoot" and thus look GOOD! Very Happy I'll be back to this as I've much to add. :idea:

    PS: I see people use belt sanders to clean up as well as shape limbs...what kind of fiberglass are you using here...unidirectional prepreg like in laminated bows?
    Kali
    Kali
    Fresh Blood

    Doesn't mean
    I'm new to crossbows


    Fresh Blood Doesn't meanI'm new to crossbows


    Posts : 31
    Join date : 2010-01-29

    Reverse limb "Test" crossbow Empty Re: Reverse limb "Test" crossbow

    Post by Kali Mon Feb 22, 2010 11:35 pm

    Thank you for appreciation and advices,
    I did downloaded the program (Google sketchup) - it looks very interesting. I will try these days too see if i can plan the riser 3d.
    Indeed, the fiberglass is unidirectional. I bought it from 3rivers archery:
    http://www.3riversarchery.com/Bow+Building+Fiberglass++Clear_c49_s133_p0_i4475X_product.html
    they are selling some very good quality stuff.
    I tested the trigger with some 25 kilos hanged up, and it works incredibly smooth - the ball bearing is reducing a lot the weight to be applied on the trigger pull to release. Is not clearly seen in the picture, but all pieces are well locked in place - the permissible movement of the trigger being 5mm - just enough to release the rope.
    Ivo
    Ivo
    Admin
    Admin


    Posts : 1041
    Join date : 2009-11-25
    Age : 36
    Location : NJ, USA

    Reverse limb "Test" crossbow Empty Re: Reverse limb "Test" crossbow

    Post by Ivo Tue Feb 23, 2010 12:59 am

    I'm glad you like it...it will save much of you time...thou I sometimes sit and draw on paper as well. Smile

    If you don't mind I go by your list here...


    1. to build the new pulleys
    2. to design/ build a reliable way to attach the pulleys to limbs (here, i'm still debating with myself if to use 2 limbs with holes at tops, or to cut the limbs in 2 and to use 4 narrower limbs)
    3. to build the fire rail
    4. to build the stock (here I think that i will go with a very simple idea - some aluminum tube with a shoulder rest attached
    5. to build the rope (I think that dacron is the most recommended)
    6. some solution to cover the 1000 screws in the trigger mechanism Smile
    7. painting, etc, etc - most probably there are a lot of things that i didn't thought about yet Smile)

    1.Speaking of bearings...I know a place where you can get some really nice tiny bearings in practically any size and variety...from regular ball bearings to ceramics used in engines...here is a section where I hang out(look at the price and you'll see why Smile )

    http://www.bocabearings.com/main1.aspx?p=searchWebstore&s=3&where=%20storeid%20=3&colnames=Categoryvalues$4%20as%20[ID%20%28d%29],Categoryvalues$5%20as%20[OD%20%28D%29],Categoryvalues$6%20as%20[Width%20%28B1%29]

    2. You are right in this moment. I know from looking at some crossbows that have a split tip are usually reinforced by thickening that area. If limbs are pressed into a laminate - a wooden "wedge" is used...sort of how the man did here(scroll down a bit to the compound bow)>>>Link

    ...if you decide to make split limb made up of two narrower limbs...I can see that you will most likely have to make some big or complex mounting brackets to keep the limbs from twisting. Let me know if I'm not making any sense. Wink

    3. Well the arrow track or rail or whatever the world calls it today(some people don't like to use term "fire" with crossbows Wink ) You have chosen a pretty good design...in this type of crossbow I don't see an extreme need for rail rigidity as it doesn't need to support the draw weight of the crossbow when it's loaded...so what ever you do just make sure it is strong enough to support a foot stirrup without bending. Also a good note might be to fill the hollow space in the rail to quite down the crossbow as shooting it will send vibrations down the crossbow body making it humm like a tuning fork. Very Happy

    4. Sounds good to me. sniper shot

    5. There are better ones out there, but Dacron is recommended simply because it stretches a bit compared to the more expensive string materials that have much less stretch. The stretch is good for a reason...those stronger and less stretchy strings are very hard on the crossbow as each shot is a very hard stop that sends more destructive vibrations down the crossbow limbs and and other components.

    Then there are also a few different ways of making the string...there is the "endless loop" method and the "Flemish twist" method of making a string. Both are widely described by bow builders. Advantages of The Flemish string(even thou it takes longer to make) is that it has additional amortization and can be adjusted for length by twisting much better than the endless strings...thou Endless strings are not bad and the speed and simplicity of making them also makes them an excellent choice. Don't forget to Pre-stretch your strings. Wink

    6. Cast, machine, or layer(riveting one layer to another) a dedicated housing perhaps Smile

    Interesting trigger you've got there...to be honest I don't exactly understand the principal of it's operation other than what you've already mentioned with the bearing retaining the latch...thou it does looks very familiar. cyclops

    7. Well painting is certainly an interesting topic...for example I'm currently getting ready to spray my brothers stock to a carbon fiber cloth effect yeh

    PS: 3rivers sells it a bit more expensive than where I get it...what do you think about this guy...I've bought black glass as well as fast flex bamboo laminations from him before with out any trouble >>>Link
    Ivo
    Ivo
    Admin
    Admin


    Posts : 1041
    Join date : 2009-11-25
    Age : 36
    Location : NJ, USA

    Reverse limb "Test" crossbow Empty Re: Reverse limb "Test" crossbow

    Post by Ivo Fri Feb 26, 2010 12:45 am

    Excellent gallery full of useful detail...If I wasn't building a crossbow already...I'd be building one of these. Very Happy

    http://crossbow-review.com/Slideshows/ArmcrossLeopro/index.html

    Also an interesting thing I've noticed after looking at various crossbows of reversed limb design...the cams are slightly angled up towards the rail....I assume they should flatten out a bit upon full draw. Suspect

    Reverse limb "Test" crossbow Scorpy10 Reverse limb "Test" crossbow Leopro10

    I hear that connector has an interesting use...If I'm not mistaken it makes possible changing of the string in the field. Smile
    Kali
    Kali
    Fresh Blood

    Doesn't mean
    I'm new to crossbows


    Fresh Blood Doesn't meanI'm new to crossbows


    Posts : 31
    Join date : 2010-01-29

    Reverse limb "Test" crossbow Empty Re: Reverse limb "Test" crossbow

    Post by Kali Fri Feb 26, 2010 5:01 am

    To be honest, i started to think about my reverse limb design after I've seen LeoPro first time ... On the other hand, Scorpyd RDT looks a bit more attractive for me - especially considering the low draw weight involved that can be easily achieved using "classical" bamboo + fiberglass limb construction
    I hope that the "test RDT crossbow" will convince you that the next crossbow that you will build will also be reverse limb configuration ...
    Thank you very much for your very useful advices regarding my "to do" list
    This morning i went to the machine shop - just to find that i will get the riser sometime during the next week ... i can't wait to see the final product Smile
    On the other hand, i found a very interesting solution for the trigger - how to make it work using just one steel spring ... Later today I will take some pictures to let you see what i'm talking about ...
    Kali
    Kali
    Fresh Blood

    Doesn't mean
    I'm new to crossbows


    Fresh Blood Doesn't meanI'm new to crossbows


    Posts : 31
    Join date : 2010-01-29

    Reverse limb "Test" crossbow Empty Re: Reverse limb "Test" crossbow

    Post by Kali Fri Feb 26, 2010 10:42 am

    Ok, so this will be my trigger idea:
    uncooked: Reverse limb "Test" crossbow Th_IMG_1855
    cooked: Reverse limb "Test" crossbow Th_IMG_1854
    and a little movie showing how is working (I had to screw both housing's plates to make it work properly ...)
    Reverse limb "Test" crossbow Th_MVI_1862
    any ideas about how to include a safety system there ? so far i'm pretty much out of ideas ... mainly because the lack of space inside of the mechanism ... as you can see, the whole thing is just slightly bigger than a pack of cigarettes
    Mention that the mechanism (including housing and everything) is weighting precisely 365 grams - that i will say is pretty light Smile
    Ivo
    Ivo
    Admin
    Admin


    Posts : 1041
    Join date : 2009-11-25
    Age : 36
    Location : NJ, USA

    Reverse limb "Test" crossbow Empty Re: Reverse limb "Test" crossbow

    Post by Ivo Mon Mar 01, 2010 2:05 pm

    Very nice touch with a video(especially for slow people like me Reverse limb "Test" crossbow Icon_lol )

    The safety is usually recommended to be placed in such a way that it blocks the transitional piece used for retaining the release(in your case the piece with the bearing) and not the actual trigger hook.

    Adding a safety usually isn't a problem, especially in a trigger wit hso much space inside. The interesting moment begins when you try to think where to actually have the safety switch Reverse limb "Test" crossbow Icon_wink > on the side? > on the back of the trigger? > in front of the trigger hook? > incorporated into the pistol grip? >on the forearm of your crossbow? One may be easier than the other, but the other maybe more favorable in comfort of use in various environments. Reverse limb "Test" crossbow Icon_tongue

    As for the housing and millions of bolts sticking out...I'll be back a little later today with a few pictures of a Chinese made crossbow trigger(modern one of coarseReverse limb "Test" crossbow Icon_smile)
    Pavise
    Pavise
    Dear Friend, You will be Greatly Missed.
    Dear Friend, You will be Greatly Missed.


    Posts : 128
    Join date : 2010-02-07

    Reverse limb "Test" crossbow Empty Re: Reverse limb "Test" crossbow

    Post by Pavise Mon Mar 01, 2010 4:23 pm

    With all due respect here guys I think this trigger might not act desirably when highly loaded with string pressure. The mini roller bearing is a good idea to reduce friction but the way I see it, this simple vertical trigger lever may be overcome by reverse action originating at the claw sear which might too easily roll over the bearing. Just my observation for what it's worth.

    Let's be careful out there by testing everything before commitment in front of our fragile bodies!

    I have found RC model shops to be a good source of mini bearings as well as some that are sold by various shops that carry replacement ones for wood router bits.

    Pavise
    Kali
    Kali
    Fresh Blood

    Doesn't mean
    I'm new to crossbows


    Fresh Blood Doesn't meanI'm new to crossbows


    Posts : 31
    Join date : 2010-01-29

    Reverse limb "Test" crossbow Empty Re: Reverse limb "Test" crossbow

    Post by Kali Mon Mar 01, 2010 11:09 pm

    Hi Pavise,
    Thank you very much for your concern and advise.
    I was also thought myself about this during the design phase and I did tested several alignments for the claw and the bearing piece. When the claw is looked in place by the string, there is a slight angle there, moving the bearing uphill to release. All tests were conducted using a 25kg (55lb) pull weight and i can say that there is no way that the string to escape - other than pulling the trigger or braking some parts inside. Initially i used a 5mm thick aluminum housing that looked to be too unsafe to me - this why i switched to steel housing.
    Later today I will take some pictures with the "testing device" loaded with 25 kilos Smile
    Ivo
    Ivo
    Admin
    Admin


    Posts : 1041
    Join date : 2009-11-25
    Age : 36
    Location : NJ, USA

    Reverse limb "Test" crossbow Empty Re: Reverse limb "Test" crossbow

    Post by Ivo Tue Mar 02, 2010 1:40 am

    I think what Pavise is trying to say is that this type of trigger is "very sensitive" to increase in draw weight. So if you intend to use it with higher powered limbs you should definitely test it with an even higher draw weight test setup before proceeding...I believe you are aiming for about 100lb draw weight...right? Meaning 200lb(limbs)/2(rollers)=100lb actual draw weight? Then the testing load should be almost double that 175-195lb...That's how I would test it.

    I hear the tech guys say that it is better to have something break right
    away while testing rather than for it to break with time when you least expect it...so it is also interesting to know how such mechs are tested...how close do they let the tolerances get in the industry. Reverse limb "Test" crossbow Icon_question

    Anyway...test it to exceed expectations and if it isn't performing good enough and there is doubt>>>the string latch is strong stuff and a proven sear based mech made of matching material can still be made just as this one on Robin's site >>> Link ...it is for you to decide Kali...you are the man in charge of this machine and we are only making suggestions. Reverse limb "Test" crossbow Icon_smile

    About those pictures I promised...here we go.

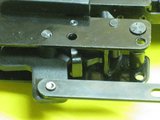
    Reverse limb "Test" crossbow Th_IMG_3140

    If I'm correct all you would have to do is slightly countersink the holes and hammer flat a rivet pin little by little on both sides...then once you have them hammered flat I'm sure they are not going to be flush with the mech walls, so file it down slightly and finish it with a center punch tool(it will further spread the rivet end in the opening)...I simply used cutoff nails and in some places cold rolled steel rod...holding 150lb so far with no problems, but then again I have a very flat/tight trigger mech. so make sure you test yours with care accounting for the design. Good Luck! Reverse limb "Test" crossbow Icon_wink
    Kali
    Kali
    Fresh Blood

    Doesn't mean
    I'm new to crossbows


    Fresh Blood Doesn't meanI'm new to crossbows


    Posts : 31
    Join date : 2010-01-29

    Reverse limb "Test" crossbow Empty Re: Reverse limb "Test" crossbow

    Post by Kali Tue Mar 02, 2010 8:10 am

    OK, tested again with my own weight (75kilos - aprox 150lb) with very bad results - the mechanism opened itself for some reason (still unknown to me) and released the string - I've done this 3 times, and it seems that as long as the string is not moving at all - things are fine, but the slightness oscillation cause the mechanism to open ... It seems that I have to go back to the design table Sad
    Getting a small scarf during the process I fully realized what Pavise was told to me about our "fragile bodies". Thank you again for your warning.
    The fact that the trigger is still working as nothing had happened I think is pointless ...
    Still I don't fully understand what had happened or why the trigger releases just at high loads and not at all at low weights (the spring inside is strong enough to hold 25kg ?)
    Kali
    Kali
    Fresh Blood

    Doesn't mean
    I'm new to crossbows


    Fresh Blood Doesn't meanI'm new to crossbows


    Posts : 31
    Join date : 2010-01-29

    Reverse limb "Test" crossbow Empty Re: Reverse limb "Test" crossbow

    Post by Kali Tue Mar 02, 2010 8:57 am

    Some pictures during the tests (with 30 kilos):
    Reverse limb "Test" crossbow Th_IMG_1864Reverse limb "Test" crossbow Th_IMG_1866Reverse limb "Test" crossbow Th_IMG_1867
    and a short movie releasing the 30kg load:
    Reverse limb "Test" crossbow Th_MVI_1869
    Pavise
    Pavise
    Dear Friend, You will be Greatly Missed.
    Dear Friend, You will be Greatly Missed.


    Posts : 128
    Join date : 2010-02-07

    Reverse limb "Test" crossbow Empty Re: Reverse limb "Test" crossbow

    Post by Pavise Wed Mar 03, 2010 12:14 pm

    When we examine some old crossbow trigger designs we find that they are invariably of the multiplying "jamb" type. This is where the sear and latch engagement are being compressed together by the load from the string. The very early bronze Chinese example is but one we should look at. Even the "rolling nut" is designed to jamb the two parts together and this is what generally makes a crossbow trigger "hard to pull" compared to the "lighter" trigger pull on a firearm. When we add things like roller bearings to overcome this high friction effort, we also perhaps unwittingly, make it easier for reverse loads to be overcome too! It is paramount that any trigger be strong enough and the sear engaged enough to resist all attempts for the string to escape prematurely, or else we're ony inviting trouble. Likewise: nails and mild steel pins are poor choices. Better that we use "drill rod" (otherwise known as silver steel) for these most critical and highly loaded axles in our trigger-sets.

    "Safeties" although desirable and now generally incorporated in manufactured crossbows , must never be a substitute for safe conduct at all times! Keep your crossbow pointed in a safe direction and your finger OFF the trigger until ready to shoot.

    And if we are to have our trigger-box and mechanism inserted into a mortise in our wooden stock, then sufficient wood must be allowed for that in our design. A trigger-box that encompasses a claw, perhaps three quarters of an inch or 20 mm wide, will mean that the box will be quite wide and require a lot of corresponding wood to be removed; thus making our stock weak in this area. Better that we make our internal working parts about one quarter inch thick and then our completed trigger box can be kept as narrow as one half inch. This size can also allow the mortise to be a bit wider and provide for ajustment within for more precise alignment of the claw to track groove. The latter can make a huge difference in the way a crossbow shoots! Manufacturers have better control when it comes to consistency of fit because they are jigged up to avoid such errors. CNC machining and special aluminum profiles make much of this possible and perhaps hard for us hobbyists to replicate.

    Respectfully submitted.

    Pavise
    Kali
    Kali
    Fresh Blood

    Doesn't mean
    I'm new to crossbows


    Fresh Blood Doesn't meanI'm new to crossbows


    Posts : 31
    Join date : 2010-01-29

    Reverse limb "Test" crossbow Empty Re: Reverse limb "Test" crossbow

    Post by Kali Wed Mar 03, 2010 2:43 pm

    I think that everything you said makes perfect sense.
    Indeed, even with 30kilos of load, the ball bearing mechanism is releasing the string extremely effortless (I will appreciate that less than 1lb) - most probably there is a small reverse angle that make the trigger to release at high loads (or maybe that the mechanism itself beds at high loads, as you suggested).
    There is no way that the pins to cause that - all screws are 11/11 very hard steel and the pin that is holding the roller is chrome-vanadium steel alloy (all are harder than silver steel) ... most probably the mild steel housing is bending a bit.
    As well, you are perfectly right about the trigger-box - this one is 25mm thick ...
    Anyway, what do you think about my new design (is a kind of copy of one of Robin Allen 's designs):
    Reverse limb "Test" crossbow Th_Trigger_Plan_1Reverse limb "Test" crossbow Th_Trigger_Plan_2
    Mention that the claw and the holding piece will be rounded (the machine shop cannot cut the tool-steel in round forms, and the round design will be made by sanding)
    The 3 moving pieces will be made from tool-steel, and the housing from high carbon steel (the plates will be 2.5mm thick, and the trigger-box 15mm thick)
    Pavise
    Pavise
    Dear Friend, You will be Greatly Missed.
    Dear Friend, You will be Greatly Missed.


    Posts : 128
    Join date : 2010-02-07

    Reverse limb "Test" crossbow Empty Re: Reverse limb "Test" crossbow

    Post by Pavise Wed Mar 03, 2010 4:06 pm

    Hi Kali,

    Thanks for your kind comment my friend. If you examine your roller sear very carefully and somehow plot its movement when the trigger is pressed, I think you will find that the "breakover point" is very narrow; as in its arc of movement. Then as soon as this point is reached, the claw sear finds little remaining resistance and climbs over the rest of the roller quite easily. And in looking at your trigger lever I can see where it has enough mass, that with the slightest encouragement it will energise the roller sear and thus release with hardly any effort. This could be perhaps cured by using a strong enough trigger-piece return spring to keep it forced forward. But of course this would increase the trigger pull weight too. Can't win, can we?

    Your interpretation of Robin's trigger is excellent but I would advise you to make sure that the claw return spring is strong enough to keep the claw in the fully released position after shot. It is my experience that a claw can bounce back into a halfway position and make the crossbow difficult if not impossible to cock until the claw is moved by some means or another. And bear in mind that the angle of this spring to claw will change significantly from the cocked position too and I have had trouble with this part in the past. A plunger and spring is a better setup but a bit more complicated to execute neatly.

    You can round and polish the inside faces of the claws by using abrasive cord or even rubbing some suitable cord with valve grinding paste and then finishing up with something like jewellers' rouge etc. It is vitally important that the two claws be "matched" in every regard and given a fine polish with no scratch marks whatsoever. This will ensure that your string lives longer and that you get a nice smooth release every time.

    Keep up the good work Kali.

    Cheers,

    Pavise
    Ivo
    Ivo
    Admin
    Admin


    Posts : 1041
    Join date : 2009-11-25
    Age : 36
    Location : NJ, USA

    Reverse limb "Test" crossbow Empty Re: Reverse limb "Test" crossbow

    Post by Ivo Wed Mar 03, 2010 11:18 pm

    A thought I have about axles made from nails/steel rods is they can be case hardened...and given that case hardening can be up to 2mm deep these pins can be hardened practically to the core...am I right?

    The rail construction you showed us Kali, any new thought on it? I have been looking at the new crossbows that have been displayed at the ATA show and a good number of those had plastic or composite arrow tracks...also the Leopro gallery I posted has a great deal of photos displaying the assembly of the arrow track where a milled block insert is placed in the square U profile.

    Plunger/slider.....I have to agree that the plunger/slider block safety is a bit sensitive to precision in it's manufacture, one little problem(well not really a problem)that I encountered while making mine is that once the lock is unloaded and the latch is in rested position - it will not allow you to set it back into "safe" mode...not that it's necessary when the crossbow is unloaded Reverse limb "Test" crossbow Icon_smile , still it is definitely something to investigate Reverse limb "Test" crossbow Icon_study

    I second what Pavise said ... Keep it up Kali! Reverse limb "Test" crossbow Icon_king

    Sponsored content


    Reverse limb "Test" crossbow Empty Re: Reverse limb "Test" crossbow

    Post by Sponsored content


      Current date/time is Fri Nov 22, 2024 4:39 pm